background image

16

If you install non-original or false re-

placement parts, this can lead to se

-

vere loss of function! Tires with poor 

grip or safety, brake pads with a low friction 

coefficient and incorrectly installed or poorly 

made lightweight components can all lead to 

potentially serious accidents. The same ap-

plies for improper assembly!

Your bicycle can only function safely 

and effectively if you replace parts 

with  suitable,  authorised  replace

-

ments.  Please  consult  your  manufacturer, 

importer or specialist retailer for advice on 

suitable replacement parts.

Only replace broken or worn key 

parts with original replacement 

parts from the manufacturer or 

parts approved by your manufacturer. This 

is mandatory in the case of light systems, 

while the manufacturer‘s warranty is usu-

ally nullified if you install non-approved re-

placement parts. 

Only use tubular tires in the pre-

scribed way and with the correct air 

pressure.

Only use tubular tires on rims intend-

ed  for  this  purpose!  These  do  not 

have rim flanges but smoothly curv

-

ing surface, from the outside inwards. This is 

where the tubular tires are fitted.

Attaching tubular tires requires ex-

pert skills and lots of experience! Al

-

ways have your tubular tires changed 

by a specialist. Inform yourself about how to 

handle and change this type of tire!

Removing

 hydraulic rim brakes:

• 

If your system features a brake quick release, 

remove the brake unit according to the instruc-

tions supplied by your manufacturer.

• 

If you do not have a brake quick release, de

-

flate all of the air out of the tire

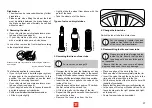
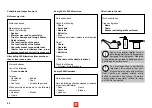
Flat tire repair for conventional tires

You will require the following equipment:

•  Tire lever (plastic)

•  Patch

•  Rubber solution

•  Sandpaper

•  An open-ended wrench for wheels without a quick 

release

•  Pump

•  Replacement inner tube

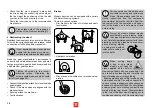
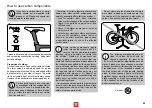
1. Open the brake

Opening 

cantilever

 or

 V-brakes:

•  Grip one hand around the wheel

•  Push the brake arms against the rim

•  Remove the brake line or line casing on one side

Opening 

side-pull caliper brakes

:

•  Open the quick release lever on the brake arm 

or lever, or:

• 

If you do not have a brake quick release, deflate 

all of the air out of the tire. Now the wheel can be 

pulled out from between the brake pads. 

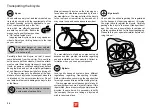
Tubular tires

Some bicycles are 

also  fitted  with  tubu

-

lar tires. For more 

information  on  these, 

please refer to the 

enclosed instructions 

from the manufacturer.

Tubeless tires

If your bicycle is fitted with tubeless tires, please 

read the instructions provided by your manufac-

turer covering the tires and rims.

Only use tubeless tires on rims in-

tended for this purpose! This will be 

marked on the rims, with the abbre

-

viation “UST” for instance.

Tubeless tires can only 

be mounted and re-

moved from the rims 

without tools, otherwise 

this could lead to leaks. 

If the sealant is not suf-

ficient  for  preventing 

damage, a normal tube 

can be used after re-

moving the valve from 

the tubeless system.

Only use tubeless tires in the pre-

scribed  way,  with  the  correct  air 

pressure and the recommended 

sealant if required.

Содержание Exploro

Страница 1: ...OPERATING MANUAL Gravel Road Bike ISO 4210 2014 Translation of the Original instruction manual ...

Страница 2: ...ibe the most important points In addition this operating manual only applies to the bicycle with which it was supplied For more specific technical details please refer to the enclosed notes and instructions from the respective manufacturers of the individual components used on the bicycle If you are unsure about a particular point please contact your specialist retailer Before riding your bicycle ...

Страница 3: ...ver Shifter Headset Shifter cable Brake cable Fork Disc brake caliper Brake disc Thru axle Wheel Front wheel hub Spoke Tire Rim Valve Bicycle parts 6 5 4 4 3 3 2 2 1 1 5 6 If you leave this page unfolded when you read this guide you can immediately recognise which part of the bicycle is being referred to C3 7 8 Fastening front wheel bolted axle thru axle quick release 7 Fastening rear wheel bolted...

Страница 4: ...re secure Note that components made of composite materials i e carbon fibre often require a lower tightening torque see Bolted connections section page 26 Common parts made of carbon fibre include the handlebars stems seat posts and saddle rails frames forks and cranks Ask your specialist retailer to instruct you on how to properly use and maintain these materials Never ride with your hands off th...

Страница 5: ...s warranty 31 Environmental protection tips 31 Inspections 32 Imprint For questions concerning your bicycle please always contact your dealer first only then in case the manufacturer of the bicycle For contact details please refer to the war ranty section back cover or other included information of the brand manufacturer Responsible for sales and marketing inMotion mar com Rosensteinstr 22 D 70191...

Страница 6: ... bodywork around you However you are travel ling more quickly and in other areas of the road than a pedestrian Accordingly you should pay particular attention to other road users When cycling never wear headphones or use a mobile telephone Never cycle if you are not in a condition to be in complete control of your bi cycle This applies particularly if you have taken medicines alcohol or other drug...

Страница 7: ...tire pressures on the sides of the tires Please adhere to the re quired minimum and maximum pressure Where no pressure values have been stated 6 5 bar 94 PSI are deemed to be a suitable pressure for racing bicycles Cyclocrosser tires may be pumped up to 3 4 bar 43 5 58 PSI As a general rule of thumb when you are out on a ride you can check the tire pressure by doing the following If you place your...

Страница 8: ...heel is not buckled Check that both brakes are operating fully Do not set off again without having checked that the chain is sitting securely on both the front chain wheel and rear sprockets It must be engaged fully with the cogs If you set off and the chain jumps off a cog you may fall at the risk of very severe injury If you notice any change in your bicycle DO NOT continue cycling Do not retigh...

Страница 9: ... Pedelecs youth bikes single speed bikes fixed gear bikes should be used on public roads smooth surfaces and paved streets Participating in a competition is only permissible if the manufacturer has de signed the bike to do so Manufacturers and dealers are not liable for damage resulting from use outside of intended use This applies particularly to damage resulting from non adherence to the safety ...

Страница 10: ...d performing stunts If you are not certain about which kind of bike you have ask your specialist retailer or the manufac turer about its use and limitations Inform yourself about current legislation before riding your bike on public roads and pathways Only ride on routes which are permitted for your type of bicycle Please ensure that you read the manufacturer s operating manual for your stem Only ...

Страница 11: ...tended for a short period of time When it is closed the quick release lever should be flat against the frame fork or seat post When it is closed the end of the quick re lease lever should always point backwards This ensures that it cannot be opened through contact during riding The quick release lever for the wheel has to be installed on the opposite side to the brake disk otherwise you could suff...

Страница 12: ...up to suit your body size This is vital for riding safely and securely To do this the seat s height alignment and an gle have to be set up as do the height and align ment of the handlebars with the stem In the case of clipless pedals you are able to adjust how much force is re quired to release the shoe from the pedal Please test this on your first ride with a setting that releases very easily Reg...

Страница 13: ...at post with two screw locking mechanism Patented seat post with one screw locking mechanism Attachment with seat clamp Setting up the angle of the seat When you have set the height of the seat you have to check that the angle of the seat is suit able In general the upper surface of the seat should be horizontal You can adjust this by loos ening the clamping bolts in the seat post see page 26 Susp...

Страница 14: ...s Set up the cable tension in such a way that the brake levers do not touch the handlebar grip even when they are applied to their fullest Threadless stem Adjustable stem Please ensure that you read the man ufacturer s operating manual for your stem Only allow specialists to work on your handlebars and stem do not attempt to do this yourself Height change possible as follows Exchange of fitted spa...

Страница 15: ... Ask your specialist retailer about safety equipment Bear in mind that when towing a trailer your bi cycle is much longer than it normally is Abicycle towing a trailer also behaves differently through bends than one without a trailer Accordingly you must be very careful in traffic First prac tice with an empty trailer on safe ground with no traffic before setting out into the traffic Only install ...

Страница 16: ...frame It is frequently found on the seat tube at the drop outs or on the bottom bracket casing As is the case for all mechanical parts bikes take on wear tear and heavy use Because of heavy use different materials and components can react to wear and tear in different ways If a com ponent is used for longer than it is designed for it may suddenly stop working and possi bly lead to injury or cause ...

Страница 17: ...htened and not the axle nuts If the bottom bracket shell contains an eccentric Chain tension bush please tighten the chain according to the instructions provided by the correspond ing manufacturer Please ensure that axle nuts and quick releases are correctly at tached 1 2 3 10 15 mm see page 26 If your bicycle is equipped with a belt drive please read the attached component manufacturer s operatin...

Страница 18: ...perating manual or on the respective manufacturer s website Modern rims from 24 indicate when they are worn from braking These in dicators take the form of embossed or coloured points or lines on the brake sur faces of the rims When these disappear you are no longer permitted to use the rims There are also similar indicators which only appear after a certain level of wear At the very latest when t...

Страница 19: ...n the side surface of the tire there is information on the maximum permitted tire pressure and generally also on the minimum permitted tire pressure Tires are available in various dimen sions The tire dimensions are stated with normed information Example 1 46 622 states that the tires have a width of 46 mm and the rim has a di ameter of 622 mm Example 2 28 x 1 60 inches states that the tire has a ...

Страница 20: ... the brake unit according to the instruc tions supplied by your manufacturer If you do not have a brake quick release de flate all of the air out of the tire Flat tire repair for conventional tires You will require the following equipment Tire lever plastic Patch Rubber solution Sandpaper An open ended wrench for wheels without a quick release Pump Replacement inner tube 1 Open the brake Opening c...

Страница 21: ...from the valve In the case of Dunlop or Woods valves remove the valve stem Release all of the remaining air from the inner tube Insert the tire lever opposite the valve on the inside of the tire Insert the second tire lever approx 10 cm from the first between the rim and tire Lift the tire wall over the edge of the rim Repeat this lifting action around the wheel until the entire tire is free Remov...

Страница 22: ...s of disk brakes are available for racing and cyclo cross bikes Please always read the en closed instructions from the component manufacturer before the first ride Familiar ise yourself with the operation and behav iour of the brakes on a safe piece of land before riding Check that the tire is properly in place and runs true using the control ring on the side of the tire Adjust the positioning of ...

Страница 23: ...part to help identify the wear level of the brake pads If you can t see them any more it is time to replace the brake blocks Brake pad wear If a brake pad is grazing against the rim The spring setting allows you to set the return force in such a way that both brake pads lift evenly from the rim when you release the brake lever Then check that the brakes are working properly Normal operation wears ...

Страница 24: ...discharge any bubbles If the pressure point remains soft please refrain from riding A specialist retailer has to then discharge the air from the brake system If your bicycle comes equipped with a converter which makes it possible to operate hydraulic brakes with me chanical brake levers read the attached com ponent manufacturer s operating instructions before using it Gears This operating manual d...

Страница 25: ...he left hand brake lever switches the chain onto the small chain wheel at the front over its short travel and onto the large chain wheel with the longer travel Gears are vital to your safety on the bike Please read the operating instructions supplied to you by your manufacturer and familiarise yourself with how to operate the bicycle and switch gears before your first ride Allow your specialist re...

Страница 26: ...he seating position of your time trial or triathlon bike Time trial triathlon handlebar attachment Disk wheel Tri spoke wheel Time trial handlebars Handlebar extension Time trial gear switcher Aerobrake lever Electrical electronic gear shifting system If your bicycle is equipped with a gear system which sends its shifting signals electronically For operation and upkeep read the enclosed in structi...

Страница 27: ...res specialist knowl edge and tools Allow your specialist retailer to do this type of work on your bicycle You can get more information about your bicy cle s parts as well as cleaning and mainte nance in the operating manual provided by your manufacturer or on the manufacturer s website Inspection plan Work which you are able to carry out yourself with no risk to safety is printed in bold To ensur...

Страница 28: ...following Chain Sprockets Gearside Belt drive Rims Brake pads for wear replace them if required Clean Chain Gearside Sprockets Belt drive Grease The chain with suitable lubricant Check the following All screw joints are secure Every 3000 kilometres Work undertaken Have the following checked cleaned or replaced by your specialist retailer Hubs Pedals Headset After rides in the wet Work undertaken C...

Страница 29: ...heir performance deteriorates once a year Silicon free lubricant Wheel bearings pedal bearings bottom bracket Once a year Bearing grease Threads during assembly During assembly Assembly grease Contact surfaces of carbon parts During assembly Carbon assembly paste Sliding surfaces of quick releases Once a year Grease spray lubricant Metal seat post in metal frame During assembly Grease Links in the...

Страница 30: ...onents Bolted connection Torque Screw of seat rails to seat post clamp 20 Nm Brake blocks 6 Nm Dynamo attachment 10 Nm Bolted connection Torque Front derailleur bracket attachment screw 3 Nm Shift lever attachment screw 3 Nm Brake lever attachment screw 3 Nm Handlebars stem clamping 5 Nm Stem fork tube clamping 4 Nm Bolted connection Thread Torque Max Bottle holder M 5 4 Nm Bottom bracket BSA acco...

Страница 31: ...teering Only transport baggage on racks intended for this purpose Only mount child seats on baggage racks if they have the corresponding holders and the manufacturers permit this Please ensure that nothing can get caught in the spokes and turning wheels If you are riding with baggage en sure that you do not exceed the max imum permissible weight of the bicy cle see page C5 Information on the weigh...

Страница 32: ...ing a trailer your bi cycle is much longer than it normally is A bicycle towing a trailer also behaves differently through bends than one without a trailer Accordingly you must be very careful in traffic First practice with an empty trailer on safe ground with no traffic before setting out into the traffic Read the manufacturer s instructions for use as they often contain impor tant information fo...

Страница 33: ... a specialist retailer to check the affected carbon parts Do not clamp a carbon frame directly into a work stand instead you should secure it by the seat post If the seat post is also made of carbon use another tube made of metal Some carbon components require lower torques than metal parts Ex cessive torques can lead to hidden damage which is possibly not visible from the outside Frames or compon...

Страница 34: ... manufacturer You may not attach the bicycle to the roof rack or rear carrier by its crank set It may come loose and cause a severe accident The manufacturers of add on components and accessories also provide information regarding use and installation on their websites Collect in formation when you use new components By train Local public transport systems have different regulations regarding tran...

Страница 35: ...ntend ed purpose Components in the motor and decel eration system as well as tires light system and contact points of the rider with the bicycle are all subject to use related wear If the manufacturer of your bicycle or pedelec e bike provides additional guarantees seek ad vice from your specialist retailer Please consult the respective warranty terms for more informa tion on the conditions of the...

Страница 36: ...__________ Materials used ___________________________________ ___________________________________ ___________________________________ Date signature Retailer stamp 2nd inspection After approx 1000 kilometres Work done ___________________________________ ___________________________________ Materials used ___________________________________ ___________________________________ _______________________...

Страница 37: ...Left brake lever operates front brake c Right brake lever operates front brake Supplied by retailer stamp __________ ____________________________________________ Date Signature assembling party retailer The following operating manuals were supplied and explained c Bicycle Plus c Gear system c Brake system _______________________________________________________ _____________________________________...

Страница 38: ..._______ Frame height size _______________________ Colour _______________________ Frame number _______________________ Fork _______________________ Serial number _______________________ Gear system _______________________ Special features _______________________ _______________________ In the case of change of ownership Owner _______________________ Address _______________________ _______ _________...

Страница 39: ...radition our bike frames and bikes are fast Use yours to race if you want Or just ride out anywhere because you can We built it to do whatever you dare comfortably securely and quickly Be sure to register your frame or bike vto get the 3T extended warranty and qualify for the crash replacement program Thank you for the trust you put in 3T products and we wish you joy of your new bike Gerard René 3...

Страница 40: ...3T BIKE ...

Отзывы: