background image


2.2


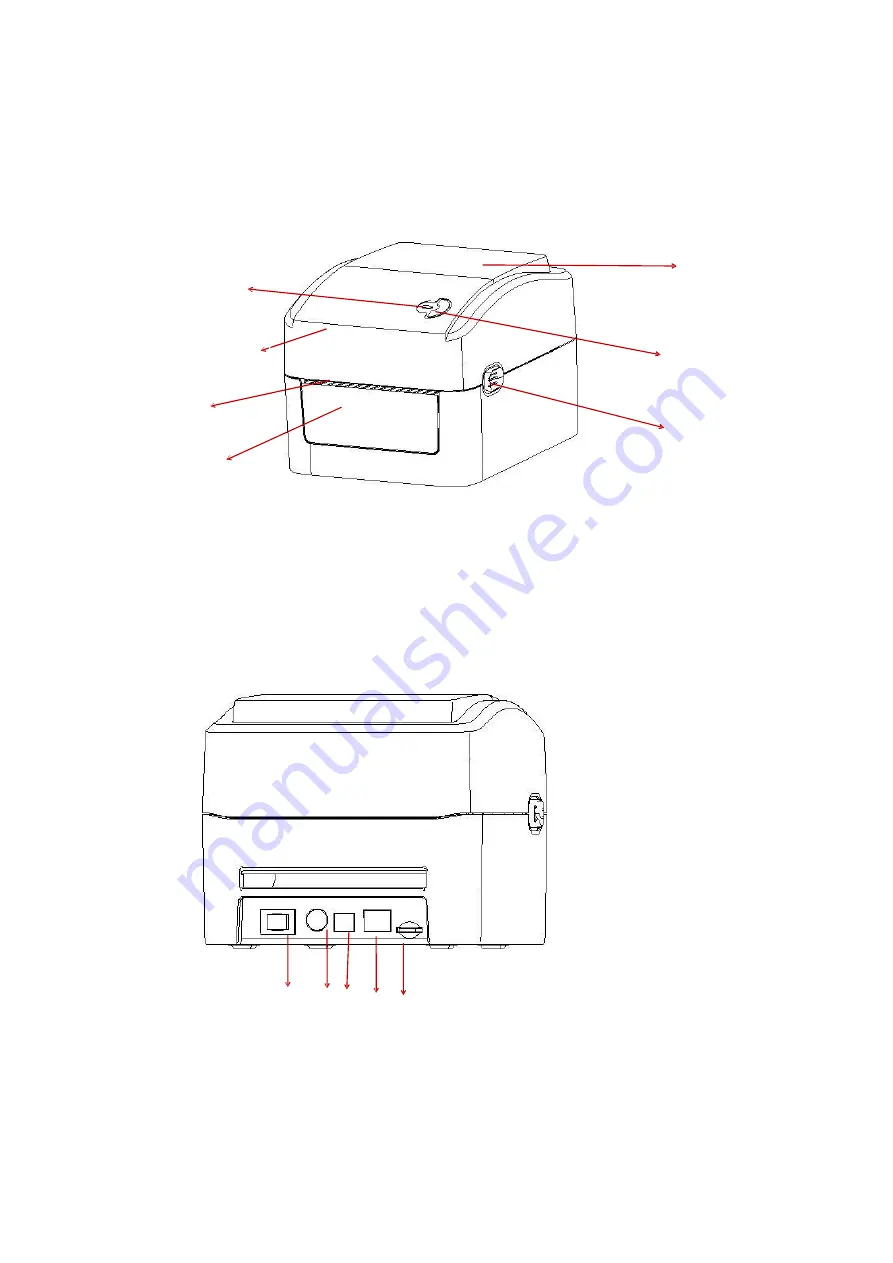
Printer components 


2.2.1


Front view 


Feed button


Transparent window


Printer cover


Power indicator


Paper exit 

Front panel


Cover hook


2.2.2


Rear view 


1.


Power switch 

2.


Power socket 

3.


USB interface 

4.


Ethernet interface 

5.


SD card slot 


2  3  4 


Note:  The  transmission  interfaces  of  the  printer  in  the  picture  will  vary  depending  on  the 

model  of  machine  you  purchase.  For  the  actual  transmission  interface,  please  refer  to  the 
catalog specifications. 

Содержание LDT114

Страница 1: ...Direct Thermal Printer LABEL PRINTER USER MANUAL...

Страница 2: ...ipping mode optional 9 3 5 Install the cutter optional 10 IV LED indicator and button functions 10 4 1 LED indicator 10 4 2 General button functions 11 4 3 Boot function 11 V Diagnostic Tool 17 5 1 En...

Страница 3: ...to change without notice and does not represent a commitment on thepart No part of this manual may be reproduced or transmitted in any form by any means for any purpose other than the purchaser s pers...

Страница 4: ...of your body away from the paper exit to avoid crushing injury 2 If the button battery RTC contained in the main board is not replaced correctly the main board cannot be used normally 3 Please dispose...

Страница 5: ...nters The LDT114 series printer provides thermal printing The printing speed is adjustable from 2 0 3 0 4 0 5 0 to 6 0 inches per second It applies to a variety of printing materials including paper r...

Страница 6: ...he printer 2 1 Unpacking and checking accessories Once you have received your barcode printer place it on a clean steady table and carefully remove the packaging materials Check if the following items...

Страница 7: ...el Cover hook 2 2 2 Rear view 1 Power switch 2 Power socket 3 USB interface 4 Ethernet interface 5 SD card slot 1 2 3 4 5 Note The transmission interfaces of the printer in the picture will vary depen...

Страница 8: ...rt cable or USB cable into the slot on the back of the printer and connect the other end of the cable to the appropriate slot of your computer 3 Plug the power cord into the power slot on the back of...

Страница 9: ...ok forward with both hands to open the printercover 3 Place the label roll on the label roll holder Print sideup 4 Pass the label through the paper guide and pull the label over the rubberroller Print...

Страница 10: ...onal 1 Push the cover hook forward with both hands to open the upper cover of theprinter 2 Dismantle the front panel insert the peel off cable into the corresponding socket hole 3 Install the peel off...

Страница 11: ...ont panel 2 Pass the label through the paper guide and pull the label over the rubberroller 3 Pass the label through the backing paper exit under the roller as shown by the blue dotted line below 4 Ad...

Страница 12: ...push the cutter module downward to lock the lower innercover 5 Reinstall the upper cover on the printer IV LED indicator and button functions This printer has one button and one indicator that can dis...

Страница 13: ...ter 2 Turn on the printer while holding down the button 3 Release the button with the light signal indicating the required function as listed in the table below Boot function Indicator color cycle mod...

Страница 14: ...as the reference value The default value of this printer sensor is set to gap calibration Please follow the steps below to calibrate the label paper by the sensor 1 Make sure that the label paper is...

Страница 15: ...rsion Machine serial number Print head mileage Check code Serial port setting Character set Country code Printing speed Printing density Paper size width height Black mark or gap size vertical gap off...

Страница 16: ...he left are the data received by the system The data on the right are printed from the strings on the left in hexadecimal values This function is provided for users or engineers to debug programs You...

Страница 17: ...ator color will cycle as follows Indicator color cycle mode Purple Blue Red blink 5 times Purple blink 5 times Blue blink 5 times Blue fixed 3 Release the feed button when the power indicator is blink...

Страница 18: ...BAS after power on you can use this boot function to ignore this auto execute file Please follow the steps below to skip AUTO BAS 1 Turn off the power 2 Hold down the feed button and turn on the power...

Страница 19: ...s creation and download of dot matrix fonts transmission of commands or files and so on By using it you can complete the printer setup check the printer status and troubleshoot the printer usage probl...

Страница 20: ...e Diagnostic Tool 5 3 1 Automatic correction 1 Make sure that the paper is installed correctly and the print head is closed 2 Turn on the printer 3 Start the Diagnostic Tool and set the transmission i...

Страница 21: ...ansmission no changes need to be made to the settings 5 In the printer functions page click the Network Setting button in the printer functions to set IP subnet mask and gateway 5 4 2 Setting via Ethe...

Страница 22: ...nter name or Set IP button the printer will reset its value 8 Press the Exit button to leave this TCP IP Setup screen and return to the main screen of the Diagnostic Tool program Factory default value...

Страница 23: ...that the AC socket and the power supply plug are properly connected to the printer Turn on the power switch The Diagnostic Tool displays Head open The cover of printer is not closed Close the cover o...

Страница 24: ...the IP address setting is correct when it uses a fixed IP address Wait a few seconds for the printer to contact the server and then check the IP address again Replace it with a new transmission line C...

Страница 25: ...the left of the printed label adjust and increase the value of the pressure adjusting knob on the left side If the value is already 5 but it is still too light adjust the value of the pressure adjusti...

Страница 26: ...ot correct after restarting the printer The battery is dead Check the battery on the main board Wrinkle problem The print head pressure is uneven The label paper is installed incorrectly The printing...

Страница 27: ...r roller carefully wipe it with a cotton cloth or cotton swab dipped in medical alcohol When installing a new roll of label paper Paper tearing off piece Paper stripping piece Wipe it with a cotton cl...

Страница 28: ...Class A product that may cause radio interference in a living environment In such case user may need to take practical measures accordingly Update history Date Content Editor August 12 2019 First iss...

Отзывы: