background image

instructables

ZS-X1, 3D Printed Endgame Gear XM1 Mini Guide

by ZoroSeerus

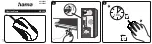
This mod uses the Logitech G305 PCB. Here are some
renders, measurements, and example of a print. 

Supplies:

Patience 

Basic troubleshooting steps 

-G305 

-3D Printer or Printed pieces 

-Etsy Shop for  les and prints:
https://www.etsy.com/shop/ZoroSeerus 

-Etsy shop  le direct link:
https://www.etsy.com/listing/1022879637/zs-x1-3d-p... 

-Screwdriver 

-Tape

-AAA Battery 

Cables I use:
https://www.amazon.com/gp/product/B07RHVNFQ6 

Battery I use:
https://www.amazon.com/gp/product/B07QW531W2 

-There are likely multiple combinations of chargers and
batteries that work. These are the ones I use. The battery
matters less than the connector since they'll only vary in
weight and battery life. If you get a di erent battery
make sure it's 1.5v. 

Video demonstration of rechargeability: 

//www.youtube.com/embed/vPNx4j_xXlk

ZS-X1, 3D Printed Endgame Gear XM1 Mini Guide: Page 1

Summary of Contents for ZS-X1

Page 1: ...sy com listing 1022879637 zs x1 3d p Screwdriver Tape AAA Battery Cables I use https www amazon com gp product B07RHVNFQ6 Battery I use https www amazon com gp product B07QW531W2 There are likely mult...

Page 2: ...ZS X1 3D Printed Endgame Gear XM1 Mini Guide Page 2...

Page 3: ...ZS X1 3D Printed Endgame Gear XM1 Mini Guide Page 3...

Page 4: ...Printing Instructions and Considerations Here are the printing orientations I use I ve printed this on an Artillery Genius in PLA My slicer is Superslic3r ZS X1 3D Printed Endgame Gear XM1 Mini Guide...

Page 5: ...ce on Face and the at spot at the back I manually paint supports mainly but I m sure you can use the auto generated ones Your settings may vary but I have provided the settings I ve sliced this at on...

Page 6: ...that hold in the mouse button to hold the side buttons in place Use the screws that hold the PCB in place in the G305 to do the same here Use the side button screw with the little plastic to hold the...

Page 7: ...e the side button PCB I screw them all the way down and then back o like 1 4 turn Use the very small screws that hold the G305 switches into place For the side button PCB you ll want to push it gently...

Page 8: ...ttom of the mouse Push it in at an angle like picture 1 Push it toward the front of the mouse and then upward One it s in you can slide it back into place I do the red wire rst Slide the battery forwa...

Page 9: ...the mouse and upward This can be a tight t so don t go hulk mode on it and put the majority of the force on the area marked with an X I ve found it helpful to hold the front together while screwing t...

Page 10: ...al ring then you can push down and snap it into place The back isn t ush by design I am aware that it looks sort of weird but it was too di cult to pry open before I changed it like this The at spot a...

Reviews: