


X 7 N Q U I C K S T A R T
This Quick Start describes how to connect the X7N to one or more computers or other devices. First the X7N is configured using a
computer; and then the X7N is connected to one or more computers or other devices. More detailed information, including information
using the X7N for online gaming, is in the User Manual on the CD.
Package Contents
Zoom X7N ADSL modem
Ethernet cable
Power cube
One long phone cord
A splitter to enable you to use a single ADSL wall jack for both an Internet connection and for telephone service (certain countries
only). Some splitters ship with a small phone cord attached to the splitter, others ship with a separate small phone cord.
CD (contains the installation software, documentation, warranty, and Customer Support information)
If ADSL service was working at your location and you are replacing an ADSL modem, read this.
It’s important to know whether your ADSL service requires the modem to have a User Name and Password to access and browse the
Internet. This User Name and Password may be different from the User Name and Password used to access a service provider’s email
or to log in to the modem’s Configuration Manager.
If your ADSL service DOES require a User Name and Password, be sure to write down the ones you’ve been using. They will
be useful when you install your Zoom modem.
If your ADSL service DOES NOT require a User Name and Password, please be aware that some of these services require
you to disconnect your “old” modem for at least 2 hours before installing a new modem including your Zoom modem.
To Install the X7N on a Windows Computer, use the Install Assistant.
1
Turn on the Windows computer that you will use for setup. This can be any Windows 7, Vista™, XP, 2000, Me or 98 computer with
an available Ethernet port.
2
Insert the supplied CD into the CD drive of your computer. The CD should start automatically.
3
Follow the on-screen prompts for the
Install Assistant.
Note to Windows 7 users:
You may see a message box that says your software may not have installed
correctly. You can safely ignore this message box.
Now check that your installation worked by opening a Web browser and connecting to your favorite web site. If you cannot connect to
the Web, please refer to the
Troubleshooting
Tips
in this Quick Start or the User Manual on your CD.
For
Advanced Setup
options such as setting up your X7N for online gaming, please refer to the User Manual on the CD.
If you would like to connect additional computers or other devices to your X7N by using a wired Ethernet connection, please go to
Connecting additional computers or other devices to the X7N.
Installing your X7N on a Macintosh or other computer (does not use Install Assistant)
1
Shut down the computer that you want to connect to the X7N.
2
Connect the power adapter to the receptor on the back panel of your X7N and plug the other end of the power adapter into a wall
outlet or power strip.
3
Press the Power button on the back panel of your X7N to power ON the modem.
4
Connect an Ethernet cable between any one of the X7N’s ETHERNET ports and any of the computer’s or other device’s Ethernet
ports. Then turn on the computer or game station. One Ethernet LED on your modem’s top panel should turn on.
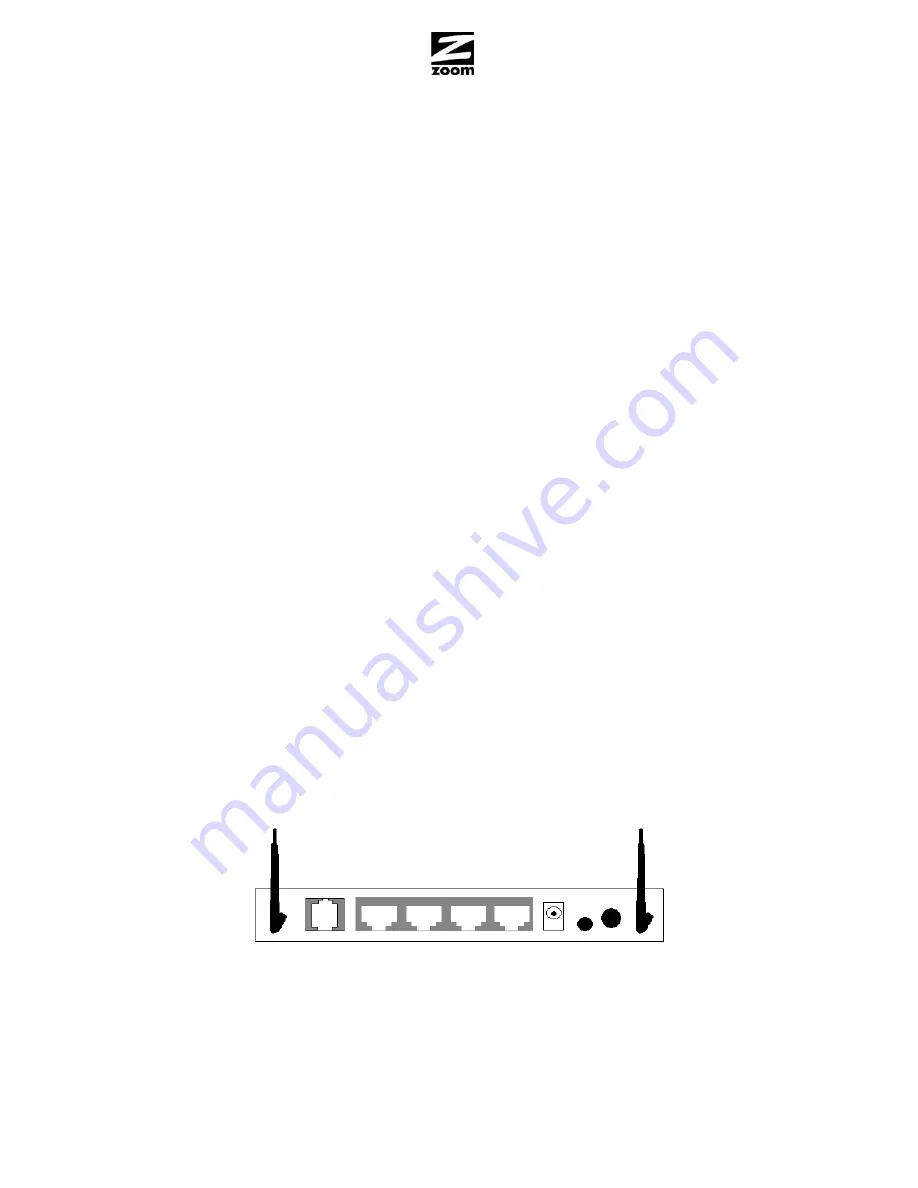
X7N Back Panel Diagram
ANTENNA DSL ETH 4 ETH 3 ETH 2 ETH 1 POWER RESET/WPS ON/OFF ANTENNA
5
Connect the supplied phone cord between your modem’s
DSL
jack and a phone jack with ADSL service
Note:
Many X7N models include a filter/splitter. This can be used if you want to use a phone near the modem. A filter/splitter or
ADSL filter should also be used with phones not located near the modem, to prevent interference between the modem and phone
when the phone is off-hook.
To use a filter/splitter with a modem and a phone, connect the filter/splitter’s LINE or PHONE LINE jack to a phone jack in the
wall, plug the supplied phone cord between your modem’s DSL jack and the filter/splitter’s MODEM jack, and plug the phone into
the filter/splitter’s PHONE jack. (Some but not all filter/splitters require you to use a short phone cord to connect the filter/splitter
to a phone jack in the wall.)


