


StudSensor
™
SL and StudSensor
™
Pro SL
Stud and Joist Finders
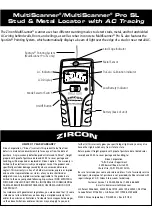
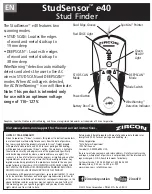
The Zircon StudSensor
™
SL and Pro SL find wood
and metal studs up to
3
⁄
4
in. (19mm) deep in
walls. The StudSensor Pro SL also finds studs up
to 1
1
⁄
2
in. (38 mm) deep in floors and ceilings.
They feature a sleek, high-impact case, a
built-in clip, and the SpotLite
™
Pointing System.
LIMITED 2 YEAR WARRANTY
Zircon Corporation, (“Zircon”) warrants this product to be free from defects
in materials and workmanship for 2 years from the date of purchase. Any
in-warranty defective product returned to Zircon*, freight prepaid with proof
of purchase date and $5.00 to cover postage and handling, will be repaired or
replaced at Zircon’s option. This warranty is limited to the electronic circuitry and
original case of the product and specifically excludes damage caused by abuse,
unreasonable use or neglect. This warranty is in lieu of all other warranties,
express or implied, and no other representations or claims of any nature shall
bind or obligate Zircon. Any implied warranties applicable to this product are
limited to the one year period following its purchase. IN NO EVENT WILL
ZIRCON BE LIABLE FOR ANY SPECIAL, INCIDENTAL OR CONSEQUENTIAL
DAMAGES RESULTING FROM POSSESSION, USE OR MALFUNCTION OF
THIS PRODUCT.
In accordance with government regulations, you are advised that:(i) some
states do not allow limitations on how long an implied warranty lasts and/or
the exclusion or limitation of incidental or consequential damages, so the
above limitations and/or exclusions may not apply to you, and further. (ii)
this warranty gives you specific legal rights and you may also have other
rights which vary from state to state. Return product freight prepaid with
proof of purchase date (dated sales receipt) and $5.00 to cover postage
and handling, to:
UPS SCS C/O ZIRCON RETURNS
Lohstrabe 30a
85445 Schwaig
Munich, Germany
Be sure to include your name and return address. Out of warranty service and
repair, where proof of purchase is not provided, shall be returned with repairs
charged C.O.D. Allow 4 to 6 weeks for delivery.
Customer Service: 1-800-245-9265 or 1-408-963-4550
Monday–Friday, 8:00 a.m. to 5:00 p.m. PST
E-mail: [email protected]
U.S. Patents 4099118, 4464622, 5352974, 5619128, 6023159, 6249241,
6291970, D455430, and D455750
Canada Patents 1106932, 2141553, 2341385, and 2353156
E.U. Patents EP0657032, EP1429148, and Patent Pending
U.K. Patents GB2159630 and GB2117909
Japan Patent 3581851
©2007 Zircon Corporation • P/N 62129 Rev A 05/07
1. MODE SELECTION
• Selecting Mode: For normal scan, press power button once. For
DeepScan
™
, click button twice (DeepScan
™
LED will light, Pro SL only).
• When looking for studs, always start with the scanner in Stud Scan
mode, which scans through surfaces up to
3
⁄
4
inch thick.
• DeepScan
™
mode should only be selected if you know the surface is
built-up and thicker than normal construction. You should always scan
the area in Stud Scan mode first, to verify that DeepScan
™
is needed.
DeepScan
™
is for depths between
3
⁄
4
inch and 1
1
⁄
2
inches (Pro SL only).
3. SCANNING IN STUD SCAN OR
DEEPSCAN
™
MODE (PRO SL ONLY)
•
Tool Position.
For proper use, always place scanner flat against
the surface before turning on power.
•
Power.
Depress and hold in the power button continuously
while in use.
•
Calibration.
Place unit flat on wall. Press and hold the power button.
Do not move the unit until calibration is complete (1-2 seconds).
When calibration is complete, the TruCal
™
LED will stay on.
•
Operation.
Move the unit slowly, while keeping it flat against the
wall. Do not rock, tilt, or lift it.
• If you calibrate over a stud in DeepScan
™
mode, you probably will not
detect any studs. Move the unit a few inches right or left, release the
power button, and start over (Pro SL only).
2. IMPORTANT OPERATING TIPS—
PLEASE READ CAREFULLY
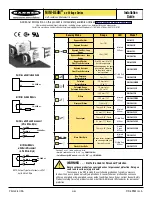
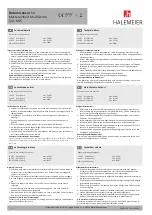
After calibrating (see number 2), continue to hold the power button and
slowly slide the unit across the surface. As you begin to approach a stud,
the red LEDs will light successively, from bottom to top (see illustrations
at top of next column).
Continue moving the scanner slowly. When the top green LED is lit, the
beep sounds, and the SpotLite
™
Pointing System beam shines, you have
located the edge of the stud. Mark this spot.
Continue scanning beyond the marked spot until the LEDs go out. Slide
unit in reverse direction to locate other edge of stud. Mark this second
spot. Middle of the stud is centered between the two marks.
Depending on the proximity of electrical wiring or pipes to the wall
surface, the StudSensor
™
may detect them in the same manner as studs,
especially in DeepScan
™
mode. Caution should always be used when
nailing, sawing, or drilling into walls, floors, and ceilings that may
contain these items. Because of its increased sensitivity, DeepScan
™
mode
may also detect other things in walls that are not studs (Pro SL only).
To avoid surprises, remember that studs or joists are normally spaced
16 in. (406mm) or 24 in. (610mm) apart and are 1
1
⁄
2
in. (38mm) in width.
Anything closer together or a different width may not be a stud, joist, or
firebreak. Always turn off the power when working near electrical wires.
Working With Different Materials
•
Wallpaper:
The StudSensor
™
functions normally on walls covered
with wallpaper or fabric, unless the materials are metallic foil, contain
metallic fibers, or are still wet after application.
•
Textured walls or acoustic ceilings:
When scanning a ceiling or
wall with an uneven surface, place thin cardboard on ceiling or wall
and scan over the cardboard using DeepScan
™
mode. Calibrate with
cardboard in place (Pro SL only).
•
Wood flooring, subflooring, or gypsum drywall over plywood
sheathing:
use DeepScan
™
mode (Pro SL only).
• The StudSensor
™
cannot scan for wood studs and joists through
ceramic tile or carpeting and pad. It is not recommended for use
on lath and plaster walls due to irregularities in plaster thickness.
Note: Sensing depth and accuracy can vary due to moisture,
content of materials, wall texture, and paint.
4. OPERATING CAUTIONS
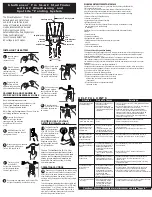
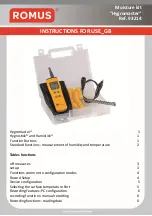
5. CHANGING THE BATTERY
Note: Do not loosen or remove screw on back of the unit.
Squeeze sides of unit to help release clip end.
Slide 9-V battery into compartment, terminal
side first, matching (+) and (-) terminals from
battery to case.
Replace the clip. Battery life is approximately
2 years under normal conditions.
Probable Causes
Solutions
Situation
• Move several inches to the left
or right and start again.
• Turn scanner off, move over
a few inches, press power
button, and start again.
• On rough surfaces, place thin
cardboard on wall, scanning
through it to help slide
scanner more smoothly.
• Check for other studs equally
spaced to either side (12, 16,
or 24 in. apart [305, 406, or
610mm]) or the same stud at
several places directly above
or below the first.
• Use CAUTION when nailing,
sawing, or drilling into walls,
floors, and ceilings where
these items may exist.
No indications.
Lights start
blinking and unit
beeps repeatedly.
Detects other
objects besides
studs in Stud Scan
and DeepScan
™
modes.
Finds more
targets than
there should be.
• No studs in that area.
• You are in DeepScan
™
mode and accidentally
calibrated over a stud.
• Tool was calibrated
over a stud or on dense
part of wall.
• Tool tilted or lifted
during scan.
• Electrical wiring and
metal/plastic pipes may
be near or touching back
surface of wall.
Note: DeepScan
™
may report other things besides studs.
Please see numbers 4 and 6.
Scanning in Stud Scan or DeepScan
™
6. HELPFUL HINTS
(See also number 2, Important Operating Tips)
SpotLite
™
Pointing System
Stud Edge Groove
Stud Scan Mode LED
Stud DeepScan
™
Mode LED
(Pro SL only)
TruCal
™
LED
Power Button
Visit www.zircon.com/support for the
most current instructions.
StudSensor
™
SL et StudSensor
™
Pro SL
Détecteur de Montants et de Poutres
Le StudSensor
™
SL et StudSensor Pro SL
de Zircon trouve les montants de bois et de
métal jusqu´à 19 mm (
3
⁄
4
po) de profondeur
dans les murs. Le StudSensor
™
Pro SL
trouve aussi les montants de profondeur
jusqu´à 38 mm (1
1
⁄
2
po) dans les planchers
et les plafonds. Ils comprennent tous deux
un boîtier élégant, très résistant, une pince
intégrée, et la Système de Pointage SpotLite
™
.
GARANTIE LIMITÉE 2 ANS
La société Zircon (« Zircon ») garantit ce produit libre de tous défauts
de matériaux et de fabrication pendant deux ans à partir de la date
d’achat. Tout produit défectueux selon la garantie retourné à Zircon,
frais de transport prépayés avec une preuve d’achat datée et 5,00 $
pour couvrir les frais de poste et de manutention sera réparé ou
remplacé, à la discrétion de Zircon. Cette garantie est limitée au circuit
électronique et au boîtier original du produit et exclut spécifiquement
les dommages causés par toute mauvaise utilisation, utilisation
déraisonnable ou négligence. Cette garantie remplace toutes autres
garanties expresses ou indirectes et aucune autre représentation ou
réclamation de quelque sorte que ce soit n’obligera ou ne liera Zircon.
Toutes autres garanties indirectes applicables à ce produit sont limitées
à une période d’un an suivant l’achat. DANS AUCUN CAS ZIRCON NE
SERA TENUE RESPONSABLE DE TOUS DOMMAGES INDIRECTS OU
CONSÉCUTIFS SUITE À LA POSSESSION, L’UTILISATION OU LE MAUVAIS
FONCTIONNEMENT DE CE PRODUIT.
Conformément aux règlements gouvernementaux, vous êtes avisé que :
(i) certains états n’acceptent pas de limites quant à la durée de la
garantie implicite, donc il se peut que les limites et / ou les exclusions
précédentes ne s’appliquent pas dans votre cas et de plus, (ii) cette
garantie vous donne certains droits juridiques précis et vous pouvez
aussi en avoir d’autres qui varient d’un état à l’autre. Retournez le
produit frais de transport prépayés avec une preuve d’achat datée et
5,00 $ pour couvrir les frais de poste et de manutention à :
UPS SCS C/O ZIRCON RETURNS
Lohstrabe 30a
85445 Schwaig
Munich, Germany
Assurez-vous d’inclure vos nom et adresse de retour. Les réparations
et entretien hors garantie, lorsque la preuve d’achat n’est pas fournie,
seront retournés avec les frais de réparation par envoi contre
remboursement. Allouez 4 à 6 semaines pour la livraison.
Service à la clientèle : 1-800-245-9265 ou 1-408-963-4550
Du lundi au vendredi, 8 h à 17 h HNP
courrier électronique : [email protected]
Brevets américains 4099118, 4464622, 5352974, 5619128, 6023159,
6249241, 6291970, D455430, et D455750
Brevets canadiens 1106932, 2141553, 2341385, et 2353156
Brevets européen EP0657032, EP1429148, et Brevet en instance
Brevets anglais GB2159630 et GB2117909
Brevet japonaise 3581851
©2007 Zircon Corporation • P/N 62129 Rev A 05/07
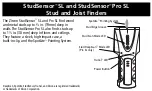
5. CHANGER DE LA PILE
Remarque : Ne desserrez pas ou n´enlevez pas la
vis dessusen arrière de l´unité
Pressez les côtés de l’appareil pour aider à dégager
l’extrémité de la pince.
Glissez la pile de 9 volts dans le compartiment, côté
des bornes d’abord en faisant correspondre les bornes
(+) et (-) de la pile au boîtier.
Replacez la pince. La pile durée environ 2 ans
dan de conditions d´utilisation normales.
6. CONSEILS UTILES
(Voir aussi numéro 2, Importants Conseils
de Fonctionnement
)
Selon la distance du fil électrique ou des tuyaux à la surface du mur, l’appareil de
balayage StudSensor
™
peut les détecter de la même manière que les montants, tout
particulièrement en mode DeepScan
™
. Soyez toujours prudent en clouant, sciant ou
perforant les murs, les planchers et les plafonds car ils peuvent contenir ces éléments.
À cause de sa sensibilité accrue, le mode DeepScan
™
pourrait aussi détecter d’autres
objets dans les murs qui ne sont pas des montants (Seulement Pro SL).
Pour éviter les surprises, rappelez-vous que les montants ou que les solives sont
normalement espacés de 16 po (406 mm) ou 24 po (610 mm) de distance et sont
de 1
1
⁄
2
po (38 mm) de profondeur. Tout ce qui est plus rapproché ou d’une largeur
différente n’est peut-être pas un poteau, une solive ou un coupe-feu. Coupez
toujours le courant en travaillant près de fils électriques.
Travailler Avec Différents Matériaux
• Papier peint:
Le StudSensor
™
fonctionne normalement sur les murs recouverts
de papier peint ou de tissu, à moins que les matériaux ne soient métallique,
contiennent des fibres métalliques ou soient encore humides après l’application.
• Les murs texturés ou les plafonds acoustiques:
en balayant un plafond
ou un mur à la surface inégale, placez un mince carton sur le plafond et
balayez à travers ce carton en utilisant le mode DeepScan
™
. Calibrez avec le
carton en place (Seulement Pro SL).
• Les planchers, les sous-planchers de bois ou les cloisons sèches
de gypse sur une feuille de contreplaqué :
utilisent le mode DeepScan
™
(Seulement Pro SL).
• Le StudSensor
™
ne peut pas balayer les montants de bois et les solives à
travers les carreaux de céramique ou le tapis et les sous-tapis. Il ne doit
pas recommander pour l´usage sur des murs de tour et de plâtre dus aux
irrégularités dans l´épaisseur de plâtre.
Note : La profondeur et le précision de détection peuvent varié à cause de la
quantité d’humidité dans les matériaux, la texture du mur, et la peinture.
4. MODE D’EMPLOI
Balayer en modes Stud Scan ou DeepScan
™
1. SÉLÉCTION DE MODE
• Sélectionner le mode : Pour mode de balayage normal, appuyez une fois sur le
bouton marche/arrêt. Pour mode de balayage en profondeur DeepScan
™
, appuyez
deux fois sur le bouton marche/arrêt (DEL en mode DeepScan
™
s´allumera,
seulemnet Pro SL).
• Lorsque vous cherchez les montants, commencez toujours par le balayage en mode
Stud Scan qui balaie à travers les surfaces jusqu’à 19 mm (
3
⁄
4
po) d’épaisseur.
• Le mode DeepScan
™
devrait seulement être choisi si vous savez que la surface
est reconstituée et plus épaisse qu’une construction normale. Vous devriez
toujours balayer le secteur d’abord en mode Stud Scan pour vérifier si vous
devez utiliser DeepScan
™
. DeepScan
™
est pour les profondeurs entre 19 mm (
3
⁄
4
po)
et 38 mm 1
1
⁄
2
po (Seulement Pro SL).
3. BALAYER EN MODES STUD SCAN
OU DEEPSCAN
™
(SEULEMENT PRO SL)
• Position de l’outil.
Pour une bonne utilisation, placez toujours le scanneur à plat
contre la surface avant de mettre le courant.
• Courant.
Appuyez et tenez le bouton de courant enfoncé lorsque vous l’utilisez.
• Calibrage.
Placez l’appareil à plat contre le mur. Appuyez et tenez le bouton
de courant enfoncé. Ne déplacez pas l’appareil avant la fin du calibrage (1 à 2
secondes). Lorsque le calibrage est terminé, DEL en TruCal
™
s´allumera.
• Mode d’emploi.
Déplacez lentement l’appareil tout en le gardant à plat contre
le mur. Ne le basculez pas, n´inclinze, ou ne soulevez pas.
• Si vous calibrez au-dessus d’un montants en mode DeepScan
™
, vous ne
détecterez probablement pas de montants. Déplacez l’appareil de quelques
pouces vers la gauche ou vers la droite, dégagez le bouton de courant et
recommencez (Seulement Pro SL).
2. IMPORTANTS CONSEILS DE
FONCTIONNEMENT—VEUILLEZ
LIRE ATTENTIVEMENT
Après le calibrage (voir numéro 2), continuez à tenir le bouton de courant et à glisser
lentement l’appareil le long de la surface. En commençant à approcher un montants,
le voyant rouge DEL s‘allumera en succession de bas en haut (voir les illustrations
en haut de la colonne suivante).
Continuez à déplacer lentement le scanneur. Lorsque le voyant vert DEL du haut
s’allume, un bip se fait entendre et le faisceau du système de ciblage SpotLite
™
brille,
vous avez trouvé le bord du montant. Marquez cet endroit.
Continuez à balayer au-delà du point marqué jusqu’à ce que la DEL s’éteigne.
Inversez pour trouver l’autre bord du montant. Marquez le deuxième endroit.
Le milieu du poteau est au centre, entre les deux marques.
Remarque : DeepScan
™
peut détecter d’autres choses en plus des montants.
Veuillez voir numéros 4 et 6.
Cause Probable
Solution
Situation
• Dégagez le bouton marche/arrêt,
déplacez-vous de quelques pouces
ou centimètres, appuyez sur le bouton
marche/arrêt et recommencez.
• Éteignez le scanneur, déplacez-le de
quelques pouces, appuyez sur le
bouton de courant et recommencez.
• Sur les surfaces rugueuses, placez
une feuille de carton mince sur le
mur, balayez sur le carton pour aider
l’appareil à glisser plus en douceur.
• Vérifiez d’autres montants à distance
égale d’un côté ou l’autre (12, 16 ou
24 po de distance [305, 406, ou 610
mm]) ou le même poteau à plusieurs
endroits directement au-dessus ou
sous le premier.
• Soyez toujours PRUDENT en
clouant, sciant, ou perçant les murs,
les planchers et les plafonds car
ils peuvent contenir ces éléments.
Pas d’indications.
Le voyant commence
à clignoter et
l’appareil fait
entendre un bip
à répétition.
Détecte d’autres
objets en plus des
montants en modes
Stud Scan et
DeepScan
™
.
Trouve plus de cibles
qu’il ne devrait y
en avoir.
• Pas de montants dans
cette location.
• Vous êtes dans le mode
DeepScan
™
et avez étalonné
sur un montant par hasard.
• L’outil était calibré sur le
montants ou sur une partie
dense d’un mur.
• L’outil est penché ou soulevé
durant le balayage.
• Les fils électriques et les
tuyaux de métal ou de
plastique peuvent être près
ou peuvent toucher la
surface arrière du mur.
Système de Pointage SpotLite
™
Rainure du Bord de Montants
DEL en Mode de Balayge de
Montants Stud Scan
DEL em Mode DeepScan
™
(Seulement Pro SL)
DEL de TruCal
™
Bouton de Mise
en Marche
Visiter www.zircon.com/support pour les
instructions plus courantes.
DeepScan, SpotLite, StudSensor, TruCal, and Zircon are registered trademarks
or trademarks of Zircon Corporation.
DeepScan, SpotLite, StudSensor, TruCal, et Zircon sont des marques de commerce
déposées ou des marques de commerce de la Zircon Corporation.