background image

ZICSD455

Installation &


Instruction Manual

en

Summary of Contents for ZICSD455

Page 1: ...ZICSD455 Installation Instruction Manual en ...

Page 2: ......

Page 3: ...he symbol Some installation steps in furniture are marked with the symbol of attention Important information or useful usage tips Symbol for waste electrical and electronic equipment WARNING In order to ensure a normal operation of your refrigerating appliance which uses a completely environmentally friendly refrigerant the R600a flammable only under certain conditions you must observe the followi...

Page 4: ...he interior light bulb 9 Reversing the doors 10 4 Before operating 18 Final Check 18 5 Using your refrigerator 19 Temperature control and adjustment 19 Suggested arrangement of food in the fridge freezer 20 Storing frozen food 21 Freezing fresh food 21 Making ice cubes 21 Defrosting 22 6 Maintenance and cleaning 23 7 Do s and Don ts 24 Installation instructions detailed step by step 11 Problem sol...

Page 5: ...lid for other models 10 11 1 Fridge compartment door shelf 2 Bottle Shelf 3 Deep freeze compartment 4 Fast freeze compartment 5 Crisper 6 Defrost water collection channel 7 Adjustable body shelves 8 Interior light 9 Thermostat control 10 Fridge compartment 11 Freezer compartment 1 9 8 7 7 6 5 4 3 3 3 2 Congratulations on your choice of a zenith quality appliance which has been designed to give you...

Page 6: ...ou contact your local authority for disposal information and facilities available See Installation Instructions on page 9 for information on suitable location To obtain the best possible performance and trouble free operation from your appliance it is very important to carefully read these instructions On delivery check to make sure that the product is not damaged and that all the parts and access...

Page 7: ...g is not suitable for your socket then the plug should be cut off and an appropriate plug fitted Destroy the old plug which is cut off as a plug with bared cord could cause a shock hazard if inserted into a socket elsewhere in the house The moulded plug on this appliance incorporates a 13 A fuse Should the fuse needs to be replaced an ASTABEAB approved BS 1362 fuse of the same rating must be used ...

Page 8: ...of the Waste Product This product complies with EU WEEE Directive 2012 19 EU This product bears a classification symbol for waste electrical and electronic equipment WEEE This product has been manufactured with high quality parts and materials which can be reused and are suitable for recycling Do not dispose of the waste product with normal domestic and other wastes at the end of its service life ...

Page 9: ...al of your refrigerator Before disposing of your refrigerator cut off the electric plug and if there are any locks on the door make them inoperable in order to protect children against any danger Placing and Installation 1 Install your refrigerator to a place that allows ease of use 2 Keep your refrigerator away from heat sources humid places and direct sunlight 3 There must be appropriate air ven...

Page 10: ...move the appliance by pulling by the door or handle 6 Empty any water in the drain tray before moving See section Defrosting and Maintenance and cleaning for further information 7 Make sure that the defrost water pipe at the back of the product is fixed to the plastic evaporating pan on the top of the compressor to avoid defrost water spillage on the floor IMPORTANT Care must be taken while cleani...

Page 11: ...ceptacle is supplied to store the mains plug during transit The receptacle is fixed at the back of the cabinet on the side of the compressor see diagram Gently remove the plug from the receptacle Never pull the mains cord you may damage the appliance In the case of transportation ensure you locate the plug in the receptacle provided to avoid transit damage Replacing the interior light bulb To chan...

Page 12: ...eft hand side 6 Replace top door 17 7 Refit lower hinge 3 as top hinge 18 on the left hand side Lower door 1 Unscrew top hinge 4 2 Carefully remove the lower door 5 3 Unscrew lower hinge 6 4 Remove plastic plugs 9 10 5 Refit hinge 4 as lower hinge 11 on the left hand side 6 Replace lower door 12 7 Refit lower hinge 6 as top hinge 13 on the left hand side Refit plastic plugs 7 8 9 10 into the screw hol...

Page 13: ... 1775 mm 855 mm Installation instructions detailed step by step Adjusting the legs If your refrigerator is unbalanced You can balance your refrigerator by turning the legs of it as illustrated in the figure The corner where the leg exists is lowered when you turn in the direction of black arrow and raised when you turn in the opposite direction Taking help from someone to slightly lift the refrige...

Page 14: ...EN 12 775 mm 40 mm 855 mm 1778 1788 mm ...

Page 15: ... for connecting top plastic part should not be screwed very hard because of moving the plastic part easily left or right side Spares included 1 b 1 a 1 1 a 5 1 a 4 b PS 17 mm 1 b 2 42 mm Top view If the subject parts are not included in the product you have purchased then it is valid for other models 900 ...

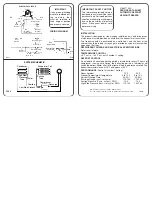
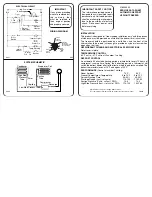
Page 16: ...EN 14 6 1 5 4 4 mm T 2 3 ...

Page 17: ...EN 15 42 0 mm 42 0mm 1TW 10 42 0 mm 42 0 mm 7 8 9 T ...

Page 18: ...EN 16 11 15 14 42 0 mm 42 0mm 1TW 1TW 16 17 18 19 12 T 13 ...

Page 19: ...EN 17 22 90 o 21 mm 21 W 2 mm 2 mm 2 mm 23 4 mm 4 mm W 2 mm 24 25 W 2 0 mm 20 ...

Page 20: ...will come on 5 You will hear a noise as the compressor starts up The liquid and gases sealed within the refrigeration system may also give rise to noise whether the compressor is running or not which is quite normal 6 Set the thermostat knob half way between 1 and 5 7 Front edges of the cabinet may feel warm This is normal These areas are designed to be warm to avoid condensation 8 Do not load the...

Page 21: ...temperature of the freezer should be 18 C 0 F Lower temperatures may be obtained by adjusting thermostat knob towards 5 position We recommend that you check the temperature with an accurate thermometer to ensure that the storage compartments are kept to the desired temperature Remember you must take your reading very quickly since the thermometer temperature will rise very rapidly after you remove...

Page 22: ... in airtight covered containers 4 Fresh wrapped produce can be placed on the shelf Fresh fruit and vegetables should be cleaned and stored in the crisper bins 5 Bottles can be placed in the door section 6 To store raw meat wrap in polythene bags and place on the lowest shelf Do not allow to come into contact with cooked food to avoid contamination For safety only store raw meat for two to three da...

Page 23: ...ot be affected if the failure lasts for less than 13 hrs If the failure is longer then the food should be checked and either eaten immediately or cooked and then re frozen Freezing fresh food Please observe the following instructions to obtain the best results Do not freeze too large a quantity at any one time The quality of the food is best preserved when it is frozen right through to the core as...

Page 24: ...reezer compartment does not perform automatic defrosting in order to prevent decaying of the frozen food Defrosting is very easy and without mess thanks to a special defrost collection well Defrost twice a year or when a frost layer of around 7 mm 1 4 has formed To start the defrosting procedure switch off the appliance at the socket outlet and pull out the mains plug All food should be wrapped in...

Page 25: ...ce is not going to be used for a long period of time switch it off remove all food clean it and leave the door ajar Check door seals regularly to ensure they are clean and free from food particles Removal of door tray To remove door racks remove all the contents and then simply push the door rack upwards from the base To remove a freezer drawer pull it as far as possible and then tilt it upwards a...

Page 26: ...sh food and be sure it is thoroughly clean before you freeze it Do Prepare fresh food for freezing in small portions to ensure rapid freezing Do Wrap all food in aluminium foil or freezer quality polythene bags and make sure any air is excluded Do Wrap frozen food when you buy it and put it in to the freezer as soon as possible Do Defrost food in the fridge compartment Do Remove ice cream from the...

Page 27: ...s to put it in the fridge to thaw slowly Make sure you avoid defrosting food or food juices drip onto other food Problem solving If the appliance does not operate when switched on check whether The plug is inserted properly in the socket and that the power supply is on To check the power supply to the socket plug in another appliance The fuse has blown circuit breaker has tripped main distribution...

Page 28: ... All dimensions are in mm 1 3 3 2 2 45 FRONT FEET 45 8 mm 59 mm EN 26 8 Installation of high levelling foot optional high levelling optional standard ...

Page 29: ...4 5 REAR FEET 45 EN 27 ...

Page 30: ...540 mm 545 mm 775 mm 855 mm min 555 mm EN 28 min 560 mm 1826 mm 855 mm 1775 mm standard high levelling optional No wooden back wall 1775 mm 1826 mm 91 mm 40 mm 900 900 1778 1788 mm 1829 1839 mm ...

Page 31: ...Repairs to the product required as a result of faulty materials defective components or manufacturing defects x Functional replacement parts to repair a product x The costs of a Zenith Approved Engineer to carry out the repair What is not covered x Transit and delivery damage x Cabinet or appearance parts including but not limited to control knobs flaps and handles x Accessories and or consumable ...

Page 32: ... cost of repairing the product x Gas Cookers must be professionally installed by a Gas Safe or Gas Networks Ireland for Republic of Ireland registered gas installer x This guarantee is given in respect of products purchased and used within the United Kingdom x This guarantee is effective from the initial date of purchase of a new product from an authorised retailer and will be void if the product ...

Page 33: ...annot be arranged Will there be any charge for the repairs It is your responsibility to provide evidence to the Engineer that your product is covered by this guarantee with a proof of purchase The Manufacturer reserves the right to charge for the reasonable cost of any service call if x You cannot provide evidence that your product is covered by this guarantee x Where a service call has been made ...

Page 34: ...cessible to the Engineer without the need for cabinets or furniture being removed It is your responsibility to ensure our Engineers have a clean and safe environment to carry out any repairs Model No Serial No Retailer Date of purchase For service under guarantee simply telephone the appropriate number below UK Mainland Northern Ireland 0333 207 2028 Register your appliance at https www zenithappl...

Page 35: ...difficulty in obtaining service contact the Zenith Customer Helpline on Tel 0333 207 2028 or email customerservice support zenithappliance co uk This guarantee is provided by Beko plc Beko House 1 Greenhill Crescent Watford Herts WD18 8QU Beko plc is registered in England and Wales with company registration number 02415578 EN 33 ...

Page 36: ...4578339738_AA EN ...

Reviews: