Yamaha PortaTone PSR-1000, Owner'S Manual
The Yamaha PortaTone PSR-1000 is a versatile keyboard designed for music enthusiasts. Unlock your musical potential with the help of the comprehensive user manual available for free download on our website. Follow the quick steps provided in the manual to easily navigate through the keyboard's features and functionalities.
Share
Download


Reviews:
No comments
Related manuals for PortaTone PSR-1000

Escalade 2016
Brand: Cadillac Pages: 20
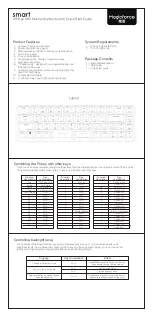
smart
Brand: Magicforce Pages: 2

AUDI 4G HIGHEND
Brand: KAP Pages: 20

KB-E5500
Brand: Sven Pages: 4

LIGHTNING 02
Brand: Ceratech Pages: 1

keyboard for iPad 3
Brand: Kensington Pages: 9

Celviano AP-24
Brand: Casio Pages: 33

97764
Brand: GE Pages: 2

Relay
Brand: WeGo Pages: 19

AKB867
Brand: Targus Pages: 15

AKB862
Brand: Targus Pages: 15

PERIBOARD-428
Brand: perixx Pages: 20

MWS-1840
Brand: Franklin Pages: 30

40998
Brand: Hamilton Beach Pages: 20

DP-990F
Brand: Roland Pages: 2

4 Professional
Brand: Das Keyboard Pages: 5

iCAT 13-300
Brand: Tifone Pages: 40

AT6SD
Brand: ACI Farfisa Pages: 13


