Yamaha CDC-685, Owner'S Manual
The Yamaha CDC-685 is a high-quality audio CD changer designed for music enthusiasts. Enhance your listening experience with this sleek device. Download the free Yamaha CDC-685 Owner's Manual from our website to easily set up and optimize your device for optimal performance.
Share
Download


Reviews:
No comments
Related manuals for CDC-685
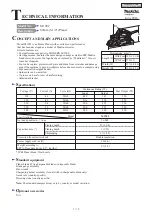
M1902
Brand: Makita Pages: 19

S500i
Brand: NAD Pages: 32

M5 C/AH
Brand: NAD Pages: 18

C541i
Brand: NAD Pages: 37

C540
Brand: NAD Pages: 38

C521
Brand: NAD Pages: 44

C 542
Brand: NAD Pages: 44

C 525BEE
Brand: NAD Pages: 50

C 521BEE
Brand: NAD Pages: 50

T 513
Brand: NAD Pages: 30

T534
Brand: NAD Pages: 2

523
Brand: NAD Pages: 52

Monitor 6300 Series
Brand: NAD Pages: 4

6125
Brand: NAD Pages: 8

PD-D2750
Brand: Teac Pages: 44

TE-268
Brand: Teac Pages: 59

NP-H750
Brand: Teac Pages: 2

Esoteric DV-50
Brand: Teac Pages: 56


