

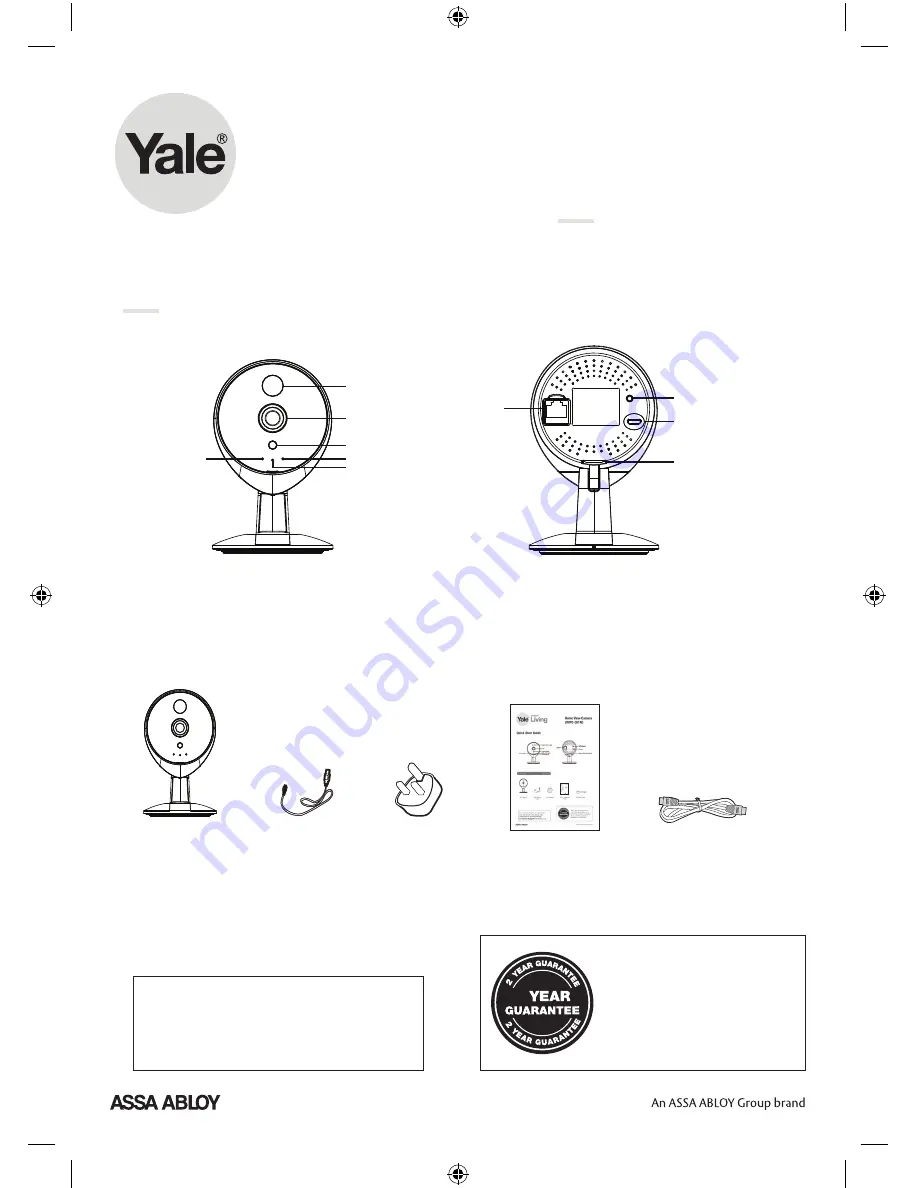
Home View Camera
(WIPC-301W)
smart
Living
For more information on this product
and Yale Smart Living Range visit
www.yale.co.uk/smart-living
Consumer Support:
2
The 2 year guarantee for this
product is active from the date
of purchase (A copy of this
guarantee is available on our
website).
V1.1
EQ140500
Quick Installation Guide
Indoor Wireless HD IP Camera
Model: FC1405P/ FC1405PC
Package Contents
Quick Installation Guide
Resource CD
IP Camera
Quick Start Guide
Model: FC1405P/ FC1405PC
AC Adapter
USB Power Cable
1
Hardware Introduction
Physical Description
Light Sensor
Lens
Night Vision Light
Network Light
Power Light
Microphone
Micro SD Card Slot
LAN
WPS/Reset
Power
Please Note:
Only FC1405PC supports the LAN interface, but FC1405P
does not support.
Hardware Installation
1.
Rotate the base of the camera until points a and bare
aligned, this allows for the mounting plate to be
removed.
2.
Install the mounting plate on a wall or ceiling with
supplied fixing screws.
3.
Align points a and b to insert the camera base to the
mounting plate. Rotate so that points a and b are no
longer aligned, this attaches the camera securely to
the base.
a b
A
B
Hardware Connection
1.
After connect the AC power adapter to the camera,
the camera is in EZLink mode by default.
2.
Turn on your wireless router.
Before you continue, please note:
Make sure your smart phone is located near the camera.
Do not use an ethernet cable to connect the camera if
you want to use a wireless connection (Only FC1405PC).
Make sure smart phone is connected to your wireless
router.
WPS
V1.1
Package Contents
Quick Installation Guide
Resource CD
Ethernet Cable
Power Adapter
IP Camera
1
Hardware Introduction
Physical Description
Quick Installation Guide
Indoor Wireless HD IP Camera
Hardware Installation
Model: FC2501PA
Wi-Fi Antenna
Mounting Bracket
Power light
Network light
I/O Alarm
Antenna
Power
LAN
Speaker
IN
OUT
I / O Alarm
LAN
DC 5V
Audio Output
Audio Input
Audio
OUT / IN
Microphone
LENS
SD Card
Slot
Reset/WPS Button Mounting Port
Network Light Status
Network Light Description
Off No Wi-Fi connection
Flashing every 0.2 seconds EZLink takes effect (default)
Flashing every 0.4 seconds WPS is connecting
Slow Flash once per second Wi-Fi connected
Constant for 3 seconds Camera resetting
1.
Screw the mount on the wall with the two screws
provided.
2.
Loosen the thumb screws to adjust the mount to
the desired position. Once the position is set,
tighten the screws securely.
Quick Start Guide
Home View Pan, Tilt, Zoom
Camera (WIPC-303W)
Home View
Camera
USB Power
Cable
AC Adapter
Quick Installation
Guide
Ethernet Cable
V1.1
EQ140500
Quick Installation Guide
Indoor Wireless HD IP Camera
Model: FC1405P/ FC1405PC
Package Contents
Quick Installation Guide
Resource CD
IP Camera
Quick Start Guide
Model: FC1405P/ FC1405PC
AC Adapter
USB Power Cable
1
Hardware Introduction
Physical Description
Light Sensor
Lens
Night Vision Light
Network Light
Power Light
Microphone
Micro SD Card Slot
LAN
WPS/Reset
Power
Please Note:
Only FC1405PC supports the LAN interface, but FC1405P
does not support.
Hardware Installation
1.
Rotate the base of the camera until points a and bare
aligned, this allows for the mounting plate to be
removed.
2.
Install the mounting plate on a wall or ceiling with
supplied fixing screws.
3.
Align points a and b to insert the camera base to the
mounting plate. Rotate so that points a and b are no
longer aligned, this attaches the camera securely to
the base.
a b
A
B
Hardware Connection
1.
After connect the AC power adapter to the camera,
the camera is in EZLink mode by default.
2.
Turn on your wireless router.
Before you continue, please note:
Make sure your smart phone is located near the camera.
Do not use an ethernet cable to connect the camera if
you want to use a wireless connection (Only FC1405PC).
Make sure smart phone is connected to your wireless
router.
WPS
V1.1
EQ140500
Quick Installation Guide
Indoor Wireless HD IP Camera
Model: FC1405P/ FC1405PC
Package Contents
Quick Installation Guide
Resource CD
IP Camera
Quick Start Guide
Model: FC1405P/ FC1405PC
AC Adapter
USB Power Cable
1
Hardware Introduction
Physical Description
Light Sensor
Lens
Night Vision Light
Network Light
Power Light
Microphone
Micro SD Card Slot
LAN
WPS/Reset
Power
Please Note:
Only FC1405PC supports the LAN interface, but FC1405P
does not support.
Hardware Installation
1.
Rotate the base of the camera until points a and bare
aligned, this allows for the mounting plate to be
removed.
2.
Install the mounting plate on a wall or ceiling with
supplied fixing screws.
3.
Align points a and b to insert the camera base to the
mounting plate. Rotate so that points a and b are no
longer aligned, this attaches the camera securely to
the base.
a b
A
B
Hardware Connection
1.
After connect the AC power adapter to the camera,
the camera is in EZLink mode by default.
2.
Turn on your wireless router.
Before you continue, please note:
Make sure your smart phone is located near the camera.
Do not use an ethernet cable to connect the camera if
you want to use a wireless connection (Only FC1405PC).
Make sure smart phone is connected to your wireless
router.
WPS
Quick Start Guide
Inside the Box


