Quick Start Guide
1080P Digital Video Recorder
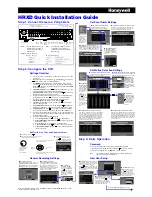
FRONT/REAR PANEL
CAMERA CONNECTION
After adjusting the time and date for the first time, it is highly
recommended to format your Hard Disk Drive.
1. Go to the System Menu and select the HDD submenu.
2. Select the Check box next to the HDDs.
3. Click the [HDD Clear] button.
4. When the HDD formatting is complete, exit the main menu and
reboot the DVR to save all changes.
Formatting the Hard Drive Disk
INITIAL SETUP
When all necessary cameras and monitors are setup in their permanent
locations, connect them to the DVR.
Use the diagram in the Quick Start Guide and manual for additional
information. When all connections have been made, connect the DVR to
an appropriate power supply. The DVR will boot up automatically.
1. Go to the System Menu and select SYSTEM INFO.
Click on the pencil icon next to the Date/ Time to enter edit mode.
2. Select the appropriate display format from the [DATE/TIME FORMAT]
drop down lists.
3. Select the appropriate date and local time in the [DATE/ TIME] section.
4. Select the appropriate time zone from the [TIME ZONE] drop down list.
5. If applicable, enable Daylight Savings mode.
The Quick Setup Menu offers an automatic recording and HDD calculator.
By entering your anticipated recording days, or the desired recording
resolution, the DVR will provide you with the estimated days recorded
on your current HDD space.
Initial Setup
Date and Time Setup
1. Select how many days you wish to record on your current storage.
The system will populate recommended recording resolution,
frame-rate, and quality.
2. Select the desired recording specifications.
The system will display the number of days that will be recorded on
your available storage.
Quick Setup
1. Make sure the cameras and the monitors are properly connected to
the DVR.
2. The DVR should be placed in a dust and moisture free environment.
It must never be exposed to direct sunlight. Server room temperature
is highly recommended to reduce the chance of overheating.
Overheating may cause the DVR to become unstable.
3. During the boot process, the DVR should not be interrupted by
pressing any buttons on the front keypad, mouse, or remote controller.
Do not unplug the power adapter or turn the DVR off during the boot
process.
A UPS (Uninterruptable Power Supply) is highly recommended to
prevent malfunctioning of the DVR during a power outage.
Connect camera which has UTC function and “V” check to
USE UTC/PTZ MENU and select proper protocol with camera.
Then MENU button is activated.
Click MENU button and set camera menu with direction key.
To use full screen Click the Menu icon in 'PTZ Control' tab in 'Show
Controller'
DVR Installation Safety Tips
The Main Menu (Setup Menu) system includes six (6) sub-menus:
System, Device, Record, Network, Backup, & Q. Setup. To access the
Setup Menu, press the [Menu] button on the front panel of the DVR,
or right-click anywhere on the screen and select 'Setup Menu'.
The DVR's default user ID and password are: admin/ no password.
Main Menu
Note: When Auto detection is not working well under improper
environment, select type of camera directly on Video Type.
UTC application
Camera connection (Auto detection)
Automatically detect the cameras such as HD Analog and 960H.
(Set Video Type as AUTO)
Front Panel
Rear Panel
No.
I/O
Please note that the Accessory kit and
Shipping Box contain the following items :
- Digital Video Recorder (1 ea)
- Power Supply (1 ea)
- Quick Start Guide (1 ea)
Default Login Information
(ID: Admin / No Password)
This document is intended to serve as a quick
reference page for initial set-up.
It is recommended that the user read the entire
instruction manual before beginning.
Basic programming can be accomplished by
simply reading the appropriate instructions first,
then scroll through the easy to operate “On Screen
Display” and make changes.
Description
1
Audio-In
2
Audio-Out
3
Sensor Input
4
5
6
7
9
10
11
Audio Input Device (with Amplifier)
Audio Output Device (with Amplifier)
Sensor Input
RS-485 Port
HD OUTPUT
VGA
SPOT
Alarm Output
PTZ Dome Camera or External Keyboard Controller connection
HD OUTPUT
SPOT Output
12
USB 3.0 Port
USB Port for Mouse Operation, Backup Device, or Firmware Update
LAN Port
1/10/100/1000M
Power Input
8
Video-In
12V
Alarm Output
VGA Output
2
12
ATTENTION PLEASE !!!
Note: To manually setup recording configurations, Quick Setup must be
DISABLED. If the "Use Quick Setup" option is enabled, the system will
ignore all other configurations set manually.
No.
Buttons
Functions
1
LED Indicator
2
USB Port
Indicate System Status Power, Record, Network
USB Port for Mouse Operation, Backup Device or
Firmware Update
MADE IN KOREA
RISK OF ELECTRIC
SHOCK / DO NOT OPEN
KBD
PTZ
+ -
+ -
ALARM IN
ALARM OUT
C2NC2NO2
C1NC1 NO1
G
4
3
2
1
G
8
7
6
5
G
12
11
10
9
G
16
15
14
13
3
7
4
8
2
6
1
5
VGA
HD OUTPUT
SPOT OUT
USB 3.0
CH17
CH18
CH19
CH20
CH21
CH22
CH23
CH24
CH25
CH26
CH27
CH28
CH29
CH30
CH31
CH32
12V
POWER
1
7
8
10 11 12
2
3
4 5
6
9
1
2
Camera inputs (Supports NTSC/PAL)
Note: 4K resolution is only available when 4K monitor is connected.
If it is set to 4K (3840X2160) resolution without connection of 4K
monitor, it is returned to previous resolution after 30sec screen out.
Display
HD resolution can be set by maximum 4K (3840X2160)
XHDAR
Quick guide