

QUICK START GUIDE
What’s included:
• Drone • Rechargeable Batter y • Charging Cable • Micro SD Card
• Micro SD USB Adapter • Spare Par ts Kit • Remote Control
BEFORE YOU STA R T:
1.
Find the Micro-SD card. It is located in the small zip-lock pouch with your USB adapter.
2.
Slide the Micro-SD card into the back of the camera on the underside of your drone. Push until you hear a click.
The card should slide in easily. If you find it is not clicking into place, do not force the card. Remove it, and turn the
card over and try again. (To remove the card, push in until you hear a click, then the card will be easily removable)
3.
Charge the drone fully by connecting the cable on the battery with the included USB cable. Plug into the USB port
of a computer or a USB compatible charging block and allow to charge for at least 90 minutes. During charging, the
USB connector will illuminate. When the battery is fully charged, the light on the USB connector will turn off.
4.
Put 4 AA batteries into the Remote Control according to the diagram inside the battery compartment.
TURNING ON DRONE AND PAIRING WITH REMOTE CONTROL:
1.
Unplug the battery from the charging cable.
2.
Insert the battery into the compartment on the underside of the drone with the battery cable sticking out. (Note:
the camera does not need to be removed.)
3.
Insert the white battery connector into the slot marked power. Then close the battery compartment.
4.
Turn on the power switch on the back of the drone, place the drone on a flat level surface.
5.
Turn on the Remote Control using the switch at the center of the remote. The lights on the drone will be flashing.
6.
Start with the left stick on the remote control all the way down. Then push the left stick on the remote all the way
up, then all the way back down again. The lights on the drone should stop flashing and remain illuminated. This
means the drone is paired. (If this does not occur, turn off the remote control, and repeat steps 3-5.
7.
Once paired, the drone is ready to fly. Keep the left stick all the way down to prevent the rotors from turning until
you are ready to fly. It is STRONGLY recommended that you use the drone outdoors during initial flights.
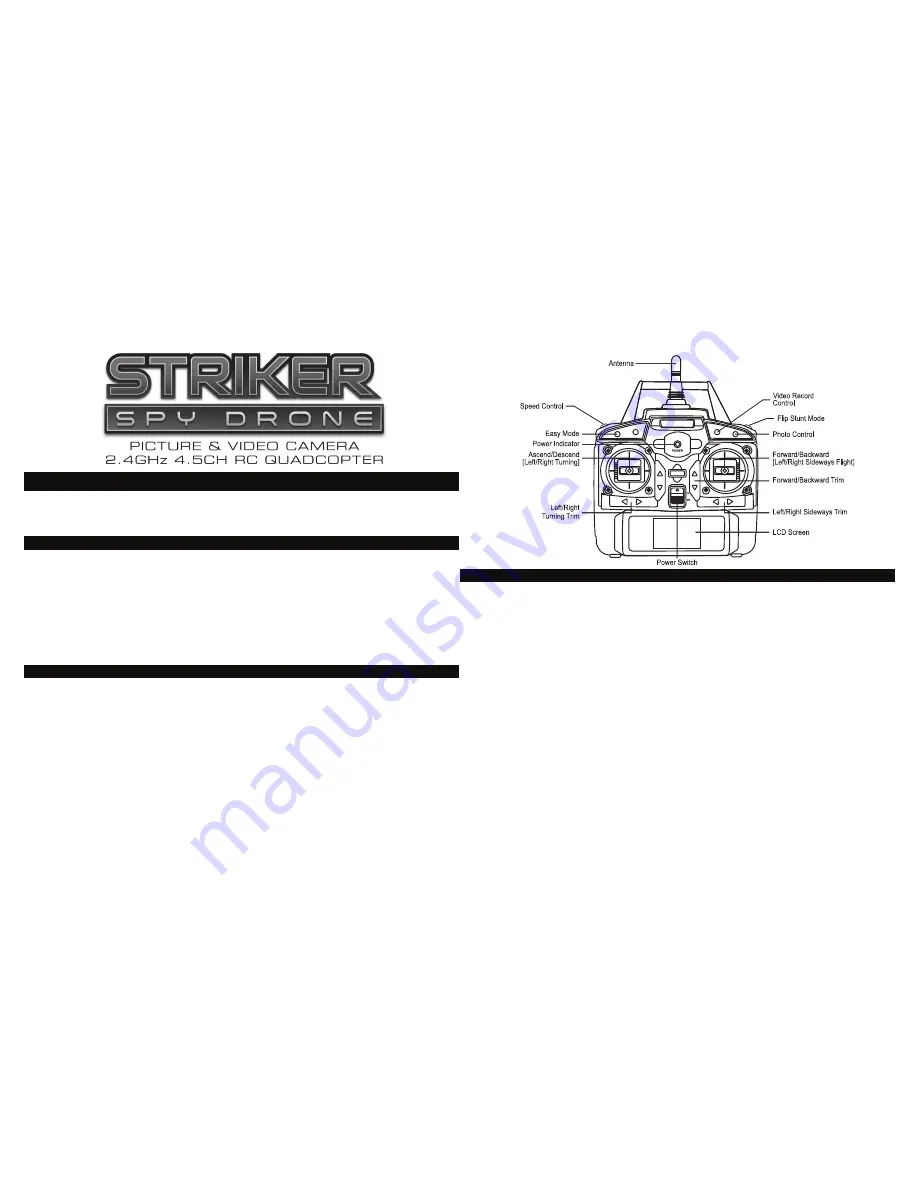
R E M O T E C O N T R O L O V E R V I E W:
1.
Your remote control has an LCD screen on it that will give you basic information including the thrust % you are
using when flying your drone, battery life, and connection strength between the remote control and the drone. For
additional information regarding the LCD screen, please consult the user’s manual.
2.
The left stick controls ELEVATION and ROTATION. Pushing the stick up will increase elevation and lowering the
stick will reduce elevation. Pushing the stick right and left will rotate the drone clockwise and counterclockwise.
3.
The right stick controls direction of movement. Pushing the stick up will make the drone fly forward. Pushing down
will make the drone fly backward. Pushing left and right will make the drone fly left and right.
IMPORTANT NOTE:
Once rotated, remember that the drone will still operate according to the direction it is pointing.
If the drone is facing you, for example, pushing forward will actually cause the drone to move towards you. Pushing
right will cause the drone to move to your left. Always keep track of which direction your drone is facing.
The red
propellers are at the front of the drone, while the black propellers are at the back of the drone. The LED light
colors also indicate front and back.
4.
Your remote control has little triangle-shaped buttons near the two sticks. These buttons on the remote “trim” the
flight. These buttons allow you to correct drifting. For example, if the drone drifts to the right a bit too much, you can
correct that with the use of the correct trim button. Please consult the user’s manual included with the drone for full
explanation of the trim buttons.
5.
There are 4 buttons on the top of the remote. They are labeled according to their purpose. From right to left they
will perform the following functions: take a still photograph, start and stop video recording, the next button is not
utilized on this model, the last button on this row toggles Easy Mode.
6.
Above those 4 buttons are 2 shoulder buttons. The shoulder button on the right engages 360º stunt mode. The
shoulder button on the left adjusts the speed of flight. It has three modes delineated by the number of beeps it makes
when pressed. A single beep indicates the lowest speed, two beeps indicates medium speed, and three beeps
indicates the highest speed. Low speed flying is better for tight spaces, while high speed flying is better for flight at
higher elevations and open areas, or in stronger breezes.


