background image

Installation instructions
Primor 1000

Content

1 General instructions

 �������������������������������������������������� 2

1.1 Liability notes ��������������������������������������������������������� 2
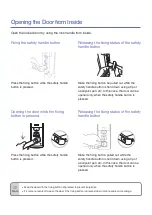
2 Lock installation

 ������������������������������������������������������ 2

2.1 Installing the lock ������������������������������������������������������ 2

2.2 Input unit installation ��������������������������������������������������� 3

2.3 Connection input unit/lock ���������������������������������������������� 3

2.4 Functional test ��������������������������������������������������������� 3

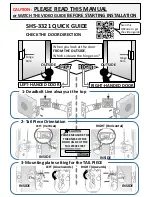
3 Installation examples/input unit

 �������������������������������������� 4

4 Installation input unit RO

 ��������������������������������������������� 5

4.1 Installation overview  ��������������������������������������������������� 5

4.2 Axis length calculation �������������������������������������������������� 5

4.3 Installation of fixing ring ������������������������������������������������ 6

4.4 Mounting the input unit RO ��������������������������������������������� 6

4.4.1 Cable guidance input unit RO (turnable) �������������������������������� 7

4.5 Installation input unit RO (fixed) ������������������������������������������ 7

5 Installation input unit FL

 (fixing on the inside) ���������������������������� 8

5.1 Installation input unit FL (fixing from the front) ����������������������������� 9

5.2 Installation battery compartment ����������������������������������������� 9

6 Installation input unit FS

 ���������������������������������������������10

6.1 Cable guidance input unit FS �������������������������������������������11

© Carl Wittkopp GmbH - Errors and omissions excepted

Installation instructions no. 9999-118-1

Summary of Contents for Primor 1000

Page 1: ...allation overview 5 4 2 Axis length calculation 5 4 3 Installation of fixing ring 6 4 4 Mounting the input unit RO 6 4 4 1 Cable guidance input unit RO turnable 7 4 5 Installation input unit RO fixed 7 5 Installation input unit FL fixing on the inside 8 5 1 Installation input unit FL fixing from the front 9 5 2 Installation battery compartment 9 6 Installation input unit FS 10 6 1 Cable guidance i...

Page 2: ... so that the swing bolt lock inevitably locks first The swing bolt lock has to be fixed with 3 x M6 screws in the prepared drillings in order to ensure a permanent hold An independent loosening of the screws has to be avoided It is recommended to put lock washers underneath the screw s head To avoid malfunctions turn the screws with a maximum turning force of 3 5 5 Nm After the installation the lo...

Page 3: ...t installation see page 5 Fig 3 Connection plug input unit electronic lock 2 3 Connection input unit lock Connect the plug from to the input unit into the outer plug position on the lock and check fixation To loose the plug care fully lift and pull out When using an external battery compartment or a signalbox the cable has to be plugged into the assigned position Connect battery to the battery cli...

Page 4: ...000 09 11 2012 3 Installation examples input unit Input unit RO tur nable as boltwork actuator p 5 Input unit RO fixed p 7 Input unit FL fixing on the inside fixing on the outside with external battery com partment p 8 Input unit FS p 10 ...

Page 5: ...th of the connection axis spindle as boltwork actuator the total length has to be adjusted to the depth of insertion within the boltwork The axis has to be secured against shifting in axial direction Fig 5 Explosion diagram Primor RO Fixing ring for input unit Cylinder screws M4 x 10 4 1 Installation overview Connection axis for turnable input unit Input unit Connection cable ...

Page 6: ...r to install the fixing ring 4 threaded holes M4 and 1 drilling with max Ø 11 4 mm min Ø 10 5 mm have to be drilled into the safe door When mounting the fixed input unit RO a door hole drilling of Ø 9mm is enough Afterwards the fixing ring has to be fixed with the enclosed cylinder screws M4 x 10 from the front Do not damage the input unit when doing this Fig 6 Installation dimensions fixing ring ...

Page 7: ...e fig 7 and fig 8 Adjust input unit to the closed electronic lock boltwork and insert arrest pin Drilling to fix the input unit 4 4 1 Cable guidance input unit RO turnable Lead the connection cable with the plug through the connection axis Lead the connection cable with the plug through the input unit Plug the connection axis into the input unit from behind and adjust the input unit to the locked ...

Page 8: ...drilling of Ø 8 mm for the connection cable is required in the door centric of the input unit Watch out that through this drilling as well as the fixing screw drillings of the input unit no access to security relevant components is possible Fig 12 Installation dimensions input unit FL fixing on the inside Fixing position for screws M5 Centre of drilling identical for front and inside fixing Fixing...

Page 9: ... Emergency power supply Cable opening Fixing position for screws M3 Centre of drilling identical for front and inside fixing Fixing position for screws M3 Fig 13 Installation dimensions input unit FL fixing from the front Fixing from the front When fixing the input unit from the front 2 threaded holes M3 have to be drilled into the front of the door EN 1300 A VdS Class 1 A passage drilling of Ø 8 ...

Page 10: ...d into the front of the door A passage drilling with min Ø 8 mm and max Ø 11 mm is required for the connection cable to the input unit Afterwards the input unit has to be fixed with the enclosed cylinder screws M5 from the front Do not damage the input unit when doing this Fixing position for screws M5 Fig 14 Installation dimensions input unit FS Cable opening ...

Page 11: ... The connection cables have to be installed according to the figures Fixing screws M5 bottom of case Folding unit Fig 15 Cable guidance input unit FS Connection cable input unit lock Battery clip Lead connection cable underneath the clip input unit battery clip Fig 16 Leading the cable ...

Page 12: ...12 Installation instructions Primor 1000 09 11 2012 ...

Reviews: