background image

WIFI07

User Guide (IOS Version)

I. Product Overview

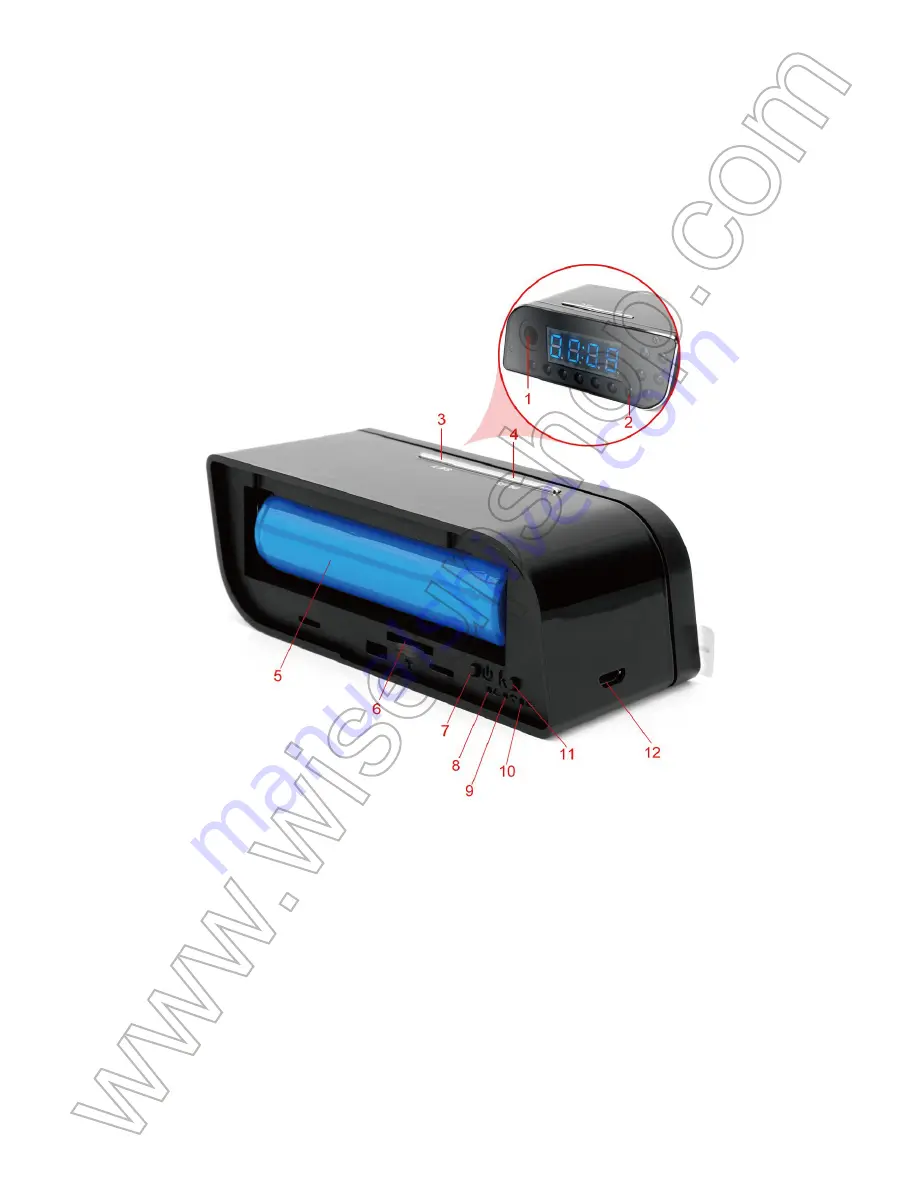
1. Camera Lens
2. IR LEDs
3. Set Button
4. Plus Button
5. Rechargeable Backup Battery
6. Micro SD card Slot
 

II. What’s in the Box

 -1× WIFI Camera Clock
-1× USB Cable
-1× AC110-240V to DC 5V Charging Adapter
-1× 8GB Micro SD Card (fitted into the Micro SD card slot already)
-1× Rechargeable Backup Battery

III. Before You Start

3.1. Get the Clock Part Ready

3.1.1. Open back cover, put the backup battery in place and plug it into AC power using 
the power adapter included, time display will be light on.
 

3.1.2. Press the Set Button once and the hour will start flashing, then press the Plus 
Button to adjust the current hour.
3.1.3. Press the Set Button once again to save the hour setting and the minute will start 
flashing, then press the Plus Button to adjust the current minute.
3.1.4. Press the Set Button to save the minute setting. Press the Plus Button to choose 
12-hour or 24-hour display mode, then press the Set Button once to save the setting.

3.2. Get The Wifi Camera Part Ready

3.2.1. Please make sure the 8GB Micro SD card provided has been formatted already 
and is securely fitted into the camera’s SD card slot. If you want tochange a Micro SD 
card, we recommend you to use SDHC Class 10 Micro SD cards.
3.2.2. Power on the camera by pressing and holding the Power Button for 2 seconds. 
Wait about 15 seconds or so, you will see that the LAN indicator light is glowing solid 

yellow, which means the camera’s WIFI signal is ready.

IV. Network Setup

4.1. Install the “

Camwf

” APP on Your iPhone or iPad

Search for “

Camwf

” in App Store and install it on your iPhone or iPad.


4.2. P2P Connection Setup (LAN Mode)

4.2.1. Go to WLAN Setting page on your iPhone or iPad, connect your iPhone or iPad to 
the camera’s WIFI signal named “

RT-*****

”. Wait for the WIFI to be connected and your 

phone status bar will appear WIFI symbol as below:
 

[Note]:


If the camera’s WIFI signal cannot be found after a long time, please reset it (See VIII) 

or recharge the backup battery only if the camera is powered by the backup battery (See X).

4.2.2.Run the “

Camwf

” APP.

4.2.3. Add the camera to the “

Camwf

” APP as below:

Tap + symbol at the top right corner>Search for the camera> Tap the camera’s UID> Tap 
OK.
 

4.2.4. If the camera shows “

Connected

” on the“

Devices

”page, it means the camera’s 

P2P (LAN) setup is complete. The LAN indicator light will be solid yellow. You can check 
or record video in the P2P (LAN) mode.

[Note]:

In this P2P (LAN) mode, you can only view video locally, within 15 meters (49 feet)open 

range.


4.3. Remote View Setup (WAN Mode)

>> Before remote view setup, please make sure that the camera is successfully added to 
the APP and it's online in the P2P (LAN) mode.

4.3.1. Launch the “

Camwf

” APP.

4.3.2. Follow the steps below to set up remote view function:
Step 1: On the “

Devices

” page, tap the gear icon       then choose “

Network Settings

”.

Step 2: On the “

Network Settings

” page, tap the search icon       and then select a desired 

WIFI hotspot to enroll the camera in.
Step 3: Tap “

OK

”to complete the remote view setup and the camera will reboot automatically.

Step 4: Exit the “

Camwf

” APP.


How to check if remote view function works?

1. Back to the WLAN setting page on your iPhone or iPad, exit your iPhone or iPad from 
the current WIFI network, enroll your iPhone or iPad in another WIFI hotspot, or you can 
turn off the WLAN function, enable your mobile network data instead.
 

2.Make sure your iPhone or iPad has Internet access, launch the “

Camwf

” APP again. If 

the camera shows “

Connected

” on the “

Devices

” page, it means the remote view setup 

is successful and the camera has entered into WAN mode. You can go ahead to view live 
or recorded video remotely from any location. The WAN Indicator light will be solid yellow.

Tips:

 If the camera shows “

Connection failed

” on the“

Devices

”page, please tap the 

Refreshing icon     and wait for 1 minute, the camera will show “

Connected

”. If it still 

doesn’t work, that means you need to reset the camera (See VIII) and set up all over 
again.

V. Motion Detection Recording Setup

>> Please make sure the camera is successfully added to the APP and it's online before 
you start.

5.1. Launch the “

Camwf

” APP.

5.2. Tap the gear icon      on the “

Devices

” page and then choose “

Device Settings

”.

5.3. On the “

Device Settings

” page, turn on “

SD Record

”and “

Motion Detection

” 

function.
5.4.Tap “

Confirm

” to complete the Motion Detection Video Recording setting.


 7. Power/Reset Button
 8. WAN Indicator Light
 9. LAN Indicator Light
10. Battery Charge Indicator Light
11. Restart Button
12. USB Port

5.5 Back to the “

Devices

” page, tap the gear icon      and go to “

SD Card Record

” page. 

You can download the video files and play them back on your iPhone or iPad.
 

[Note]:


Video Resolution: 1280x720P  Video Format: MP4

VI. Recording Video to the Local Micro SD Card

>> Please make sure the camera is successfully added to the APP and it's online before 
you start.

6.1. Launch the “

Camwf

” APP.

6.2. Tap the gear icon      on the “

Devices

” page and then go to “

Device Settings

” page.

6.3. Turn on “

SD Record

” and turn off “

Motion Detection

” function.

6.4. Tap “

Confirm

” to complete the SD card recording setting and the camera will record 

video to the Micro SD card continuously.  Follow 5.5 to access the video files.


[Note]:

1). A video clip will be generated and saved every 3 minutes automatically.

2). If the outlet power is cut off, the camera can still record video for 4 hours continuously with the 

backup battery.

3).Video Resolution: 1280x720P  Video Format: MP4

VII. Recording Video to Your iPhone or iPad

>> Please make sure the camera is successfully added to the APP and it's online before 
you start.

7.1. Launch the “

Camwf

” APP.

7.2. On the “

Devices

” page, tap the camera icon to get into the live video screen. Tap the 

video recording button     to start or stop recording video. These video files willonly be 
found in the application and come without audio.
 

7.3. Back to the “

Devices

” page and tap Media              to check the video files. 

[Note]:


Video Resolution: 1280x720P   Video Format: MP4

VIII. Resetting

If for any reason the camera stops working or isn’t working properly, you can reset the 
camera to restore it back to normal operation.

Option1: 

When the camera is powered on, press the Power Button twice to reset all 

settings to factory default. Both LAN and WAN indicator lights will be illuminated for 5 
seconds and then go out. The camera will restart automatically to default settings in 5 
seconds.

Option 2: 

In LAN or WAN mode, tap the gear icon       on the “

Devices

” page and select 

Device Settings

”. Then, tap “

Factory settings

” and tap “

OK

” to confirm. Both LAN and 

WAN indicator lights will be illuminated for 5 seconds and then go out. The camera will 
restart automatically to default settings in 5 seconds.
 

IX. Renaming Camera & Changing Password

>>Please confirm that the camera is added to the APP, and it is online before you start.

9.1. Launch the APP “

Camwf

”.

9.2. Change the camera name as below:
Step 1: Tap the gear icon       on the “

Devices

” page then go to “

User Settings

” page.

Step 2: Clear the default device name and type in names like home, office, bedroom….
Step 3: Tap “

OK

” to confirm the change. 


9.3. Change the password as below:

Step 1: Back to the “

Settings

” page, select “

User Settings

Step 2: On the “

User Settings

” page, type the default password “

888888

” first, enter a 

new password and re-enter it, tap “

OK

” to save the change.


How to check if the new password works?

1. Back to the home page, swipe the camera icon to delete the camera.
 

2. Follow chapter 4.2.3to re-add the camera to the “

Camwf

” APP with the new password.


3. If the camera shows“

Connected

” on thehomepage, it means the password has been 

changed successfully. If it shows “

Wrong Password

”, then you need to reset the 

password.

X. Charging the Backup Battery

10.1. Put the backup battery in place then connect the camera to an outlet AC power 
supply by using the charging adapter and USB cable provided.
10.2. The Battery Charge Indicator Light will be illuminated yellow during the charging 
process.
10.3.It will take 8 hours to obtain a full charge for the backup battery.
10.4. The Battery Charge Indicator Light will turn off when the backup battery is fully 
recharged.

Frequently Asked Questions

Q: Why can’t I find the camera’s WIFI signal on my iPhone or iPad?

A: There are 4solutions to this problem:
1. Take out the backupbattery, plug the camera into an outlet power supply by using the USB 
cable provided. Wait 2 minutes for the WIFI signal SSID to appear.
2. Reset the camera (See VIII),then wait for the WIFI signal SSID to show up.
3. Keep your iPhone or iPad within the camera’s WIFI hotspot range, refreshing the WIFI 
signal page. It may take up to 2 minutes for the hotspot to become recognizable on your 
iPhone or iPad 's WLAN setting page.
4. Shut off your iPhone or iPad’s WLAN function for a while, then turn it on to search again.

Q: Why live video screen shows up black and a searching circle spins in centerbut 
nothing ever displays?

A: If the camera connected WIFI speed is low,wait 10-30 seconds for live video to appear. Or 
you can exit the live video screen and get into the screen again in a minute.

Q: How to play back the video saved in the Micro SD card?

A: Use a card reader to read and play back the video on your PC computer. Or use the 
“Camwf”APP to play back (See 5.5)

Q: How to add the camera to more iPhone or iPad?

A:Make sure that camera is online in WAN mode. Then launch the “

Camwf

” APP on the other 

iPhones or iPads, tap “

+

” icon, choose“

Add Device By ID

”, input the camera UID (a unique 

combination of numbers and letters specific to your camera) and the password to add the 
camera.

Q:What to do if I forget my password?

A:You will have to reset the device to factory settings, then press the Reset Button twice, 
delete the camera in the “Camwf” APP and re-add it with the default password.

Q: The camera does not record any video to the Micro SD card?

A: Power off the camera, take out the Micro SD card, format the SD card, then insert it to the 
SD card slot to try again.

Q: Can I record video directly to my iPhone or iPad’s storage?

A: No.

Q:How many cameras are supported on the mobile application?

A: No limit.

Q: How to turn on the IR LEDs?

A: When the illumination is below 10 lux, the IR LEDs will be turned on automatically. The IR 
distance is 2 meters.

Q: Is there any PC client software I can use on my Mac computer?

A: The PC client software only supports windows operating system. CheckPC client 
software’s video instruction at https://www.youtube.com/watch?v=DeT8Y3tK9eU

Q:Why the camera doesn’t respond after I press the Reset Button twice?

A: If the WAN and LAN indicator lights don’t react like the chapter VIII said, that means you 
didn’t press the Reset Button right. Please try it again.

Q: Why is time display not stable, always blinking?

A: Because the backup battery is low or the outlet power supply is not connected properly.

Summary of Contents for WIFI07

Page 1: ...Overview 1 Camera Lens 2 IR LEDs 3 Set Button 4 Plus Button 5 Rechargeable Backup Battery 6 Micro SD card Slot 7 Power Reset Button 8 WAN Indicator Light 9 LAN Indicator Light 10 Battery Charge Indica...

Page 2: ...once again to save the hour setting and the minute will start flashing then press the Plus Button to adjust the current minute 3 1 4 Press the Set Button to save the minute setting Press the Plus Butt...

Page 3: ...ing page on your iPhone or iPad connect your iPhone or iPad to the camera s WIFI signal named RT Wait for the WIFI to be connected and your phone status bar will appear WIFI symbol as below Note If th...

Page 4: ...4 If the camera shows Connected on the Devices page it means the camera s P2P LAN setup is complete The LAN indicator light will be solid yellow You can check or record video in the P2P LAN mode Note...

Page 5: ...amwf APP 4 3 2 Follow the steps below to set up remote view function Step 1 On the Devices page tap the gear icon then choose Network Settings Step 2 On the Network Settings page tap the search icon a...

Page 6: ...live or recorded video remotely from any location The WAN Indicator light will be solid yellow Tips If the camera shows Connection failed on the Devices page please tap the Refreshing icon and wait fo...

Page 7: ...Note Video Resolution 1280x720P Video Format MP4 VI Recording Video to the Local Micro SD Card Please make sure the camera is successfully added to the APP and it s online before you start 6 1 Launch...

Page 8: ...l record video for 4 hours continuously with the backup battery 3 Video Resolution 1280x720P Video Format MP4 VII Recording Video to Your iPhone or iPad Please make sure the camera is successfully add...

Page 9: ...ps working or isn t working properly you can reset the camera to restore it back to normal operation Option1 When the camera is powered on press the Power Button twice to reset all settings to factory...

Page 10: ...tomatically to default settings in 5 seconds IX Renaming Camera Changing Password Please confirm that the camera is added to the APP and it is online before you start 9 1 Launch the APP Camwf 9 2 Chan...

Page 11: ...ype the default password 888888 first enter a new password and re enter it tap OK to save the change How to check if the new password works 1 Back to the home page swipe the camera icon to delete the...

Page 12: ...dicator Light will turn off when the backup battery is fully recharged Frequently Asked Questions Q Why can t I find the camera s WIFI signal on my iPhone or iPad A There are 4solutions to this proble...

Page 13: ...oose Add Device By ID input the camera UID a unique combination of numbers and letters specific to your camera and the password to add the camera Q What to do if I forget my password A You will have t...

Page 14: ...utube com watch v DeT8Y3tK9eU Q Why the camera doesn t respond after I press the Reset Button twice A If the WAN and LAN indicator lights don t react like the chapter VIII said that means you didn t p...

Page 15: ...t 1 Kameraobjektiv 2 IR LEDs 3 Taste dr cken 4 Plus Taste 5 Wiederaufladbare Unterst tzungsbatterie 6 Mikro Sd Einbauschlitz 7 Netzschalter Reset Taste 8 WAN Anzeigeleuchte 9 LAN Anzeigeleuchte 10 Bat...

Page 16: ...e beginnt zu blinken und dr cken Sie dann die Plus Taste um die aktuelle Stunde einzustellen 3 1 3 Dr cken Sie erneut die Set Taste um die Stundeneinstellung zu speichern und die Minute beginnt zu bli...

Page 17: ...das WIFI Signal der Kamera bereit ist IV Netzwerkeinrichtung 4 1 Installieren Sie die Camwf APP auf Ihrem iPhone oder iPad Suche nach Camwf im App Store und installieren Sie es auf Ihrem iPhone oder i...

Page 18: ...Kamera zum Camwf APP wie folgt hinzu Tippen Sie auf Symbol oben rechts Suchen Sie nach der Kamera Tippen Sie auf die UID der Kamera Tippen Sie auf OK 4 2 4 Wenn die Kamera auf der Seite Ger te Verbund...

Page 19: ...f APP 4 3 2 Gehen Sie folgenderma en vor um die Remote View Funktion einzurichten Schritt 1 Tippen Sie auf der Seite Ger te auf das Zahnradsymbol und dann auf Netzwerkeinstellungen Schritt 2 Tippen Si...

Page 20: ...dus gelangt ist Sie k nnen vorgehen um Live oder aufgezeichnetes Video von einem beliebigen Standort aus zu empfangen Die WAN Anzeige leuchtet gelb Tipps Sollte auf der Seite Ger te auf der Seite Ger...

Page 21: ...Video Recording abzuschlie en 5 5 Wenn eine Bewegung erkannt wird nimmt die Kamera automatisch ein Video auf die Micro SD Karte auf 5 6 Zur ck zur Seite Ger te tippen Sie auf das Zahnradsymbol und geh...

Page 22: ...tigen um die Aufnahmeeinstellungen der SD Karte abzuschlie en und die Kamera nimmt kontinuierlich Video auf die Micro SD Karte auf Befolgen Sie 5 5 um auf die Videodateien zuzugreifen Hinweis 1 Ein V...

Page 23: ...en Diese Video Dateien werden nur in der Anwendung gefunden und kommen ohne Audio 7 3 Zur ck zur Seite Ger te und tippen Sie auf Medien um die Videodateien zu berpr fen Anmerkung Videoentschlie ung 12...

Page 24: ...e dann auf Werkseinstellungen und tippen Sie zur Best tigung auf OK Die LAN und WAN Kontrollleuchten leuchten 5 Sekunden lang und erl schen Die Kamera startet nach 5 Sekunden automatisch auf die Stand...

Page 25: ...Benutzereinstellungen Schritt 2 Geben Sie auf der Seite Benutzereinstellungen zun chst das Standardkennwort 888888 ein geben Sie ein neues Kennwort ein und geben Sie es erneut ein tippen Sie auf OK um...

Page 26: ...d m ssen Sie das Passwort zur cksetzen X Aufladen der Backup Batterie 10 1 Legen Sie die Backup Batterie an Ort und schlie en Sie dann die Kamera an eine Steckdose Wechselstrom Netzteil mit dem Ladead...

Page 27: ...schwarz und ein suchender Kreis dreht sich in der Mitte aber nichts zeigt sich immer A Wenn die WIFI Geschwindigkeit der Kamera niedrig ist warten Sie 10 bis 30 Sekunden bis Live Video erscheint Oder...

Page 28: ...liegt werden die IR LEDs automatisch eingeschaltet Der IR Abstand betr gt 2 Meter F Gibt es irgendeine PC Client Software die ich auf meinem Mac Computer verwenden kann A Die PC Client Software unter...

Page 29: ...yants IR 3 Bouton de R glage 4 Bouton de Plus 5 Batterie de secours rechargeable 6 Emplacement pour carte m moire 7 Bouton d alimentation r initialisation 8 Indicateur lumineux WAN 9 Voyant du r seau...

Page 30: ...et l heure clignote puis appuyez sur la touche Plus pour r gler l heure actuelle 3 1 3 Appuyez nouveau sur le Bouton de R glage pour enregistrer le r glage de l heure et la minute commence clignoter p...

Page 31: ...e que le signal WIFI de l appareil est pr t IV Configuration du r seau 4 1 Installez l application Camwf sur votre iPhone ou iPad Recherchez Camwf dans App Store et installez le sur votre iPhone ou iP...

Page 32: ...omme suit Touchez symbole dans le coin sup rieur droit Rechercher la cam ra Appuyez sur l UID de la cam ra Appuyez sur OK 4 2 4 Si la cam ra affiche Connected sur la page Devices cela signifie que la...

Page 33: ...ous pour configurer la fonction d affichage distance tape 1 Sur la page P riph riques appuyez sur l ic ne en forme de roue dent e puis choisissez Param tres r seau tape 2 Dans la page Param tres r sea...

Page 34: ...r en mode WAN Vous pouvez aller de l avant pour regarder la vid o en direct ou enregistr e distance partir de n importe quel endroit Le voyant de l indicateur WAN est jaune continu Conseils Si la cam...

Page 35: ...z la page P riph riques appuyez sur l ic ne en forme de roue dent e et allez la page Enregistrement SDCarte Vous pouvez t l charger les fichiers vid o et les lire sur votre iPhone ou iPad Note R solut...

Page 36: ...et enregistr toutes les 3 minutes automatiquement 2 Si la prise de courant est coup e la cam ra peut toujours enregistrer la vid o pendant 4 heures en continu avec la batterie de secours 3 R solution...

Page 37: ...e raison que ce soit la cam ra s arr te de fonctionner ou ne fonctionne pas correctement vous pouvez r initialiser la cam ra pour le r tablir en mode normal Option1 Lorsque la cam ra est sous tension...

Page 38: ...atiquement aux r glages par d faut en 5 secondes IX Renommer la cam ra et changer le mot de passe Veuillez confirmer que la cam ra est ajout l APP et qu il est en ligne avant de commencer 9 1 Lancez l...

Page 39: ...e Param tres utilisateur saisissez d abord le mot de passe par d faut 888888 entrez un nouveau mot de passe et saisissez le nouveau appuyez sur OK pour enregistrer la modification Comment v rifier si...

Page 40: ...odifi avec succ s S il affiche Mot de passe incorrect vous devez r initialiser le mot de passe X Chargement de la batterie de secours 10 1 Mettez la batterie de secours en place puis connectez la cam...

Page 41: ...iguration WLAN de votre iPhone ou iPad 4 Fermez la fonction WLAN de votre iPhone ou iPad pendant un certain temps puis activez la pour effectuer une nouvelle recherche Q Pourquoi l cran vid o en direc...

Page 42: ...l clairage est inf rieur 10 lux les voyants IR s allument automatiquement La distance IR est de 2 m tres Q Y at il un logiciel client PC que je peux utiliser sur mon ordinateur Mac R Le logiciel clien...

Page 43: ...one del prodotto 1 Camera Lens 2 LED IR 3 Tasto Set 4 Pulsante Pi 5 batteria ricaricabile di sostegno Slot carta 6 micro SD 7 Alimentazione Reset 8 Spia WAN 9 Luce indicatore LAN 10 carica della batte...

Page 44: ...volta per salvare l impostazione ora e minuto inizier a lampeggiare quindi premere il pulsante pi per regolare i minuti correnti 3 1 4 Premere il tasto Set per salvare l impostazione dei minuti Preme...

Page 45: ...4 2 1 Vai alla pagina Impostazioni WLAN sul vostro iPhone o iPad collegare il vostro iPhone o iPad al segnale Wi Fi della fotocamera denominata RT Attendere che il Wi Fi per collegare e apparir la ba...

Page 46: ...amera mostra Connected sulla pagina Devices significa P2P LAN di impostazione della fotocamera completo La spia LAN sar giallo solido possibile controllare o registrare video in modalit P2P LAN Nota I...

Page 47: ...gi di seguito per configurare funzione di visualizzazione remota Fase 1 Nella pagina Devices toccare l icona ingranaggio quindi scegliere Impostazioni di rete Fase 2 Nella pagina Impostazioni di rete...

Page 48: ...vanti per visualizzare video in diretta o registrato in remoto da qualsiasi luogo La spia WAN sar giallo solido Punte Se il display della fotocamera Connessione fallita sulla pagina Devices si prega d...

Page 49: ...da Micro SD 5 6 Torna alla pagina Devices toccare l icona ingranaggio e vai alla pagina SDCard Record possibile scaricare i file video e riprodurli sul vostro iPhone o iPad Nota Risoluzione video 1280...

Page 50: ...e ogni 3 minuti 2 Se la presa di corrente viene interrotta la fotocamera pu ancora registrare video per 4 ore continuamente con la batteria di backup 3 Risoluzione video 1280x720P Formato video MP4 VI...

Page 51: ...on funziona correttamente possibile ripristinare la telecamera per ripristinare di nuovo al normale funzionamento Opzione 1 Quando la fotocamera accesa premere il pulsante di accensione due volte per...

Page 52: ...stazioni predefinite in 5 secondi IX Rinominare Camera Modifica della password Si prega di confermare che la fotocamera viene aggiunto alla APP ed in linea prima di iniziare 9 1 Lanciare l applicazion...

Page 53: ...te Fase 2 Nella pagina Impostazioni utente digitare la password predefinita 888888 prima inserire una nuova password e reinserirla toccare OK per salvare la modifica Come controllare se la nuova passw...

Page 54: ...ra avete bisogno di reimpostare la password X Ricarica della batteria di backup 10 1 Mettere la batteria di backup in luogo quindi collegare la fotocamera a una presa di alimentazione CA utilizzando l...

Page 55: ...nere il vostro iPhone o la funzione WLAN di iPad per un po quindi accenderlo per cercare di nuovo D Perch schermo video dal vivo si presenta in bianco e un cerchio di ricerca gira in centro ma non sem...

Page 56: ...mobile A Nessun limite D Come attivare i LED IR A Quando l illuminazione inferiore a 10 lux i LED IR si accenderanno automaticamente La distanza IR di 2 metri D Esiste un software client PC posso usa...

Page 57: ...de C mara 2 LEDs Infrarrojos 3 Bot n de Set 4 Bot n de Plus 5 Bater a de Reserva Recargable 6 Ranura para tarjeta Micro SD 7 Bot n de Potencia Reseteo 8 Luz Indicadora de WAN 9 Luz Indicadora de LAN 1...

Page 58: ...sione el Bot n de Plus para ajustar la hora actual 3 1 3 Presione el Bot n de Set otra vez para guardar el ajuste de hora y los minutos comenzar n a parpadear luego presione el Bot n de Plus para ajus...

Page 59: ...en App Store e inst lelo en su iPhone o iPad 4 2 Configuraci n de la Conexi n P2P Modo LAN 4 2 1 Vaya a la p gina de Configuraci n de WLAN de su iPhone o iPad conecte su iPhone o iPad a la se al WIFI...

Page 60: ...nectado en la p gina Dispositivos significa que la configuraci n de P2P LAN de la c mara est completa La luz indicadora de LAN ser de color amarillo s lido Puede comprobar o grabar v deo en el modo P2...

Page 61: ...uaci n para configurar la funci n de vista remota Paso 1 En la p gina Dispositivos toque el icono de rueda dentada y elija Configuraci n de Red Paso 2 En la p gina Configuraci n de Red toque el icono...

Page 62: ...rma remota desde cualquier ubicaci n La luz indicadora WAN ser de color amarillo s lido Sugerencias Si la c mara muestra Conexi n fallida en la p gina Dispositivos toque el icono Refrescar y espere 1...

Page 63: ...ispositivos toque el icono de rueda dentada y vaya a la p gina Grabaci n en Tarjeta SD Puede descargar los archivos de v deo y reproducirlos en su iPhone o iPad Nota Resoluci n de video 1280x720P Form...

Page 64: ...chivos de v deo Nota 1 Un video clip se generar y se guardar cada 3 minutos autom ticamente 2 Si se corta la fuente de alimentaci n de salida la c mara puede grabar v deo durante 4 horas continuamente...

Page 65: ...e en Medios para comprobar los archivos de v deo Nota Resoluci n de video 1280x720P Formato de video MP4 VIII Resteo Si por alg n motivo la c mara deja de funcionar o no funciona correctamente puede r...

Page 66: ...luces indicadoras LAN y WAN se iluminar n durante 5 segundos y luego se apagar n La c mara se reiniciar autom ticamente a la configuraci n predeterminada en 5 segundos IX Cambiar el Nombre de la C mar...

Page 67: ...del Usuario Paso 2 En la p gina Configuraci n del Usuario escriba la contrase a por defecto 888888 primero ingrese una nueva contrase a y vuelva a ingresarla toque OK para guardar el cambio C mo compr...

Page 68: ...tra Contrase a Incorrecta debe restablecer la contrase a X Carga de la Bater a de Reserva 10 1 Coloque la bater a de reserva en su lugar y conecte la c mara a una toma de corriente de AC utilizando el...

Page 69: ...Apague la funci n WLAN de su iPhone o iPad durante un tiempo y luego enci ndala para buscar de nuevo P Por qu la pantalla de video en vivo aparece en negro y un c rculo de b squeda gira en el centro...

Page 70: ...LEDs IR R Cuando la iluminaci n es inferior a 10 lux los LED IR se encender n autom ticamente La distancia IR es de 2 metros P Hay alg n software de cliente de PC que pueda usar en mi computadora Mac...

Page 71: ...WIFI07 IOS I 1 2 LED 3 4 5 6 SD 7 8 WAN 9 LAN 10 11 12 USB...

Page 72: ...II 1 WIFI 1 USB 1 AC110 240V DC 5V 1 8GB SD Micro SD 1 III 3 1 3 1 1 AC 3 1 2 1 3 1 3 3 1 4 12 24 1 3 2 WIFI 3 2 1 8GB Micro SD SD Micro SD SDHC Class 10 Micro SD 3 2 2 2 15 LAN WIFI...

Page 73: ...IV 4 1 iPhone iPad Camwf APP App Store Camwf iPhone iPad 4 2 P2P LAN 4 2 1 iPhone iPad WLAN iPhone iPad WIFI RT WIFI WIFI WIFI VIII X 4 2 2 Camwf APP 4 2 3 Camwf APP UID OK...

Page 74: ...4 2 4 P2P LAN LAN P2P LAN P2P LAN 15 49...

Page 75: ...4 3 WAN APP P2P LAN 4 3 1 Camwf APP 4 3 2 1 2 WIFI 3 OK 4 Camwf APP...

Page 76: ...1 iPhone iPad WLAN WIFI iPhone iPad iPhone iPad WIFI WLAN 2 iPhone iPad Camwf APP WAN WAN 1 VIII V APP 5 1 Camwf APP 5 2 5 3 SD 5 4...

Page 77: ...5 5 Micro SD 5 6 SD iPhone iPad 1280x720P MP4 VI SD APP 6 1 Camwf APP 6 2...

Page 78: ...6 3 SD 6 4 SD Micro SD 5 5 1 3 2 4 3 1280x720P MP4 VII iPhone iPad APP 7 1 Camwf APP 7 2...

Page 79: ...7 3 1280x720P MP4 VIII 1 2 LAN WAN 5 5...

Page 80: ...2 LAN WAN OK LAN WAN 5 5 IX APP 9 1 APP Camwf 9 2 1 2 3 OK...

Page 81: ...9 3 1 2 888888 OK 1 2 4 2 3 Camwf APP...

Page 82: ...3 Wrong Password X 10 1 USB AC 10 2 10 3 8 10 4 Q iPhone iPad WIFI A 4 1 USB WIFI SSID 2 2 VIII WIFI SSID 3 iPhone iPad WIFI WIFI iPhone iPad WLAN 2 4 iPhone iPad WLAN...

Page 83: ...Q A WIFI 10 30 1 Q Micro SD A PC Camwf APP 5 5 Q iPhone iPad A WAN iPhone iPad Camwf APP Add Device By ID UID Q A 2 Camwf APP Q Micro SD A Micro SD SD SD Q iPhone iPad A Q A Q IR LED A 10 IR LED 2...

Page 84: ...Q Mac PC A PC Windows PC URL https www youtube com watch v DeT8Y3tK9eU Q 2 A WAN LAN VIII Q A...

Reviews: