background image

1 of 13

WX-501-0531 • 01.22

Using the Click 301

The Click 301 serial to Ethernet converter changes half-duplex two-wire RS-232 and RS-485 communication to 

Ethernet and vice versa. Use this device in a cabinet to transfer data from a sensor to your computer or traffic 

operations center via a wired network connection.
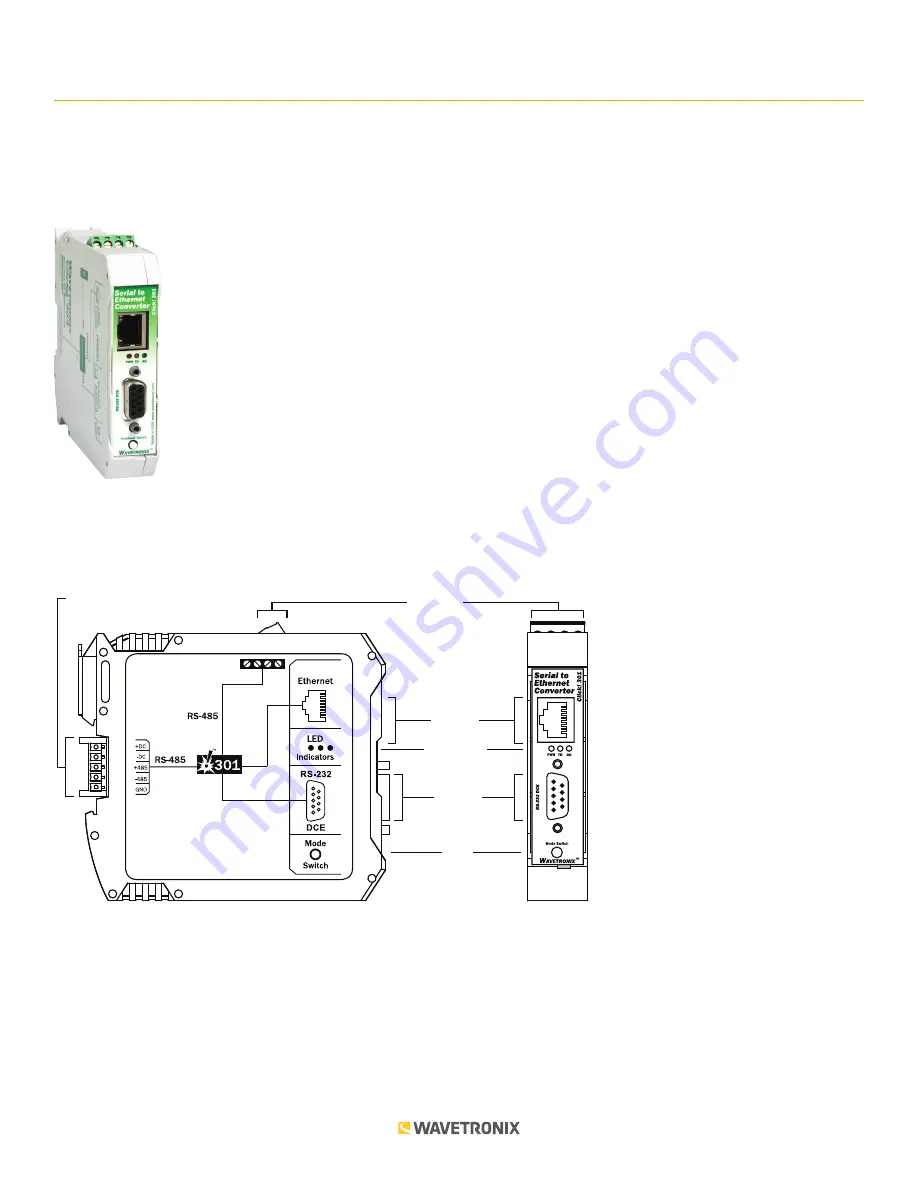
Physical Features

The Click 301 has several communication ports, as well as features for configuration (see the figure below).

Mode

Switch

LED Indicators

RS-485

Connector

RS-232

Connector

Ethernet

Connector

T-Bus

Connector

TOP

FRONT

Communication Ports

The back of the Click 301 features a 5-position connector that plugs into a T-bus connector and provides power 

and RS-485 communication to the device. It also passes RS-485 communication from the module to all other 

devices on the T-bus.

The top of the device has a pluggable screw terminal block that features -485, one +485 and two ground screw 

terminals for wiring RS-485 communication. This screw terminal block can be removed for easy preinstallation 

0531

Summary of Contents for click 301

Page 1: ...uration see the figure below Mode Switch LED Indicators RS 485 Connector RS 232 Connector Ethernet Connector T Bus Connector TOP FRONT Communication Ports The back of the Click 301 features a 5 position connector that plugs into a T bus connector and provides power and RS 485 communication to the device It also passes RS 485 communication from the module to all other devices on the T bus The top o...

Page 2: ...ched A quick press and release of the push button will exit out of any mode and return the unit back to normal operation The table below and the following sections describe the different operating modes Mode LED Definition Autobaud Green solid To autobaud the Click 301 press the push button then release when the green LED turns on Reset Red flashing To reset the Click 301 to factory defaults press...

Page 3: ...Use the list below to find the appropriate driver for your application If you intend to connect from your TOC to the Click 301 to a sensor use the SmartSensor driver If you intend to connect from your TOC to a Click 301 to another Click 301 to the sensor use the Point to Point driver To see advanced settings use the Expert driver This driver which exposes every available field for the Click 301 sh...

Page 4: ...another device on the network has the same ID number Baud Rate Allows you to change the baud rate at which the device connects to the sensor IP Address Lets you view and change the IP address currently assigned to the device Each Click 301 defaults to an IP address of 172 16 0 13 IP Port Lets you view and change the IP port currently assigned to the device Each Click 301 defaults to 10001 In addit...

Page 5: ...o the item in question If no problems are detected a green circle will appear Once you have finished use the menu bar at the top of the screen to save your settings return to the Select Driver screen and more The Save menu allows you to save your settings Select Save to File to save your settings to a file Selecting this will open a directory box allowing you to name your settings file This file w...

Page 6: ...eing configured This is only for your information and does not affect the operation of the device Location Displays the location of the device being configured This is only for your information and does not affect the operation of the device Serial Number Displays the serial number of your device Firmware Version Shows the version of firmware your device currently has installed If Click Supervisor...

Page 7: ...device autobauds see the figure and table below Setting Description Command Allows you to set the command sent from the device during the autobaud process Don t change these values unless instructed to by Wavetronix Technical Services Response Shows the response the device is expecting from the above command Don t change these values unless instructed to by Wavetronix Technical Services SmartSenso...

Page 8: ...onfiguring should connect to Each Click 301 defaults to a remote IP address of 172 16 0 14 Remote TCP Port Allows you to enter the port of the Click 301 that the Click 301 you re configuring should connect to Each Click 301 defaults to a remote port of 10001 Auto Increment Increments the local port number for new outgoing connections automatically The range of auto incremented port numbers is 50 0...

Page 9: ...of the web server port number The valid range is 1 65535 The default port is 80 The Ethernet Channel Connect tab defines how the unit makes a connection see the figure and table below Setting Description Incoming Connection Allows you to configure how the device reacts to incoming connections over the network Never rejects all external connection attempts Accept DTR accepts external connection req...

Page 10: ...ached serial device It accepts AT style modem commands and handles the modem signals correctly Input Buffer Allows you to choose circumstances under which the input buffer will be flushed On Active clears the input buffer when a connection is initiated from the device to the network On Passive clears the input buffer when a connection is initiated from the network to the device At Disconn clears t...

Page 11: ...e disconnect request Inactivity Timeout Sets the amount of time there can be no activity on the serial line before the device drops the connection Telnet Name Port Password Lets you enter either the Telnet name you re using or the password for the serial port depending on which of those two boxes Telnet Mode or Port Password is checked The Ethernet Channel Packing tab allows you to configure packi...

Page 12: ...e host list supports a minimum of 1 and a maximum of 12 entries Each entry contains an IP address and a port number The host list is flowed onto three third level tabs If you need to enter more than the three host IP addresses on the first screen go to the IP 4 9 and IP 10 12 third level tabs The three third level tabs below Ethernet Hostlist allow you to configure the hostlist see the figure and ...

Page 13: ...our settings Select Save to File to save your settings to a file Selecting this will open a directory box allowing you to name your settings file This file will always be saved in the Wavetronix folder created when you installed Click Supervisor under Wavetronix ClickHome Drivers 301 User You can also select Save to Device to save your settings to your Click 301 Note If you do not save your settin...

Reviews: