Warmhaus Minerwa 25 System IE, Installation & Service Manual
The Warmhaus Minerwa 25 System IE is a high-efficiency boiler system that provides reliable heating for your home. For detailed instructions on installation and servicing, download the free Installation & Service Manual from our website. Ensure proper maintenance and operation of your Warmhaus Minerwa 25 System IE with this comprehensive manual.
Share
Download


Reviews:
No comments
Related manuals for Minerwa 25 System IE

Altherma 3 H F
Brand: Daikin Pages: 24

BioWIN 2
Brand: Windhager Pages: 59

Gas 220 Ace 160
Brand: REMEHA Pages: 92

LAARS OmniTherm ONH1250
Brand: Bradford White Pages: 132
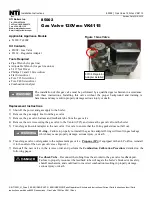
85002
Brand: NTI Pages: 4

NIKE Mini Export
Brand: Immergas Pages: 32

BGE 10
Brand: Truma Pages: 60

RESIDENTIAL INDOOR GAS FIRED BOILERS 39006DP4-A
Brand: Bryant Pages: 6

Solo 18
Brand: ACV Pages: 48

GB10
Brand: gledhill Pages: 41

SIRENA CAL HFD
Brand: DOMUSA TEKNIK Pages: 32

BLUEHELIX TECH A
Brand: Ferroli Pages: 88

24Si II series
Brand: Worcester Pages: 65

Geneva C3
Brand: Strebel Pages: 16

S-AF
Brand: Strebel Pages: 64

ML 125 GT
Brand: Strebel Pages: 19

S-HQ
Brand: Strebel Pages: 43

S-FX 125
Brand: Strebel Pages: 68


