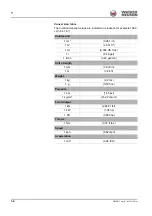
manualshive.com logo in svg
background image

Track Excavator

EZ17

OPERATOR’S MANUAL

5200019151

1.0

0314


www.wackerneuson.com

5

2

0

0

0

1

9

1

5

1

This Operator's Manual include

s


t

he 

AEM 

S

af

et

M

anual


Содержание EZ17

Страница 1: ...Track Excavator EZ17 OPERATOR S MANUAL 5200019151 1 0 0314 www wackerneuson com 5 2 0 0 0 1 9 1 5 1 This Operator s Manual includes the AEM Safety Manual...

Страница 2: ...n whole or part without the written consent of Wacker Neuson Linz GmbH Violations of legal regulations in particular of the copyright protection will be subject to civil and criminal prosecu tion Wack...

Страница 3: ...1 Machine overview 3 1 3 2 Brief description of the machine 3 2 3 3 Notices and regulations on use 3 4 3 4 Labels 3 7 4 Putting into operation 4 1 Cab control stand 4 1 4 2 Control element overview 4...

Страница 4: ...ystem 7 47 7 18 Tires tracks 7 48 7 19 Maintenance of attachments 7 51 7 20 Maintenance of options 7 51 8 Troubleshooting 8 1 Diesel engine malfunctions 8 1 8 2 Malfunctions of the traveling drive 8 2...

Страница 5: ...ppendix XI DGUV Test Pr f und Zertifizierungsstelle Fachbereich Bauwesen Landsberger Str 309 D 80687 Munich Distinguishing EU number 0515 Notified body according to Directive 2000 14 EC appendix VI T...

Страница 6: ...W Measured sound power level 93 3 dB A Guaranteed sound power level 93 0 dB A Directives and standards We hereby declare that this product corresponds to the relevant regulations and requirements of t...

Страница 7: ...in the Operator s Manual This is why the Operator s Manual must always be kept at hand in the machine The operator must carefully read and understand the Operator s Manual before starting up servicin...

Страница 8: ...list B Continuation of an alphabetical list Cross references see page 1 1 page Cross references 7 pos no or table no Cross references Fig 5 fig no 1 Cross references see chapter 5 2 Accelerator actua...

Страница 9: ...ucture FOPS Falling Objects Protective Structure FGPS Front Guard Protective Structure AUX Auxiliary hydraulic circuit B Width NE Nominal width PS Stabilizer blade LS Stick HSWS Hydraulic Easy Lock qu...

Страница 10: ...e unit 1 cm 0 061 in 1 m 35 31 ft 1 ml 0 034 US fl oz 1 l 0 26 gal 1 l min 0 26 gal min Unit of length 1 mm 0 039 in 1 m 3 28 ft Weight 1 kg 2 2 lbs 1 g 0 035 oz Pressure 1 bar 14 5 psi 1 kg cm 14 22...

Страница 11: ...d by these modifica tions shall not be applicable The safety of the machine can be negatively affected by performing machine modifications without proper authority and by using spare parts equipment a...

Страница 12: ...1 6 OM EZ17 us 1 0 ez17v100 fm 1 Notes...

Страница 13: ...id injury or death WARNING WARNING indicates a hazardous situation which if not avoided could result in death or serious injury Consequences in case of non observance Obey all safety messages that fol...

Страница 14: ...gnated use also includes observing the instructions set forth in this Operator s Manual and observing the maintenance schedule 4 Machine safety can be negatively affected by performing machine modific...

Страница 15: ...perating or servicing persons to wear protective clothing and safety equipment Operator training and knowledge Always keep this Operator s Manual and other manuals that accompany the machine in their...

Страница 16: ...under any circumstances Machines with a maximum authorized lifting capacity of over 1000 kg 2 205 lbs or an overturning moment of over 40 000 Nm 29 500 ft lbs may be used for lifting gear application...

Страница 17: ...nd only after the machine operator has given his permission The machine operator may give his permission only after the machine is at a standstill and the work attachment no longer moves General instr...

Страница 18: ...quipment on the undercarriage and the steering and brake systems can be performed only by skilled individuals who have been specially trained for such work Work on the hydraulic system of the machine...

Страница 19: ...which a heater plug intake air pre heating is used at the same time Make sure the control levers the signaling and the light systems are functional before operating the machine and also before restart...

Страница 20: ...itions Never get on or off a moving machine and do not jump off the machine The travel control levers require practice before an operator becomes familiar with the control response Therefore adjust th...

Страница 21: ...load This applies for example to lifting and lowering pipes shaft rings or containers The excavator may be used for applications with lifting gear ONLY if the prescribed safety devices are in place a...

Страница 22: ...Do not attach the attachment with the engine running and the machine moving Before putting the machine attachment into operation startup moving make sure that no one in the immediate vicinity will be...

Страница 23: ...y Guidelines for Maintenance General maintenance notes Adhere to prescribed intervals or those specified in this Operator s Manual for routine checks inspections and maintenance on or with the machine...

Страница 24: ...nt of the machine and its safety oriented devices or any work related to inspection and maintenance Prior to performing assembly work on the machine stabilize the area under repair and use proper lift...

Страница 25: ...maintenance repair work Do not use aggressive detergents Use lint free cleaning rags Before cleaning the machine with water steam jet high pressure cleaner or detergents cover or tape up all openings...

Страница 26: ...re check the tracks regularly for cracks cuts or other damage Check track tension at regular intervals Electric energy Use only original fuses with the specified current rating In case of electrical s...

Страница 27: ...especially important when performing hammer operations or working in enclosed areas MSDS When handling oil grease and other chemical substances such as battery electrolyte or hydraulic fluid observe...

Страница 28: ...UTES Engine exhaust contains carbon monoxide This is a poison you cannot see or smell Never run the machine indoors or in an enclosed area such as a deep trench unless adequate ventilation through suc...

Страница 29: ...t on boom 8 Eye hook for tying down the machine 2 Roof lights option 9 Stabilizer blade 3 Lifting eye 10 Travel gear 4 Rotating beacon option 11 Handle 5 Engine cover 12 Extra weight option 6 Fuel tan...

Страница 30: ...rther applications The main components of the machine are Travel gear Travel gear Stabilizer blade Live ring Upper carriage Canopy Water cooled diesel engine Hydraulic and electrical components Boom I...

Страница 31: ...ure Installing a protective Front Guard structure according to EN 474 5 item 5 3 2 1 is not possible Only perform work that does not require a protective Front Guard structure Definition of FOPS Front...

Страница 32: ...the risk Designated use also includes observing the instructions set forth in the Operator s Manual and observing the maintenance and service conditions The machine may not be used for transport jobs...

Страница 33: ...ickhitch etc EZ17 without quickhitch Bucket type Width Capacity Weight Bucket 250 mm 10 in 30 kg 66 lbs 0 023 m3 0 81 ft3 Bucket 300 mm 12 in 32 kg 71 lbs 0 028 m3 0 99 ft3 Bucket standard bucket 400...

Страница 34: ...ck quickhitch Bucket type Width Capacity Weight EZ17 equipment Attachments Weight Hammer bracket HS 02 NE 8 NE 12 13 8 kg 66 lbs Hammer NE 8 88 kg 149 lbs Hammer NE 12 110 kg 242 5 lbs Hydraulic Easy...

Страница 35: ...4 Fig 5 Description of attachment HYDRAULIC EXCAVA TOR Fahrzeug Seriennummer serial no no de s rie Machine serial number Fahrzeug Modell model mod le Machine designation Leistung performance Engine ou...

Страница 36: ...abel is located behind the seat on the chassis Engine number The type label is located on the valve cover engine Hydraulic quickhitch The serial number is located on the type label The type label is l...

Страница 37: ...ertilt is stamped in the housing near the hydraulic connections The serial number of the hydraulic quickhitch is located on the type label The type label is located on the hydraulic quickhitch fork FO...

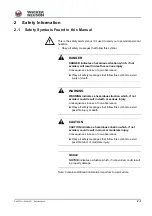
Страница 38: ...3 10 OM EZ17 us 1 0 ez17e300 fm 3 Warning labels Fig 11 symbolic representation...

Страница 39: ...e lubrication system Meaning Crushing hazard Stay clear of the machine s danger zone during operation Position At the front of the chassis near the swiveling console Meaning Explosion hazard due to wr...

Страница 40: ...m Read and understand the Operator s Manual Position Inside on the right Meaning option If the specified weight or mass values are exceeded there is crushing hazard causing serious injuries and even d...

Страница 41: ...the machine When traveling on slopes pay attention to the maximum gradient angle and maximum lateral angle of inclination Do not use high speed During machine operation maintain a safe distance from...

Страница 42: ...down Burn hazard due to hot fluid Injury hazard due to fluid escaping under pressure Let the engine cool down Release the pressure in the hydraulic system and open the covers carefully Meaning Crushi...

Страница 43: ...OM EZ17 us 1 0 ez17e300 fm 3 15 3 Labels Fig 24 symbolic representation...

Страница 44: ...radable hydraulic oil Position Next to the filler inlet of the hydraulic oil reservoir Meaning Indicates the lifting points of the machine Position At the upper left and right of the roof Meaning opti...

Страница 45: ...n lubrication every 10 hours or daily Position On the upper carriage at the front right in traveling direction Meaning Reflector at the rear Position On either side of the machine at the rear Meaning...

Страница 46: ...he headliner Meaning This label describes the functions of the pedals and control levers Operating Pattern A ISO controls Check before starting the machine the operating pattern that has been chosen P...

Страница 47: ...3 Meaning Indication of maintenance intervals Position On the roof window on the left in traveling direction Meaning This label describes the functions of the hydraulic Easy Lock quickhitch Position...

Страница 48: ...3 20 OM EZ17 us 1 0 ez17e300 fm 3 Notes...

Страница 49: ...when entering or exiting Entering or exiting incorrectly can cause injuries Keep the mandatory climbing aids A clean and use them for entering and exiting Face the machine as you enter and leave it Ha...

Страница 50: ...top and park the machine Stop the engine See Preparing lubrication 2 Roll up the rear tarp and secure it with both straps A 3 Push the rear tarp into the frame or pull it out of the rail under it Hook...

Страница 51: ...top and park the machine Stop the engine See Preparing lubrication 2 Unhitch both straps A and unroll the rear tarp 3 Fasten straps C at the 8 fastening points outside the canopy Do not unhitch both u...

Страница 52: ...justment An incorrect weight adjustment can cause injuries to the spinal cord Ensure that the seat is correctly adjusted to the operator s weight before starting machine travel or operation No load mu...

Страница 53: ...The seat may only be adjusted while the operator s back touches the backrest 2 Pull and hold lever B upward on the left 3 Move the seat to the required position and release the lever and let it lock...

Страница 54: ...ed or dirty seat belt A damaged or dirty seat belt can cause serious injuries or death Keep the seat belt and buckle clean and check them for damage Have a damaged seat belt and buckle immediately rep...

Страница 55: ...elt 1 Insert buckle latch A into seat belt buckle B with an audible click Unfastening the retracting seat belt 1 Press the red pushbutton switch D on seat belt buckle B until the buckle latch comes ou...

Страница 56: ...ors guide for example Additional equipment or attachments must not be installed if they impair visibility WARNING Accident hazard due to incorrect adjustment of visual aids Incorrectly adjusted visual...

Страница 57: ...machine in the left hand mirror Ensure visibility of the rear right edge of the machine in the right hand mirror Information Set the machine to travel position before adjusting the mirrors see Travel...

Страница 58: ...heck of control lever base Perform a functional check of the control lever base every time before you start the machine 1 Start the machine 2 Lower the control lever base 3 Travel on open terrain 4 Se...

Страница 59: ...ilable neither as standard nor optional equipment If necessary a fire extinguisher according to NFPA must be installed by a Wacker Neuson service center Fasten an appropriate bracket on the chassis be...

Страница 60: ...ker Neuson service center in case of doubt Retrofit assembly and repair work may only be performed by a Wacker Neuson service center Replace self locking fasteners Information Machine operation is onl...

Страница 61: ...ner must ensure that the hazard situation is evaluated and that the national regulations are observed The machine owner must ensure that only work is performed that does not require any higher protect...

Страница 62: ...4 14 OM EZ17 us 1 0 ez17i400 fm 4 6 Install the lights in positions C option 7 Install the mirror on the left and right in positions D option Fig 58 C Fig 59 D...

Страница 63: ...AUTION Accident hazard in conditions of restricted visibility due to rain snowfall dust etc Restricted visibility can cause serious injuries or death Resume work only if visibility is no longer restri...

Страница 64: ...other attachment can result in a different work range Installing 1 2 persons are required for installing 2 Stop and park the machine Stop the engine See Preparing lubrication 3 Install shatter protect...

Страница 65: ...0 ez17i400 fm 4 17 4 Checking the screw connections of the canopy 4 Tighten screws A on the left and right to 110 Nm 81 ft lbs 5 Tighten rear screws B on the left and right to 110 Nm 81 ft lbs Fig 64...

Страница 66: ...4 18 OM EZ17 us 1 0 ez17i400 fm 4 Socket The machine is equpped with a 12 V socket on the right Fig 66...

Страница 67: ...Control element overview This chapter describes the controls and contains information on the function and handling of the indicator lights and controls on the machine The pages stated in the table ref...

Страница 68: ...4 20 OM EZ17 us 1 0 ez17i400 fm 4 Canopy 3 2 4 11 13 9 21 14 16 10 22 Fig 67 Proportional controls Fig 67 Standard controls 15 1 5 6 7 12 6 19 20 8 18 17...

Страница 69: ...r 9 Travel speed changeover 5 1 10 Stabilizer blade lever 5 18 11 Display element 4 22 12 Starter 4 30 13 Seat 4 4 14 Throttle 5 1 15 ISO SAE changeover option 5 17 16 Changeover for stabilizer blade...

Страница 70: ...4 22 OM EZ17 us 1 0 ez17i400 fm 4 Display element and switches Fig 68 Switch panel on left hand control lever base 38 39 40 26 27 25 28 29 30 31 32 34 35 33 36 36 37 41 42 43...

Страница 71: ...e 4 24 30 Preheating 4 24 31 Safe load indicator light 4 24 32 Coolant temperature 4 25 33 For a Wacker Neuson service center 34 Hour meter maintenance meter 4 25 35 Hour meter maintenance meter chang...

Страница 72: ...illuminates The electrical system works if the indicator light of the electrical system goes out within one minute Engine oil pressure The indicator light red illuminates and the buzzer sounds Stop t...

Страница 73: ...perature of the engine The indicator light illuminates if the segments reach the red range Let the engine run at idling speed without any load Wait until the temperature drops and the indicator light...

Страница 74: ...he instructions in this Operator s Manual The operator must observe the local regulations Perform a functional check of the control lever base Perform a functional check of the safe load indicator opt...

Страница 75: ...fuel filter checked and drained if necessary 7 30 7 31 3 Correct engine oil level 7 32 4 Coolant level OK 7 34 5 Correct oil level in the hydraulic oil reservoir 7 42 6 Lubrication points greased 7 6...

Страница 76: ...ine in normal range 4 25 4 Do the pedals and control levers work correctly 5 12 5 Performed functional check of control lever base 4 10 No Question Page 1 Attachment lowered to the ground 5 34 5 38 2...

Страница 77: ...arefully during its first 50 operating hours Do not load a cold engine Warm up the machine at low engine speed and little load do not warm it up at a standstill Do not change engine speed abruptly Avo...

Страница 78: ...t interlock Do not run the starter for more than 10 seconds Wait about 1 minute so the battery can recover and the starter does not overheat before trying again Information Ensure that there is suffic...

Страница 79: ...il the engine starts All indicator lights go out If the engine does not start after 10 seconds Interrupt the start procedure and repeat it after about 1 minute If the engine still does not start after...

Страница 80: ...o machine due to electrical short circuit or overvoltage The positive terminal of the starting battery must not be brought into contact with electrically conductive vehicle parts NOTICE Damage to mach...

Страница 81: ...negative terminal of the starting battery 5 Connect the other end of the black battery jumper cable onto a solid metal component fimly screwed on the engine block or onto the engine block itself Do n...

Страница 82: ...w load operation are Increased engine oil consumption Engine oil in the exhaust system causes engine contamination Blue smoke in exhaust gas Stopping the engine NOTICE Engine damage by stopping the en...

Страница 83: ...el speeds that can be selected with the stabilizer blade lever 25 Normal speed Check the selected speed on the display element The high speed symbol does not illuminate Switch in position 0 High speed...

Страница 84: ...the automatic hydraulic brake valves prevent the machine from traveling faster than the admissible travel speed Information Reduce travel speed with the travel levers and not with the engine speed co...

Страница 85: ...unless the control lever base is folded down Stopping see chapter Hydraulic brake on page 5 2 Operating temperature range The following operating conditions must be fulfilled in order to ensure optima...

Страница 86: ...downhill or uphill with a full attachment Traveling diagonally on slopes is prohibited Stones and the humidity in the upper layer of the ground can drastically affect machine traction and stability T...

Страница 87: ...canopy must face uphill Set the stabilizer blade uphill Raise the boom about 20 30 cm 8 12 in off the ground and position it straight ahead at the center of the machine Do not exceed a maximum gradie...

Страница 88: ...angle of inclination Do not exceed a maximum lateral angle of inclination of 10 On lateral inclinations over 10 pile up material to create a horizontal firm and level surface that can be used as a pla...

Страница 89: ...repeatedly to release the pressure in the hydraulic system 6 Remove the starting key and carry it with you 7 Raise the control lever base 8 Close and lock all covers 9 Secure the tracks accordingly c...

Страница 90: ...gain if sufficient illumination on the job site can be ensured without blinding motorists Information Switch on the working lights in poor light conditions If illumination still is not sufficient use...

Страница 91: ...be fastened on the roof with a magnetic bracket Line routing on A pillar on the right Connection A is located on the right in the machine The rotating beacon illuminates once the connection is establ...

Страница 92: ...traveling forward backward Severe crushing hazard causing death or serious injuries Ensure that no one is in the danger zone Do not rely on the travel alarm under any circumstances If the travel alar...

Страница 93: ...OM EZ17 us 1 0 ez17b500 fm 5 11 5 5 7 Wiper wash system Not available 5 8 Heating ventilation and air conditioning system Not available...

Страница 94: ...hand track forward Right hand track forward Left hand track reverse Right hand track reverse Extend stick Swivel upper carriage to the right Retract stick Swivel upper carriage to the left Swivel boo...

Страница 95: ...track forward Right hand track forward Left hand track reverse Right hand track reverse Extend stick Swivel upper carriage to the right Retract stick Swivel upper carriage to the left Swivel boom to...

Страница 96: ...that both tracks move as you change direction The stabilizer blade side is the front side main traveling direction The travel movements of the machine are controlled with the travel levers The travel...

Страница 97: ...the swiveling range of the machine can be seriously injured Ensure that no one is in the swiveling range The upper carriage protrudes beyond the tracks if the machine is equipped with the extra weigh...

Страница 98: ...owly if the control lever is not pressed as far If the upper carriage is supposed to be rotated on a slope operate the control lever carefully to avoid fast movements Hydraulic swivel unit brake The u...

Страница 99: ...eover lever of the directional valve Do not operate the machine with a malfunctioning wing nut Contact a Wacker Neuson service center and replace the malfunctioning wing nut The changeover valve is lo...

Страница 100: ...Information Lowering the stabilizer blade too deeply into the ground can create a high resistance Slightly raise the stabilizer blade The clearance between the stabilizer blade and the ground should b...

Страница 101: ...g through passages Pay attention to the width of the stabilizer blade and of the telescopic travel gear when traveling through passages Adjust the stabilizer blade and the telescopic travel gear to th...

Страница 102: ...easing the width of the stabilizer blade 1 Raise the stabilizer blade to about 1 2 cm about 0 4 0 8 in 2 Pull out pins A on either side 3 Turn out the stabilizer blade extensions B on either side 4 In...

Страница 103: ...opic hydraulic cylinder lower the boom immediately to prevent the machine from tipping over Extend and retract the travel gear only on horizontal level and firm ground Telescopic travel gear completel...

Страница 104: ...tion In order to ensure maximum stability during work Only perform work with an extended telescopic travel gear Lower the stabilizer blade and turn out the extensions A B Fig 102 Position Function A T...

Страница 105: ...ol mode offers proportional operation of the auxiliary hydraulics depending on the position of slide switch A on the control lever If precision work for example with an offset bucket does not require...

Страница 106: ...r the building can collapse Only work in the work range Machine operation is prohibited without a shatter protection WARNING Accident hazard due to tipping over of machine A tipping machine can cause...

Страница 107: ...nd 30 during hammer operation otherwise the load on the boom increases enormously Stop work immediately if a hydraulic hose moves back and forth in an unusual manner The pressure accumulator could be...

Страница 108: ...Operating the additional control circuit Oil flow to right hand line Press pedal 3 to the right Oil flow to left hand line Press pedal 3 to the left Swiveling the boom Swiveling the boom to the right...

Страница 109: ...r lifting gear applications only if the mandatory lifting gear joint rod for example and safety equipment optical and acoustic warning devices safe load indicator stability table hydraulic hose burst...

Страница 110: ...ad indicator As soon as indicator light 31 illuminates and the warning sounds Reduce the load until the indicator light goes out and the warning no longer sounds Suitable equipment for fastening and s...

Страница 111: ...switch on the left hand control lever base to the required position Operating the additional control circuit Oil flow to left hand line Push slide switch 22 on the left hand control lever to the left...

Страница 112: ...uries or death Ensure that no one is in the danger zone Information For more information see Easy Lock Powertilt with Easy Lock Operator s Manual Information The Powertilt unit may only be installed a...

Страница 113: ...Powertilt unit to the left Push slide switch 22 on the left hand control lever to the left Rotating the Powertilt unit to the right Push slide switch 22 on the left hand control lever to the right Fig...

Страница 114: ...e hitching For more information see Easy Lock Powertilt with Easy Lock Operator s Manual WARNING Crushing hazard when picking up attachments If an attachment is not locked correctly it can come off an...

Страница 115: ...itch claws A on the side of the machine into pins Z of the mount 6 Extend the bucket hydraulic cylinder so that the second pin D of the attachment touches the quickhitch 7 Check whether the attachment...

Страница 116: ...ous injuries or death Ensure that no one is in the danger zone Lower the attachment to level and firm ground ensuring stability 1 Lower the attachment to about 5 10 cm 2 4 in above the ground 2 Actuat...

Страница 117: ...ease the stabilizer blade lever 12 Switch off switch 40 The buzzer is silent Grab control circuit option Left hand side grab operation 1 Fit lever A onto the ball type cock 2 Set the ball type cock to...

Страница 118: ...dly 6 Remove the starting key and carry it with you The grab hose couplings can now be coupled and uncoupled Hydraulic connections Information Follow the instructions in the Operator s Manual of the a...

Страница 119: ...achments Picking up attachments incorrectly can cause serious injuries or death Always wear protective equipment when installing the connecting pins Ensure that no one is in the danger zone Only use a...

Страница 120: ...nt to the ground without too much pressure otherwise the resistance when removing the pins is too high Re equipping the attachments is described below for a bucket If you are fitting or removing attac...

Страница 121: ...5 Turn the starting key to position 1 6 Move the control lever or the slide switch of the proportional controls of the relevant hydraulic circuit in all directions repeatedly The pressure in the syst...

Страница 122: ...e See Preparing lubrication 4 Raise the control lever base 5 Remove the starting key and carry it with you Assembly 1 Install a bucket only if it is positioned on level ground with the flat side facin...

Страница 123: ...machine or the attachment Working with traveling force Never ram the attachment into the ground to dig when traveling This can damage the machine or the attachment Retracting the attachment When retr...

Страница 124: ...width of the stabi lizer blade when using it for stabilization Protecting the stabilizer blade against shocks The stabilizer blade or stabilizer blade hydraulic cylinder can be damaged when hitting i...

Страница 125: ...void starting and stopping machine travel abruptly as well as changing direction suddenly The stabilizer blade must be at the front when traveling in high speed Operation in water Do not immerse the r...

Страница 126: ...between the boom and the stick 1 Penetrate into the ground with the bucket 2 Lower the stick and at the same time position the bucket so that the flat lower side of the bucket is parallel with the gro...

Страница 127: ...end Work is performed with the smallest possible swivel angle Grading Use the stabilizer blade to Fill in trenches Grade surfaces Lower the stabilizer blade to the ground for grading work Set the dep...

Страница 128: ...he danger zone Stop all work movements immediately if someone enters the danger zone Observe the following during emergency lowering 1 Turn the starting key to position 1 2 Lower the control lever bas...

Страница 129: ...alfunctioning safe load indicator is prohibited Have the error repaired by a Wacker Neuson service center Functional check of the pressure switch of the safe load indicator Always perform a functional...

Страница 130: ...base 1 Press switch 39 on the instrument panel down Indicator light 31 in the display element is used for monitoring As soon as the admissible values are exceeded indicator light 31 illuminates and an...

Страница 131: ...tandard hydraulic hose burst valve keeps the blade in its position Hydraulic Hose burst valve Basic option The boom and stick are equipped with a hydraulic hose burst valve that keeps them in the last...

Страница 132: ...2 Emergency lowering on page 5 46 4 Raise the control lever base 5 Remove the starting key and carry it with you 6 Secure the machine and the attachment 7 Contact a Wacker Neuson service center and ha...

Страница 133: ...tion 0 and remove master key B 4 Now insert the new key or the key requiring coding in the starter and turn it to position 1 within 15 seconds 5 This action registers the key The procedure is automati...

Страница 134: ...son backhoe buckets can also be used for shovel bucket operation NOTICE The stick is damaged if it is hit by the bucket base Do not dump the bucket completely if it is used as a shovel bucket Trailer...

Страница 135: ...uitable place see chapter 7 5 Cleaning and maintenance on page 7 21 3 Check the machine for leaks and loose nuts screws and connections 4 Carefully clean and dry the entire machine 5 Spray an anticorr...

Страница 136: ...ll engine machine fluids in the units or tanks and add fluids if necessary 11 If the machine was out of service for over 6 months change the oil in the gearbox engine hydraulic oil reservoir and other...

Страница 137: ...guidelines regarding disposal Environment Avoid damage to the environment Do not allow the oil and oily wastes to get into the ground or stretches of water and dispose of them in an environmentally f...

Страница 138: ...5 56 OM EZ17 us 1 0 ez17b510 fm 5 Notes...

Страница 139: ...g facilities such as a towing coupling hooks and eyes The maximum admissible load of the towing eye hook is equal to 1 5 times the maximum weight of the machine A tractor vehicle of the same weight ca...

Страница 140: ...us 1 0 ez17t600 fm 6 Information The manufacturer s warranty shall not apply to accidents or damage caused by towing the machine Using towing eye hook A to pull other machines or to tow equipment is...

Страница 141: ...angle Ensure that the grade does not exceed 15 27 4 Use access ramps with an antiskid surface only 5 Ensure that the loading area is clear and access to it is not obstructed due to superstructures for...

Страница 142: ...the upper carriage during transport Unlocking the upper carriage Align the upper carriage with the travel gear Raise pin 18 and hitch it in the lock Locking the upper carriage Align the upper carriage...

Страница 143: ...talled equipment to the weight of the machine Information Use OSHA rated and approved lifting devices capable lifting the excavator attachments options and accumulated debris Refer to the general weig...

Страница 144: ...o release the pressure in the hydraulic system 13 Raise the control lever base 14 Remove the starting key and carry it with you 15 Remove loose objects from inside the machine 16 Get off the machine a...

Страница 145: ...the machine 4 Lower the boom and the stabilizer blade 5 Lock the upper carriage 6 Firmly fasten the machine on the loading area with lashing points A with slings of adequate size observe the legal reg...

Страница 146: ...6 8 OM EZ17 us 1 0 ez17t600 fm 6...

Страница 147: ...l spare parts for repairs The manufacturer shall not be liable for damage to the machine or personal injury caused by failure to observe the specific notices and descriptions Important safety instruct...

Страница 148: ...ings for dirt Check the screw connections of the protective structures canopy for example for tightness Option Adjust the mirrors correctly clean them and check them for damage check the fastening scr...

Страница 149: ...ning system Check V belt condition and tension 7 40 7 41 Option Actuate Powertilt swivel device in final position for 1 minute 2 All steps for previous maintenance intervals 1 Air filter replacement a...

Страница 150: ...son service center Engine oil replacement Engine oil filter replacement Fuel filter replacement Clean the water separator prefilter element Hydraulic oil filter insert replacement Replace the V belt D...

Страница 151: ...ities steel and aluminium mills chemical plants and other nonferrous metal plants independently of the dirt indi cator Check the pilot control filter for dirt clean it if necessary Check valve clearan...

Страница 152: ...7 6 OM EZ17 us 1 0 ez17w700 fm 7 Lubrication plan 7 10 9 4 4 6 14 13 14 13 11 1 1 2 2 3 3 5 12 8 Fig 167 Shown with Powertilt and hydraulic Easy Lock quickhitch option...

Страница 153: ...y 2 2 Stick hydraulic cylinder Daily 2 3 Bucket hydraulic cylinder Daily 2 4 Boom hydraulic cylinder Daily 2 5 Joint rod Daily 1 6 Bucket pin Daily 2 7 Stick Daily 1 8 Swiveling console Daily 2 9 Stab...

Страница 154: ...7 8 OM EZ17 us 1 0 ez17w700 fm 7 Maintenance label Some maintenance on or with the machine may only be performed by a Wacker Neuson service center see maintenance plan Fig 168 Yanmar 3TNV76 SNSE12...

Страница 155: ...Replace the engine oil filter Engine Check the V belt tension Engine Replacing the V belt Engine Replacing the air filter element Engine Checking valve clearance Traveling drive Check the gearbox oil...

Страница 156: ...se Roller and friction bear ings KPF 2 K 20 6 ISO L X BCEB 2 7 6 KPF 2 K 20 according to DIN 51502 lithium saponified grease 7 ISO L X BCEB 2 according to DIN ISO 6743 9 lithium saponified grease Year...

Страница 157: ...ls Engine oil grade Ambient temperature C API CF CF 4 CI 4 ACEA E3 E4 E5 JASO DH 1 C 20 15 10 5 0 5 10 15 20 25 30 35 40 SAE 10W SAE 20W SAE 10W 40 SAE 15W 40 SAE 20 SAE 30 SAE 40 F 4 5 14 23 32 41 50...

Страница 158: ...draulic system depending on temperature Hydraulics oil grade Ambient temperature C HVLP 46 1 1 According to DIN 51524 section 3 ISO VG 46 C 20 15 10 5 0 5 10 15 20 25 30 35 40 50 ISO VG32 ISO VG46 ISO...

Страница 159: ...refore ensure that the remaining amount of initial hydraulic fluid in the hydraulic system does not exceed 8 when changing biodegradable oil observe the manufacturer indications Do not add mineral oil...

Страница 160: ...protective equipment WARNING Injury hazard due to rotating parts Rotating parts can cause serious injuries or death Open the engine cover only at engine standstill Raise the seat only at engine stand...

Страница 161: ...ked with the starting key Turn the starting key in lock A to the right R Engine cover locked Turn the starting key in lock A to the left L Engine cover unlocked Right hand cover Opening 1 Stop and par...

Страница 162: ...over Opening 1 Stop and park the machine Stop the engine See Preparing lubrication 2 Unscrew screws A 3 Open the engine cover 4 Loosen screw B 5 Unhitch shackle C and remove the side cover Closing Loc...

Страница 163: ...e seat 1 Press and hold seat belt buckle A outward 2 Lower the seat until it engages with an audible click The seat is locked if it cannot be raised at the backrest 3 Close and lock the engine cover B...

Страница 164: ...el ground Avoid tipping movements of the machine under all circumstances Traveling in areas involving a risk of falling objects is prohibited WARNING Accident hazard due to incorrect loading Incorrect...

Страница 165: ...AUTION Crushing hazard due to pre tensioned canopy The pre tensioned canopy can cause serious injuries Pay attention to the movements of the pre tensioned canopy as you remove the screws 9 Remove scre...

Страница 166: ...ioned canopy The pre tensioned canopy can cause serious injuries Pay attention to the movements of the pre tensioned canopy as you install the screws NOTICE Damage to surface due to centering D on low...

Страница 167: ...Wear safety glasses and protective clothing Do not aim the compressed air at the skin or at other people Do not use compressed air for cleaning your clothing Cleaning with a high pressure cleaner or...

Страница 168: ...short circuits and damage seals and disable the controls The following aids are recommended for cleaning Broom Vacuum cleaner Damp cloth Brush Water with mild soap solution Cleaning outside the machin...

Страница 169: ...ication 3 Clean the machine Cleaning the seat belt Always keep the seat belt clean as coarse dirt can impair the proper functioning of the seat belt buckle Clean the seat belt which remains fitted in...

Страница 170: ...nd 4 Stop the engine 5 Operate the control lever repeatedly to release the pressure in the hydraulic system 6 Raise the control lever base 7 Remove the starting key and carry it with you 8 Remove loos...

Страница 171: ...e boom and the stabilizer blade to the ground 3 Stop the engine remove the starting key and carry it with you 4 Apply grease to lubrication point 10 with two strokes of the grease gun 5 Start the engi...

Страница 172: ...Stay clear extremities clothing of the moving parts 1 Stop and park the machine Stop the engine See Preparing lubrication 2 Raise the control lever base 3 Spray fluid grease onto guide lever A 4 Spray...

Страница 173: ...system Diesel fuel specification NOTICE Engine damage due to incorrect or dirty diesel fuel Only used clean diesel fuel according to the engine machine fluids and lubricants Do not use diesel fuel wit...

Страница 174: ...ler inlet A with the starting key 3 Remove the filler cap 4 Refuel 5 Close the filler cap Stationary fuel pumps If possible refuel only from stationary fuel pumps Fuel from barrels or cans is usually...

Страница 175: ...d close the fuel tank 4 Turn the starting key to the first position 5 Wait about 5 minutes while the fuel system bleeds itself automatically 6 Start the engine If the engine runs smoothly for a while...

Страница 176: ...ck D to the OFF mark Fuel supply is interrupted 5 Unscrew threaded ring E 6 Collect the fuel water mixture in a suitable container 7 Screw threaded ring E back on again The indicator ring is at the ba...

Страница 177: ...ation 2 Open the engine cover 3 Connect a drain hose to port B Place the hose into a container on the ground 4 Prepare a suitable container for collecting the fuel water mixture 5 Open screw C 6 Colle...

Страница 178: ...the intake system Information Check the oil level once a day We recommend checking it before starting the engine After stopping a warm engine wait at least 5 minutes before checking Checking the engin...

Страница 179: ...slightly to allow any trapped air to escape 6 Add engine oil 7 Wait about 5 minutes until all the oil has run into the oil sump 8 Check the oil level 9 Add oil if necessary and check the oil level ag...

Страница 180: ...ns of the skin Wear protective equipment Let the engine cool down Carefully open the radiator cap NOTICE Engine damage due to wrong coolant Observe the fluids and lubricants table and the coolant comp...

Страница 181: ...f the sight glass FULL 7 Close filler cap C 8 Start the engine and let it warm up for about 5 10 minutes 9 Stop the engine 10 Remove the starting key and carry it with you 11 Let the engine cool down...

Страница 182: ...In dusty or dirty work conditions clean more frequently than indicated in the maintenance plans NOTICE Damage to radiator fins during cleaning Keep a safe distance from the radiator during cleaning U...

Страница 183: ...the induction manifold and the clamps for tightness Dirt indicator NOTICE Damage to diesel engine due to dirty air filter Replace the air filter elements as soon as the red mark on the dirt indicator...

Страница 184: ...r 4 Remove dirt and dust from the air filter housing and the area around it 5 Fold bow clips A on lower housing section B to the outside 6 Remove the lower housing section B 7 Carefully remove outside...

Страница 185: ...he air intake NOTICE In order to avoid engine damage Check once a day for cleanliness before putting the machine into operation 1 Stop and park the machine Stop the engine See Preparing lubrication 2...

Страница 186: ...Raise the seat see chapter Maintenance accesses 6 Carefully check V belt A for damage cracks cuts etc 7 If the V belt is damaged cracks wear ruptures etc Have the V belt replaced by a Wacker Neuson s...

Страница 187: ...nents Open the breather filter carefully to slowly release the pressure inside the tank Wear protective equipment If oil contacts the eye flush immediately with clean water and seek medical treatment...

Страница 188: ...vel and horizontal ground 2 Position the boom straight ahead at the center of the machine see figure 3 Lower the boom and the stabilizer blade to the ground 4 Stop the engine 5 Operate the control lev...

Страница 189: ...raulic oil up to the corresponding mark 7 Check the hydraulic oil level on sight glass A 8 Add if necessary and check again 9 Screw in filler plug E tightly Environment Use a suitable container to col...

Страница 190: ...ct we recommend that you observe all the relevant safety regulations for hydraulic lines as well as the safety regulations regarding accident prevention and occupational health and safety in your coun...

Страница 191: ...tteries give off explosive gases that can cause deflagrations if ignited Do not smoke avoid fire and open flames Do not place any tools on the battery Wear protective gloves and safety glasses Do not...

Страница 192: ...e free However have the battery checked at regular intervals to ensure that the electrolyte level is between the MIN and MAX marks Checking the battery requires it to be removed and must be performed...

Страница 193: ...ion and air conditioning system Not available 7 15 Washer system Not available 7 16 Axles traveling drive Have maintenance only performed by a Wacker Neuson service center 7 17 Brake system Have maint...

Страница 194: ...Ensure that no one is in the danger zone 1 Place the machine on firm level and horizontal ground 2 Raise the machine evenly and horizontally by means of the boom and the stabilizer blade Raise the mac...

Страница 195: ...nsion NOTICE Damage to tracks due to overtightening This causes severe damage to the hydraulic cylinder and the track Tighten the tracks only up to the mandatory measuring distance Tightening the trac...

Страница 196: ...of the lubricating valve 3 Retighten the lubricating valve A 4 Check the tension is correct by Lowering the machine to the ground starting the engine letting it run at idling speed without any load an...

Страница 197: ...de gauge Welding is prohibited Load hook wear Have load hooks Powertilt Powertilt for Easylock with inadmissible wear beyond the tolerance for example damage deformations surface cracks and corrosion...

Страница 198: ...7 52 OM EZ17 us 1 0 ez17w710 fm 7 Notes...

Страница 199: ...r separator 7 30 Engine overheats Engine oil level too low Add engine oil 7 33 Dirty air filter Replace the air filter 7 38 Dirty radiator fins Clean the radiator 7 36 Coolant level too low Add coolan...

Страница 200: ...Remedy See Hydraulic system overheats Dirty hydraulic oil radiator Clean the hydraulic oil radi ator 7 36 Hydraulic oil level too low Add hydraulic oil 7 42 Malfunctioning or insuffi ciently tightene...

Страница 201: ...indicator light yellow remains illuminated when the engine runs Malfunctioning starter Malfunctioning dis play element Indicator light for engine oil pressure red illuminates and the buzzer sounds whe...

Страница 202: ...8 4 OM EZ17 us 1 0 ez17b800 fm 8 Notes...

Страница 203: ...Displacement 1116 cm3 68 1 in3 Nominal bore and stroke 76 x 82 mm 2 9 x 3 2 in Output 13 4 kW at 2200 rpm 18 hp at 2 200 rpm Max torque 65 6 Nm at 1600 rpm 48 4 ft lbs 1 600 rpm Max engine speed witho...

Страница 204: ...oled 4 stroke diesel engine Number of cylinders 3 Displacement 1266 cm3 77 3 in3 Nominal bore and stroke 80 x 84 mm 3 2 x 3 3 in Output 12 8 kW at 2200 rpm 17 2 hp at 2 200 rpm Max torque 65 8 Nm at 1...

Страница 205: ...rollers 3 Work hydraulics EZ17 Type of control LUDV flow distribution inde pendent of the load pressure Number type of pumps 1 Oil flow of the variable displacement pump 39 6 l min 10 5 gal min Operat...

Страница 206: ...ated current A EZ17 F1 50 A Main fuse F2 50 A Main fuse air pressure sensor output adaptation Yanmar 3TNV80F SSNS1 F3 7 5 A Display cutoff solenoid F4 15 A Valves horn F5 10 A Proportional controls F6...

Страница 207: ...ating beacon Halogen lamp 12 V 55 W H1 EZ17 Model size 4 5 Required oil flow 2 4 l min 0 5 1 gal min Swiveling range 180 1 1 The actual angle can vary slightly from the indication made here Weight 35...

Страница 208: ...092 1770 1 305 870 642 1250 922 M30 1420 1 047 2010 1 482 2400 1 770 1200 885 1700 1 254 Tightening torques fine pitch thread Property class 8 8 10 9 12 9 8 8 10 9 Screw dimen sions Screws according t...

Страница 209: ...2 Do not mix the coolant with other coolants Up to C F by vol ume by volume 37 34 6 50 50 EZ17 Yanmar 3TNV76 SNSE12 Measured sound power level LwA 1 1 According to ISO 6395 EC Directives 2000 14 EC an...

Страница 210: ...ns use the average vibration values measured In order to obtain the estimated vibration value for an experienced operator on level ground subtract the factors from the average vibration value In case...

Страница 211: ...form the following activities smoothly without any jerks Steering Braking Acceleration Shifting gears Move attachments without any jerks Adapt your speed and the itinerary to minimize vibration Travel...

Страница 212: ...nes This method is based on vibration measurements under real operating conditions for all machines Read the original guidelines This chapter summarizes part of the legal regulations However its aim i...

Страница 213: ...ator forces According to ISO 6015 Ground clearance ground pressure Weight EZ17 EZ17 with extra weight Transport weight1 1 Transport weight basic machine 10 fuel capacity 1594 kg 3 514 lbs 1644 kg 3 62...

Страница 214: ...ified in the table Load density must also be taken into account Telescopic travel gear extended Never exceed the weight and mass values specified in the table NOTICE If the weight or mass value is exc...

Страница 215: ...B Load hook height max Admissible weight or mass value with boom in horizontal position With or without the stabilizer blade in traveling direction With or without the stabilizer blade 90 to travelin...

Страница 216: ...following threshold values 75 of the static tipping load and 87 of the hydraulic lift capacity Calculation basis according to ISO 10567 Setting pressure on boom hydraulic cylinder 22500 kPa 3 263 psi...

Страница 217: ...7 338 746 1034 2 280 602 1 328 555 1 224 1 5 m 59 in 386 851 293 646 262 579 540 1 191 383 845 346 764 811 1 788 614 1 353 567 1 250 3 0 m 9 10 2 5 m 98 in 2 0 m 79 in 1 5 m 59 in 2 5 m 98 in 434 957...

Страница 218: ...408 899 373 822 1034 2 280 653 1 439 609 1 343 1 5 m 59 in 386 851 318 702 289 638 540 1 191 416 917 381 841 811 1 788 664 1 465 621 1 370 3 0 m 9 10 2 5 m 98 in 2 0 m 79 in 1 5 m 59 in 2 5 m 98 in 43...

Страница 219: ...Use the machine for lifting gear applications only if the mandatory lifting gear joint rod for example and safety equipment optical and acoustic warning devices safe load indicator stability table ho...

Страница 220: ...es 75 of the static tipping load and 87 of the hydraulic lift capacity Calculation basis according to ISO 10567 Setting pressure on boom hydraulic cylinder 22500 kPa 3 263 psi The weight and mass valu...

Страница 221: ...OM EZ17 us 1 0 ez17t900 fm 9 19 9 Stability table EZ17 Canopy without extra weight Canopy with extra weight Fig 225 Fig 226...

Страница 222: ...9 20 OM EZ17 us 1 0 ez17t900 fm 9 Dimensions Overview EZ17 Fig 227...

Страница 223: ...0 K2 Max digging radius long stick 4050 mm 13 3 M Max boom displacement to bucket center right hand side 535 mm 21 in N Max boom displacement to bucket center left hand side 425 mm 17 in O Max lift he...

Страница 224: ...9 22 OM EZ17 us 1 0 ez17t900 fm 9 Notes...

Страница 225: ...cking the engine oil level 7 32 Checking the fuel filter 7 30 Checking the hydraulic oil level 7 42 Checking the hydraulic system for leaks 7 44 Checking the water separator 7 29 Checking track tensio...

Страница 226: ...g an attachment 5 32 Setting down an attachment 5 34 Hydraulic swivel unit brake 5 16 Hydraulic system 7 41 I Ignition lock 4 30 Inadmissible work procedures 5 41 Increasing the width of the stabilize...

Страница 227: ...Retrofitting a bucket 5 40 Right hand cover 7 15 Rotating beacon 5 9 Rotating the upper carriage 5 15 S SAE ISO controls 5 17 Safe load indicator 5 47 Safe load indicator light 4 24 Screw connections...

Страница 228: ...attachments 9 11 Wiper wash system 5 11 Work hydraulics 5 12 9 3 Work operation 5 41 Work position of machine 5 44 Work range shatter protection 4 16 Working alongside trenches 5 44 5 45 Working ligh...

Страница 229: ...Acknowledgment We wish to acknowledge the contributions of the members of AEM s Compact Loader Compact Excavator Council to the preparation of this Safety Manual NOTICE OF COPYRIGHT PROTECTION Copyri...

Страница 230: ...our employer equipment dealer or directly from the manufacturer Keep this safety manual and the manufacturer s manuals with the machine at all times Read and understand all manuals Safety videos and o...

Страница 231: ...tion must be determined by a safe acceptable and dependable method Other OSHA regulations may also apply to the jobsite Call Before You Dig Dial 811 USA only 888 258 0808 USA and Canada 6 A Word To Th...

Страница 232: ...rtness and coordination and the operator s ability to safely operate the equipment Never operate the compact excavator while impaired by use of alcohol or drugs Never knowingly allow the operation of...

Страница 233: ...Operation 10 Follow A Safety Program Some Rules You Must Work By Know the limitations and operating characteristics of the compact excavator Do not overload it Always wear the seat belt if equipped I...

Страница 234: ...quipment Read and understand the DANGER WARNING CAU TION and NOTICE safety signs and other informational signs found on the compact excavator and in the manu facturer s operator manual Ask your superv...

Страница 235: ...the down position WARNING NEVER remove or modify safety equipment Operating a machine without a protective structure TOPS ROPS FOGS FOPS or OPS could result in death or serious injury See page 44 Prot...

Страница 236: ...Body Wear Eye Protection Do Not Loosen Cap Until Cool 16 Prepare For Safe Operation Check The Machine continued Check the tracks for broken or damaged pins bushings and other parts Check the tracks f...

Страница 237: ...following Manually installing a locking pin actuating a lever or other device Movement of the attached work tool to confirm its engaged lock secure condition A visual check of the components as instr...

Страница 238: ...tion Walk Around The Worksite Be Seen Wear Visible Clothing 20 Prepare For Safe Operation Check The Work Area continued Know the exact location of electrical telephone gas or other utility lines See p...

Страница 239: ...hile carrying tools or objects that prevent three point contact Maintain Three Point Contact Face Machine Do Not Jump Off Machine Do Not Use Controls As Handholds 22 Start Safely Look Out For Others B...

Страница 240: ...plugs or intake manifold preheater Ether cold start fluid is HIGHLY FLAMMABLE Before using it always read the instructions on the ether cold start fluid container and the instructions in the manufactu...

Страница 241: ...re operating Be certain you can control speed direction braking and boom motion before operating the machine Read And Understand Manuals Before Operating Check Instruments And Controls 26 Operate Safe...

Страница 242: ...ffs Failure to know and observe weight limits and use caution could result in death or serious injury Know Weight Limits Operate Controls Smoothly And Slowly 28 Operate Safely Traveling On The Worksit...

Страница 243: ...capacity chart for the machine Changing conditions such as slopes wind ice mud soft ground type of load or the weight of attachments will affect the capacity and operating characteristics of the machi...

Страница 244: ...32 Operate Safely Locate All Underground Utilities Confirm that One Call has been contacted Confirm that any utilities not subscribing to One Call have been contacted Confirm that the site has been m...

Страница 245: ...wall to collapse Keep Personnel Away From Equipment And Attachments 34 Slope And Uneven Terrain Operation Compact excavator stability and load capacity are greatly reduced on slopes Ensure the operat...

Страница 246: ...level the machine Swing Load Uphill When On A Slope Operate Safely 36 Operate Safely Hazardous Conditions When working in hazardous areas be extremely alert Always consult the manufacturer s operator...

Страница 247: ...ive atmospheres can result in res and explosions causing death or serious injury Use Caution Near Excavation Edge Do Not Undercut Machine Avoid Silica Dust Do Not Operate In Explosive Flammable Atmosp...

Страница 248: ...ff Engine Remove Key Engage Control Lock 40 Load And Unload The Machine Safely Loading And Unloading For Transport All machines are not loaded in the same way and the procedures given in the manufactu...

Страница 249: ...s needed to protect yourself do not take chances Maintain Equipment 42 Perform Maintenance Safely WARNING Prevent death or serious injury from entanglement Do not wear loose clothing or accessories Re...

Страница 250: ...ance Manual DO NO T OPE RA TE DO NOT OPERATE Use Warning Tags Use Approved Support Device 44 Perform Maintenance Safely Use Approved Ventilation If it is necessary to run an engine in an enclosed area...

Страница 251: ...ving the cap completely Do Not Loosen Cap Until Cool 46 Perform Maintenance Safely Hydraulic System Hazards The hydraulic system is under pressure whenever the engine is running and may hold pressure...

Страница 252: ...jury from explosion Lead acid batteries produce extremely explosive gases especially when being charged Keep arcs sparks ames and lighted tobacco away Do not smoke near batteries Check battery cables...

Страница 253: ...nce Instructions 50 Perform Maintenance Safely Complete Service And Repairs Before Machine Is Released Tighten all bolts fittings and connections to torques specified by the manufacturer Clean or repl...

Страница 254: ...tuation you may encounter on a daily basis Knowledge of these safety precautions and your application to the basic rules of safety will help to build good judgment in all situations Our objective is t...

Страница 255: ...at have already been delivered and which will not be implemented on these machines Technical data dimensions and weights are given as an indication only Responsibility for errors or omissions not acce...

Страница 256: ...rveonderdelen Importante Para obter informa es sobre as pe as sobresselentes consulte o seu fornecedor da Wacker Neuson ou aceda ao site Web da Wacker Neuson em http www wackerneuson com Wa ne W celu...

Отзывы: