

PDS-ST441-VP-BX2 Manual
1. Key features
Color/Monochromatic (mono) scan selection
900/600/300 dpi scan resolution
Directly save JPG/PDF file to microSD/microSDHC card
Supports microSD/microSDHC card up to 32GB
Color LCD Display
Built-in high-speed sensor
Compatible to Windows® XP, Windows® Vista™,
Windows® 7 and Mac OS® 10.4 or above
(direct plug-in, driver installation not required)
2. Functional parts
Part
Function
1
Battery door
For 2x AA alkaline batteries
2
Power On/ Off: Press and hold this key for 2
seconds to turn power on or off. In power on
mode, press this button to start scan, press this
button again to stop
3
Scan LED indicator Ready for scan: Green LED on
4
Error LED indicator Over speed: Red LED on
5
LCD screen
Scanning status display
6
UP/DOWN
In MENU mode: Press UP/DOWN buttons to
navigate the setup menu.
In PREVIEW mode: Preview NEXT or
PREVIOUS image file.
In ZOOM Mode: Navigate upper and lower area
of the image file.
7
Press MENU/OK/RIGHT button to enter MENU
setting mode.
In ZOOM mode: Move to view right side of the
image file.
8
Press PREVIEW/LEFT button to enter
PREVIEW mode. Press again to select ZOOM
options.
In ZOOM mode: Move to view left side of image
file.
9
USB interface
Download photo to a computer via USB cable
provided.
10
microSD card slot
microSD card storage location.
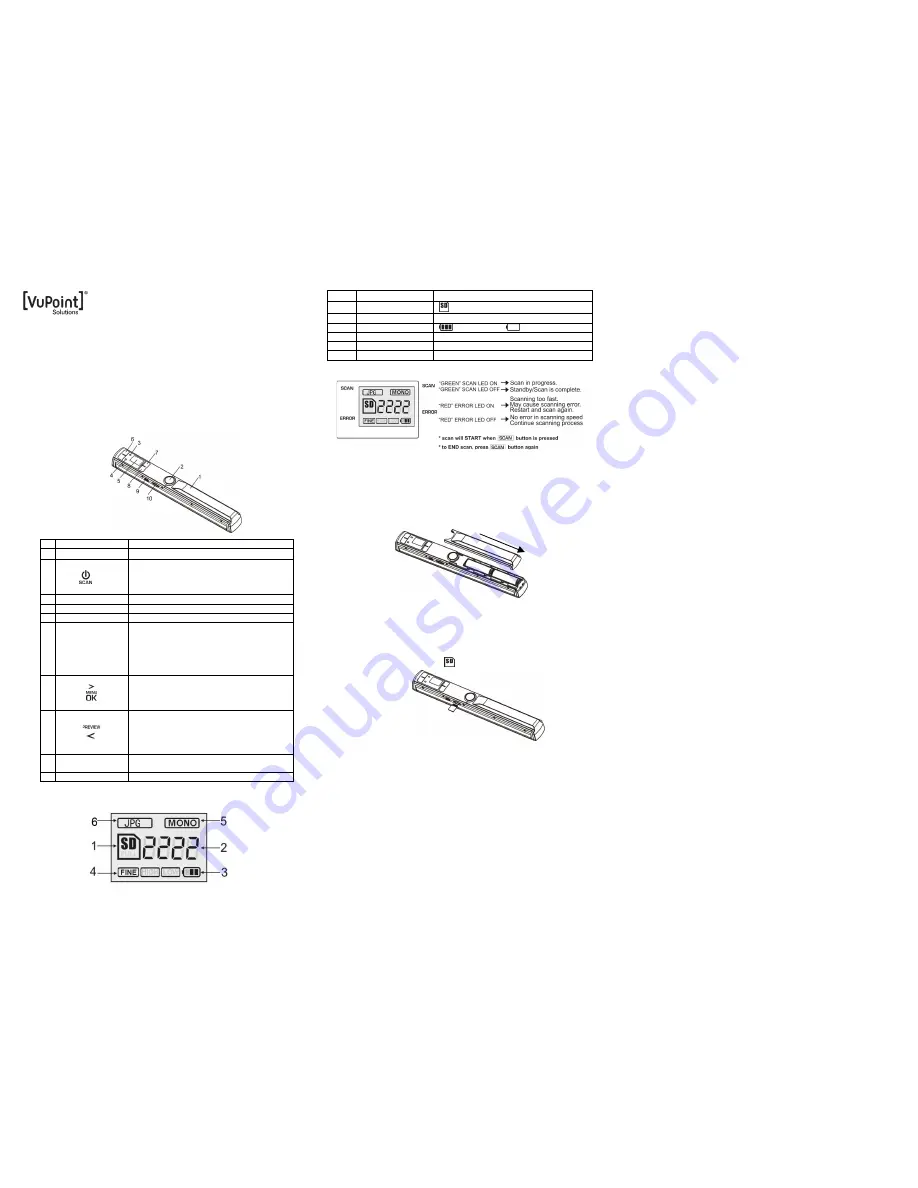
3. Explanation of the status icons
Item
Function
Description
1
SD card indicator
Photos will be stored in microSD card
2
Counting indicator
Show scanned files in microSD card
3
Battery indicator
Battery is full
Empty battery
4
Selected resolution
Fine:900dpi/ High:600dpi / Low:300dpi
5
Effect indicator
Color/Mono scan selection
6
File Format
JPG/PDF output file format selection
4.
LED light indications
5. Using the scanner
5.1 Installing the battery
1. Open the battery door by sliding the battery compartment downwards as
indicated by the arrow in the diagram below. Then lift up.
2. Insert 2x AA alkaline batteries into the battery compartment.
3. Turn on the scanner by pressing the [POWER] button for 2 seconds
5.2 Inserting a microSD memory card (not included)
To operate the scanner, you must insert a microSD Card (not supplied) to record
and store your pictures. Inserting the microSD memory card:
1.
Turn ON the scanner.
2.
Insert the microSD card into the microSD card slot (with metal side
facing upwards). Gently press in until card is clicked in and latched.
The SD card indicator
must appear on the LCD screen.
5.3 MENU
Setup mode
1.
Press [MENU] button to enter MENU Setup
2.
Press [POWER/SCAN] button to exit MENU mode
5.3.1 QUALITY setting
1.
Press [MENU] button to enter MENU Setup
2.
Press UP/DOWN buttons to select QUALITY
3.
Press [OK] to enter QUALITY mode
4.
Press UP/DOWN buttons to select options: Fine resolution (900dpi)/
High resolution (600dpi)/ Low resolution (300dpi)
5.
Press [OK] to confirm
6.
QUALITY setting will be saved and will exit to return to the previous
Menu Setup screen
5.3.2 JPG/PDF (File Format) setting
1.
Press [MENU] button to enter MENU setting mode
2.
Press UP/DOWN buttons to select JPG/PDF
3.
Press [OK] to enter JPG/PDF (FILE FORMAT) mode
4.
Press UP/DOWN to select options: JPG/ PDF_Letter/ PDF_A4
5.
Press [OK] to confirm
6.
JPG/PDF FILE FORMAT will be saved and will exit to return to the
previous Menu Setup screen
5.3.3 Color setting
1.
Press [MENU] button to enter MENU setting mode
2.
Press UP/DOWN buttons to select COLOR
3.
Press [OK] to enter color mode
4.
Press UP/DOWN to select options: color or monochromatic
5.
Press [OK] to confirm
6.
COLOR setting will be saved and will exit to return to the previous
Menu Setup screen
5.3.4 TIME setting
1.
Press [MENU] button to enter MENU Setup
2.
Press UP/DOWN buttons to select TIME SETUP
3.
Press [OK] to enter TIME SETUP mode
4.
Press UP/DOWN buttons to set the YEAR
5.
Press [OK] to set the MONTH
DAY
HOUR
MINUTES
SECONDS
6.
After setting the date and time, press [OK] to save and exit to return
to the previous Menu Setup screen
5.3.5 AUTO POWER OFF setting
1.
Press [MENU] button to enter MENU Setup
2.
Press UP/DOWN buttons to select AUTO POWER OFF
3.
Press [OK] to enter AUTO POWER OFF mode
4.
Press UP/DOWN buttons to select options: 1Min/ 3Min/ 5Min/ Off
5.
Press [OK] to confirm
6.
AUTO POWER OFF setting will be saved and will exit to return to
the previous Menu Setup screen
5.3.4 DEFAULT Setting
Note: Default setting: Scan files in low resolution, color, JPG file format.
1.
Press [MENU] button to enter MENU Setup
2.
Press UP/DOWN buttons to select DEFAULT
3.
Press [OK] to enter DEFAULT mode
4.
Press UP/DOWN buttons to select DEFAULT options: Yes/No
5.
Press [OK] to confirm
6.
DEFAULT setting will be saved and will exit to return to the previous
Menu Setup screen
5.3.6 FORMAT the microSD memory card
Note:
All contents on the microSD card will be erased during formatting.
1.
Insert a microSD card into the scanner with metal side facing
upwards
2.
Press [MENU] button to enter MENU Setup
3.
Press UP/DOWN buttons to select FORMAT
4.
Press [OK] to enter FORMAT mode
5.
Press UP/DOWN buttons to select FORMAT options
a.
YES: To FORMAT and erase contents in microSD card
b.
NO: To exit FORMAT mode and return to previous Menu
setup screen
6.
Press [OK] to confirm selection and return to Menu Setup screen
5.3.7 DELETE FILE setting
1.
Press [MENU] button to enter MENU Setup
2.
Press UP/DOWN buttons to select DELETE FILE
3.
Press [OK] to enter DELETE FILE mode
4.
Press UP/DOWN buttons to select DELETE FILE options:
a.
DELETE ONE: To delete last image scanned
b.
DELETE ALL: To delete all files on microSD card
5.
Press [OK] to confirm selection and return to Menu Setup screen
NOTE: You can delete images by accessing your files via the computer or
delete all saved images by FORMATTING your memory card. Refer to
Section 5.3.6
5.3.8 Software VERSION
To view scanner’s version number:


