background image

©ITW Food Equipment Group, LLC 
3600 North Point Blvd. 
Baltimore, MD 21222 

RETAIN THIS MANUAL FOR FUTURE USE


FORM  F-38300 (05-13)  


OPERATION AND FIELD INSTALLATION MANUAL  

GTS Heavy Duty Electric Griddle Top 


MODEL GTS12 


MODELS 

GTS12-1 
GTS12-2 
GTS12-3R 
GTS12-4R 

Summary of Contents for GTS12-1 Operation and

Page 1: ... LLC 3600 North Point Blvd Baltimore MD 21222 RETAIN THIS MANUAL FOR FUTURE USE FORM F 38300 05 13 OPERATION AND FIELD INSTALLATION MANUAL GTS Heavy Duty Electric Griddle Top MODEL GTS12 MODELS GTS12 1 GTS12 2 GTS12 3R GTS12 4R ...

Page 2: ...own Maintenance FIELD INSTALLATION ASSEMBLY Tools required Mounting bracket assembly Mounting bracket installation Griddle top installation Flue deflector installation Tension rod spring assembly Range of motion Electrical connections and specifications Wiring diagrams Troubleshooting Accessories 3 3 4 5 6 6 7 8 8 9 9 12 13 15 16 17 17 19 20 ...

Page 3: ...r Vulcan griddle top must be installed in accordance with In the United States of America 1 State and local codes 2 National Electrical Code ANSI NFPA 70 latest edition available from The National Fire Protection Association 1 Batterymarch Park Quincy MA 02269 3 NFPA Standard 96 Vapor Removal from Cooking Equipment latest edition available From the National Fire Protection Association Batterymarch...

Page 4: ...nces per GTS top plate Work the oil into the whole griddle surface After cleaning your griddle with chemicals you should repeat the seasoning procedure for proper cooking CONTROLS The heavy duty electric griddle top section is independently controlled by a power switch thermostat and high limit cutoff switch When the power switch red rocker switch is turned ON the left amber light will illuminate ...

Page 5: ...tion of excessive up or down force Contact an authorized service agent if assembly becomes difficult to move To lower the assembly 1 Lift slightly from the handle to take weight off 2 Squeeze the trigger towards handle 3 Lower it to the desired position Do not allow griddle top to fall to surface See Fig C Power Switch Thermostat Adjustment Knob Thermostat Cover Fig A Fig B Fig C 2 1 High Limit Re...

Page 6: ...as with rounded corners CARE AND CLEANING The griddle and its parts are hot Use care when operating cleaning or servicing the griddle Clean the electric griddle top regularly A clean griddle always looks better lasts longer and performs better To produce evenly cooked perfectly browned griddle products keep the griddle plate clean and free of carbonized grease Carbonized grease on the surface hind...

Page 7: ...olish with a soft dry cloth To remove discoloration use a griddle cleaner If the griddle usage is very high consider conducting this weekly cleaning procedure more than once per week Do not use a brick or griddle stone for cleaning Do not use metallic scouring pads for cleaning Do not use a water jet to clean the griddle Do not use chlorine sanitizer in contact with griddle Contact can cause disco...

Page 8: ...TION ASSEMBLY TOOLS REQUIRED FOR FIELD INSTALLATION 1 2 Philips head screw driver 2 M10 socket driver 3 7 16 socket driver 4 Rubber mallet 5 Power drill 6 7 8 deep well socket wrench 7 2 large F clamps 8 5 32 drill bits for metal 9 Thread lock compound Loctite Blue 10 wide masking tape Contact the authorized service agency in your area for field installation The field installation instructions are...

Page 9: ...of the side mount brackets to the back bracket as shown in Fig 1 The bolts should be hand tightened only at this point Repeat procedure to attach the other side mount bracket to the other end of the back bracket 2 The entire mounting bracket system should be assembled at this point as shown in Fig 2 with bolts hand tightened only 3 Slide mounting bracket system onto back of the griddle as shown in...

Page 10: ...ore drilling holes in chassis it is important that the assembly has not moved from the location prescribed in step 3 6 Using the side mounting bracket as a guide drill holes into the griddle chassis with the 5 32 bits only at the highest hole and the hole nearest the front of the unit on the side bracket See Fig 5 and Fig 6 Repeat procedure for opposite side of bracket system assembly 7 Insert and...

Page 11: ...ws as shown in Fig 8 Repeat procedure for the other side of the assembly Wall Spacer 10 Install one bottom support bracket every two feet of griddle width between griddle top mounting points as needed for additional support Bottom support brackets should be flush with bottom of griddle chassis and back mounting bracket Drill two holes with 5 32 bits and attach with 10 24 x 2 screws as shown in Fig...

Page 12: ...24 x 2 screws as shown in Fig 10 Repeat as necessary for all bottom support brackets 12 Attach masking tape to mounting plate and slide into position between the griddle back panel and the top of the selected griddle top mounting point as shown in Fig 11 13 Use tape to align holes in mounting plate with holes in griddle top mounting point as shown in Fig 12 Tape to hold in position until installat...

Page 13: ...et electric griddle top down on the gas griddle plate at desired mounting position Lower rear arm assembly into place so that notches on arm engage mounting bracket rails as shown in Fig 13 16 Check that the flue deflector has been installed as shown in Fig 14 before proceeding Fig 13 Fig 14 Flue Deflector ...

Page 14: ...hers Insert the bolts through the mounting spacer and bracket Thread into the mounting plate set into place in step 13 and tighten See Fig 15 Repeat process for upper mounting point M10 hex bolts and lock washers lower mounting point M10 hex bolts and lock washers upper mounting point Mounting Spacer Fig 15 ...

Page 15: ... INSTALLATION 18 Raise the electric griddle top to the locked 90 position Slide the springs onto the tension rods and then the spring bracket The fin should be positioned at rear bottom and the radius edge bracket facing outwards The electric cord will rest in this radius when assembled See Fig 16 Spring Bracket 19 Thread nuts onto end of tension rods Tighten both nuts evenly to the desired head w...

Page 16: ...m locked positions when handles are squeezed together Do not force unit down it should lower under its own weight when the handles are squeezed The cooking surface of the griddle top head assembly should just lightly touch the griddle surface of the bottom plate when the assembly is in the down position 22 Repeat proceeding steps as needed for each griddle top head assembly Fig 19 Fig 18 ...

Page 17: ...on box cover plate on the back of the unit This exposes the GTS clamshell griddle line leads 2 Select a suitable knockout on the sides or bottom of the junction box 3 Connect the griddle s line leads to the supply wires with factory supplied wire connectors as shown in the applicable wiring diagrams 4 Push the excess wire into the junction box and replace the cover plate Never operate griddle with...

Page 18: ... 18 ...

Page 19: ...k at the 47 and 90 position 3 Problem with locking mechanism or handles Call for service Unit will not lower from the raised or locked position 1 Lift slightly to take weight off then squeeze the upper and lower handles together while lowering the unit 2 Problem with locking mechanism Call for service Unit will not raise from the cooking or lowered position 1 Problem with locking mechanism Call fo...

Page 20: ...he cooking surface of the platen is completely covered by the Teflon sheet 7 Secure the Teflon sheet to the left side of the platen with the two Teflon clips 944504 See fig 22 GTS12 units that were shipped before March 2013 utilize a different Teflon sheet 498852 1 and mounting system two bars 498852 2 and three springs 498852 3 CARE AND CLEANING OF TEFLON WRAP 1 In between cooking runs and during...

Page 21: ...embling the Teflon sheet to the platen clean the platen as described in Care and Cleaning section GTS12 ELECTRIC GRIDDLE PLATE STABILIZER Slide plate stabilizer fig 23 onto the bottom handle as shown in fig 24 Fig 23 Fig 24 GTS12 ELECTRIC GRIDDLE PLATE GAP ADJUSTER Slide plate gap adjuster fig 25 onto the bottom handle as shown in figure 26 Fig 25 Fig 26 ...

Page 22: ... 22 NOTES ...
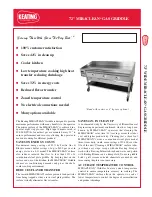
Reviews: