background image

Service Information

Document Title:

Function Group:

Information Type:

Date:

Engine, description

200

Service Information

2014/4/14 

Profile:
CEX, ECR28 [GB]

Engine, description

Model code (3TNV76)

Model code

Symbol

Description

Remarks

3

Number of cylinders

TNV

Model series

76

Cylinder bore (mm)

The engine is a 3–cylinder, indirect injected, water cooled diesel engine.
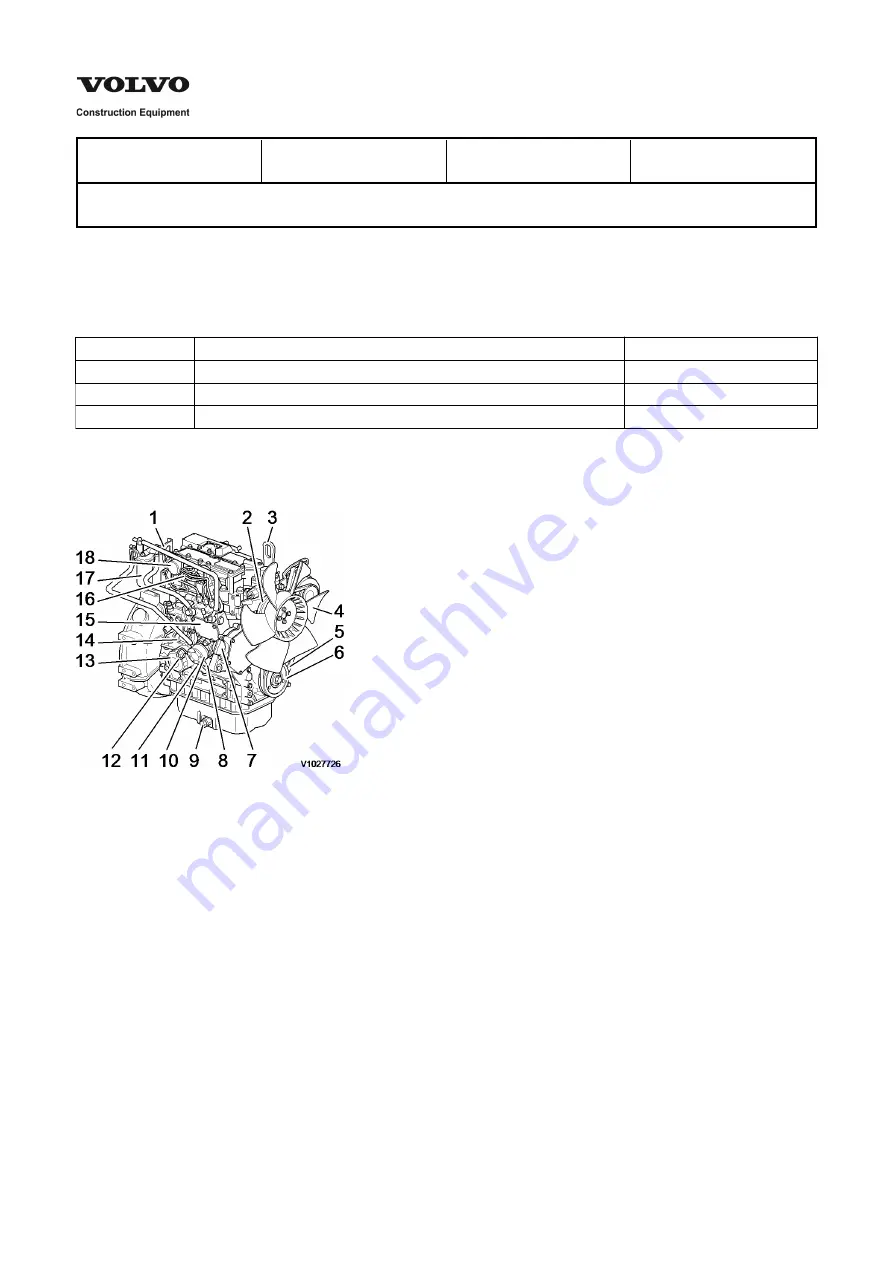
Engine, front view

Figure 1
Engine, front view

1.
2.
3.
4.
5.
6.
7.
8.
9.

10.
11.
12.
13.
14.
15.
16.
17.
18.

Lifting eye
Cooling water pump
Lifting eye
Fan
V-belt
V-pulley
Filler port (lube oil)
Fuel oil inlet
Drain plug (lube oil)
Mechanical fuel feeding pump
Fuel priming lever
Dipstick
Oil filter
Governor lever
Fuel injection pump
Intake manifold
Fuel filter
Air intake port

Summary of Contents for 3TNV76

Page 1: ...series 76 Cylinder bore mm The engine is a 3 cylinder indirect injected water cooled diesel engine Engine front view Figure 1 Engine front view 1 2 3 4 5 6 7 8 9 10 11 12 13 14 15 16 17 18 Lifting eye Cooling water pump Lifting eye Fan V belt V pulley Filler port lube oil Fuel oil inlet Drain plug lube oil Mechanical fuel feeding pump Fuel priming lever Dipstick Oil filter Governor lever Fuel inje...

Page 2: ...Engine rear view Figure 2 Engine rear view 1 2 3 4 5 6 7 Filler port lube oil Bonnet rocker arm cover Engine name plate Flywheel Starter motor Exhaust manifold Alternator ...

Page 3: ...chine and engine and drain coolant lubricating oil and fuel Remove soil oil dust etc from the engine by washing with solvent air steam etc Carefully operate so as not to let any foreign matter enter the engine Any part which is found defective as a result of inspection or any part whose measured value does not satisfy the standard or limit shall be replaced Any part predicted to dissatisfy the sta...

Page 4: ...sened clamp Fuel tank level check and fuel supply Check the remaining fuel oil level in the fuel tank and refuel the recommended fuel if necessary Lube oil level check and replenishment Checking oil level Check the engine oil level with the dipstick after adjusting the posture of the machine unit so that the engine is level Insert the dipstick fully and check the oil level The oil shall not be con...

Page 5: ...l down sufficiently When removing it turn it slowly to release the pressure NOTE Securely tighten the filler cap after checking the radiator Steam can spurt out during operation if the cap is not properly tightened Checking coolant volume Check the coolant level in the sub tank If the water level is close to the LOW mark open the sub tank cap and replenish the sub tank with clean soft water or pre...

Page 6: ...o see that the alarm function normally Failure of alarm cannot warn the lack of the engine oil or the cooling water Make it a rule to check the alarm operation before and after starting engine every day Checking accelerator operation Make sure the accelerator of the machine unit can be operated smoothly before starting the engine If it feels heavy to manipulate lubricate the accelerator cable join...

Page 7: ...ounting face of the oil filter Moisten the new oil filter gasket with the engine oil and install the new engine oil filter manually turning it clockwise until it comes into contact with the mounting surface and tighten it further to 3 4 of a turn with the filter wrench Tightening torque 2 0 2 4 kgf m 14 4 17 3 lbf ft Applicable oil filter part number 119305 35150 Figure 5 Replacement engine oil fi...

Page 8: ...flection in the following manner Press the V belt with your thumb approx 98N 10kgf at the middle of the V belt span to check the tension deflection Available positions to check and adjust the V belt tension deflection are at the A B or C direction as shown in the illustration right You may choose a position whichever you can easily carry out the check and adjustment on the machine unit New V belt ...

Page 9: ...e for 5 minutes and readjust the deflection to the value in the table above Visually check the V belt for cracks oiliness or wear If any replace the V belt with a new one Figure 7 Adjustment V belt tension A B C Bar Adjuster Alternator Inspection 50 hours Be sure to check the following points every 50 hours operation Draining of the fuel tank Figure 8 Draining fuel tank 1 2 3 Fuel tank Drain plug ...

Page 10: ...p even if not the time for periodic inspection hour The cup of the oil water separator is made from semi transparency material and in the cup the red colored float ring which rises on the surface of the drain is installed to visualize the amount of drain Also the oil water separator with a sensor to detect the drain for warning device on the control panel is provided as an option Drain off the oil...

Page 11: ... oil water separator by turning 2 3 times to the counterclockwise using a screw driver or spanner When the fuel coming out is clear and not mixed with any air bubbles tighten the air bleeding screw Feed the fuel with the fuel priming pump or electro magnetic fuel feed pump In case of the engine using the electro magnetic fuel feed pump Turn the starter switch to the ON position and hold it in the ...

Page 12: ...e battery area Keep the area around the battery well ventilated paying attention to keep away any fire source During operation or charging hydrogen gas is generated from the battery and can be easily ignited NOTE Do not come in contact with battery electrolyte Pay sufficient attention to protect your eyes or skin from being in contact with the fluid The battery electrolyte is diluted sulfuric acid...

Page 13: ...he fluid level should be checked earlier than the specified times If the engine cranking speed is so slow that the engine does not start up recharge the battery If the engine still will not start after charging replace the battery Remove the battery from the battery mounting of the machine after daily use if leaving the machine in a place that the ambient temperature could drop at 15 C 5 F or less...

Page 14: ...t with hydrometer Figure 14 Measurement battery charge 1 Float When using a hydrometer the measured specific gravity must be corrected according to the temperature at the time of measurement The specific gravity of battery electrolyte is defined with 20 C 68 F as the standard Since the specific gravity increases or decreases by 0 0007 when the temperature varies by 1 C 33 8 F correct the value acc...

Page 15: ... replace it if corroded Retighten if loosened Battery appearance Replace the battery if cracked or deformed Clean with fresh water if contaminated Inspection every 250 hours or 3 months Be sure to check the following points every 250 hours or 3 months operation whichever comes first Oil and filter replacement The second replacement and after Replace the engine oil every 250 hours operation from 2n...

Page 16: ...p water shower NOTE Wear protective equipment such as goggles to protect your eyes when blowing compressed air Dust or flying debris can causes eye injury NOTE Do not use high pressure water or air close to the fins or do not attempt to clean using a wire brush Radiator fins can be damaged Checking and adjusting radiator fan V belt Check and adjust the V belt tension See Inspection initial after 5...

Page 17: ...he limiting screw NOTE Do not release the limiting screws It will impair the safety and performance of the product and functions and result in shorter engine life Air cleaner element cleaning Figure 19 Cleaning air cleaner element double type 1 2 3 4 5 6 Dust indicator optional Air cleaner case Inner element Outer element Dust pan Air blow The engine performance is adversely affected when the air ...

Page 18: ...acing the element clean inside of the dust pan at the time If having the air cleaner with double elements do not remove the inner element If the engine output is still not normal or the dust indicator still actuates if having the air cleaner with a dust indicator even though the outer element was replaced with a new one replace the inner element with a new one Fuel filter element Figure 20 Replace...

Page 19: ...ring Retaining spring Retaining ring Fuel cock A B C D Inlet Outlet Close Open The cup of a water separator is translucent and the inside can be seen The float ring rises when water collects at the bottom of the cup Periodically wash the water separator and inside cup with clean fuel oil Close the fuel cock Loosen the retaining ring and remove the cup Take the water and trash in the cup out Wash t...

Page 20: ...it cool down sufficiently When removing it turn it slowly to release the pressure Coolant contaminated with rust or water scale reduces the cooling effect Even when antifreeze agent LLC is mixed the coolant gets contaminated due to deteriorated ingredients Replace the coolant at least once a year Remove the radiator cap Loosen the drain plug at the lower portion of the radiator and drain the coola...

Page 21: ...phragm rubber and the spring If necessary replace with new ones When a diaphragm is damaged pressure control inside the crankcase becomes insufficient and troubles such as combustion defect and so on occur At lubricating oil replacement or lubricating oil supply the amount of lubricating oil isn t to be beyond the standard upper limit If the lubricating oil quantity is beyond the upper limit or an...

Page 22: ...Thank you very much for your reading Please click here and go back to the website Then you can download the complete manual instantly No waiting ...

Page 23: ...cessary since the valve seat may be worn abnormally Insert a thickness gage between the rocker arm and valve cap and record the measured valve clearance Use it as the data for estimating the wear state Turn the crankshaft clockwise viewed from radiator side at 240 and make adjustment for the No 3 cylinder Then adjust the No 2 cylinder in this order In case of 2 cylinder engines turn the crankshaft...

Page 24: ...e of the potential risks because of the high pressure If the jet has penetrated the skin quickly call for medical assistance Injection pressure measurement 125 5 kgf cm2 1978 71 psi Remove carbon deposit at the nozzle hole thoroughly before measurement Connect the fuel injection valve to the high pressure pipe of the nozzle tester Operate the nozzle tester lever slowly and read the pressure at the...

Page 25: ...ut 5 seconds at a little before the valve opening pressure of 20 kgf cm2 285 psi and check to see that oil does not drip from the tip end of the nozzle If extreme oil leak from the overflow joint exists during injection by the nozzle tester check after retightening If excessive oil is leaking replace the nozzle assembly Spray and injection states Figure 29 Uniform spray pattern normal Operate the ...

Reviews: