Viale Vicenza 14
36063 Marostica VI - Italy
www.vimar.com
03975 01 2109
03975 - Voice control with 2 push buttons and actuator
SMART HOME
Alexa built-in voice control device with built-in Wi-Fi, two front buttons, RGB LED backlighting, 1
input for wired push button, 1 relay output for local or remote control, designed for use on View
Wireless mesh system thanks to IoT technology on Bluetooth technology 5.0 standard and on
By-me Plus system thanks to the By-me bus - 3 modules.
THREE OPERATING MODES (ALTERNATIVE)
Stand alone
•
View Wireless System
•
By-me Plus System
Stand alone
View Wireless System
By-me Plus System
Front
buttons
Relay ON-
OFF control.
Configuration with
View App.
Relay ON-OFF control.
Configuration with
View Wireless App and
management from View App.
Freely configurable
with the View Pro App.
Management from
View App.
Relay
It is controlled from
the front buttons
and from the remote
wired push button.
It is controlled from the
front buttons and from the
remote push button.
Freely configurable
with the View Pro App.
Remote
push button
Relay ON-OFF
control.
Relay ON-OFF control or
scenario activation.
Freely configurable
with the View Pro App.
Download the View
App from the stores onto the tablet/smartphone you will be
using for configuration.
Depending on the mode you select, you will also need:
Stand alone
View Wireless System
By-me Plus System
Nothing else
Gateway
art. 20597-19597-16497-14597
Home automation system gateway
art. 01410 or 01411
View Wireless
App for
configuration in the system
View Pro
App for
configuration in the system
IMPORTANT: In View Wireless and By-me Plus systems, relays, buttons and push buttons
should always be configured first. Subsequently, the voice control should be configured
using the View App.
CONFIGURATION IN THE VIEW WIRELESS SYSTEM
1.
Create your Installer account on MyVimar (on-line).
2.
Wire all the devices in the system (2-way switches, relays, thermostats, gateway, etc.).
3.
Start the View Wireless App and log in with the credentials you just created.
4.
Create the system and the environments.
5.
Associate all the devices with the environments, except for the gateway (which should be
associated last).
To associate the device 03975 in order to manage its relay output:
• Select “Add” (
), choose the environment to place it and give it a name
• Select ; activate the Bluetooth connection on your tablet/smartphone and approach the
device
• Simultaneously press button
G
followed by button
E
for 5 s; set the function of the relay, the
parameters and any wired control with the related function.
6.
For every connected device, set the function, the parameters and any accessory devices
(wired or radio control and related function).
7.
Transfer the configuration of the devices to the gateway and connect it to the Wi-Fi network.
8.
Transfer the system to the Administrator user (who must have created his/her profile on
MyVimar).
For details please refer to the View Wireless App manual you can download from www.
vimar.com
DOWNLOAD
APP MOBILE
View Wireless
CONFIGURATION IN THE BY-ME PLUS SYSTEM
1.
Create your Installer account on MyVimar (on-line).
2.
Wire all devices in the system (gateway, touch screen, relay, thermostats, etc.).
3.
Start the View Pro App and log in with the credentials you just created.
4.
Create the system and enrol the gateways and touch screens
5.
Create the environments, enrol the devices and create the applications.
To enrol the device 03975 in order to manage its two front buttons and its relay output:
• Choose the environment in which to place it and select
• Select “START” and simultaneously press button
G
followed briefly by
D
6.
For each device, set the functions and parameters
7.
Transfer the system to the Administrator user (who must have created his/her profile on
MyVimar).
For details, please refer to the manuals for the VIEW IoT Smart System platform and
the By-me Plus system you can download from www.vimar.com
DOWNLOAD
APP
MOBILE
View Pro
VOICE CONTROL CONFIGURATION
1.
Create your Administrator account on MyVimar (on-line).
2.
Wire the voice controls and any wired push buttons
3.
Start the View App and log in with the credentials you just created.
4.
To associate the voice control:
• For the Stand alone mode only, select “Create smart ecosystem” and give it a name.
• Activate the Bluetooth connection and geolocation on your tablet/smartphone
• For the Stand alone mode, select the ecosystem you just created
“Customise”
“Add
device”.
• For integration with View Wireless and By-me Plus systems, select the system
“Customise”
“Smart devices”
“Add” (
).
• Press button
G
for 5 s
• Press “Start” and follow the instructions of the configuration wizard
5.
Create your Amazon account (or use the one you already have) and log in.
6.
Activate the Vimar Skill in the Alexa App and control the device by voice.
Functions supported
Amazon Music Streaming and TuneIn
Kindle and Audible audiobook
Basic conversation
Multi-turn conversation
For details please refer to the View App manual you can download from www.vimar.com
DOWNLOAD
APP MOBILE
View
CONTROLLABLE LOADS
Loads
100 V~
250 W
50 W
60 W
125 VA
240 V~
500 W
100 W
120 W
250 VA
DEVICE RESET
Stand alone
View Wireless System
By-me Plus System
Resetting the Wi-Fi
configuration and Alexa
Press button
G
for 30 s
Resetting the home
automation system
part (buttons and
relays) and the Wi-Fi
configuration and Alexa
Concurrently with
resetting the Wi-
Fi configuration
and Alexa
Within the first 5
minutes of powering
the device, press
buttons
G
and
E
simultaneously for 30 s
After resetting the
device from the
View Pro App, press
buttons
G
and
C
simultaneously.
When reset is complete, the illuminated ring is turned off.
INSTALLATION RULES
• Installation and configuration must be carried out by qualified persons in compliance with the
current regulations regarding the installation of electrical equipment in the country where the
products are installed.
• The device must be installed in flush mounting boxes or surface mounting boxes with Eikon,
Arkè, Idea (with dedicated mounting frame 16723) and Plana mounting frames and cover
plates.
• The device should only be installed horizontally at a height of between 0.8 and 1.6 m from floor
level.
• To ensure correct device operation do not install it near any obstacles.
• The relay output power circuit must be protected against overloads by installing a device, fuse
or automatic 1-way switch, with a rated current not exceeding 10 A.
CHARACTERISTICS
• Rated supply voltage: 100-240 V~, 50/60 Hz.
• Maximum consumption: 2 W
• RF transmission power: < 100mW (20dBm).
• Frequency range: 2400-2483.5 MHz.
• Terminals:
- 2 terminals (L and N) for line and neutral
- 1 terminal (P) for connection to the remote wired push button (for instance art. 20008-
19008-16080-14008).
The max distance between the IoT device and the push button is
50 m with a cable with a minimum cross-section of 1.5 mm
2
.
- 1 terminal (1) for the relay output in voltage NO 100-240 V 50/60 Hz
• The radio control 03925 cannot be used as an accessory device for the voice assistant
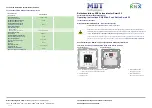
• 4 front buttons delimited by an illuminated ring which, depending on the colour, identifies the
statuses of the vocal function
• 2 front buttons fitted with RGB LEDs with configurable colour