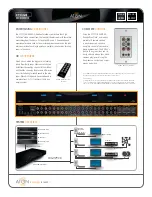
background image

1

g4observerone - 1

G4-ObserverONE

The G4-ObserverONE is best suited for Multi-10 Gb data centers.

G4-ObserverONE technical specifications

The technical specifications for the product are shown below.

System

-

Deployment

Multi-10 Gb data center

Base storage

192TB

Max storage

192TB

Lights Out Management (LOM)

Yes

Redundant OS drive

Yes

OS drive hot swappable

Yes

OS drive size

1 TB

RAID drive hot swappable

Yes

RAID version

6

Rail kit

Yes

Operating system

Windows 2012 R2

Physical

-

Height

4U

Width

19 in

Depth

26.5 in

Weight (with mounted rail kit or portable

unit without a travel case)

116 lbs

Weight (handling or portable unit in a

travel case)

121 lbs

Media

-

Monitoring interfaces

8

Speed

1/10 Gb

Accepted transceivers 

1

SFP/SFP+

Performance

-

Summary of Contents for G4-ObserverONE

Page 1: ...rage 192TB Lights Out Management LOM Yes Redundant OS drive Yes OS drive hot swappable Yes OS drive size 1 TB RAID drive hot swappable Yes RAID version 6 Rail kit Yes Operating system Windows 2012 R2 Physical Height 4U Width 19 in Depth 26 5 in Weight with mounted rail kit or portable unit without a travel case 116 lbs Weight handling or portable unit in a travel case 121 lbs Media Monitoring inte...

Page 2: ... the SFP may be any of 10Gb SR LR For QSFP the QSPF may be any 40Gb SR LR BiDi Universal For QSFP28 the QSFP28 tranceivers may be SR4 LR4 or BIDI Parts list Each appliance comes packed in a box or several boxes The boxes contain the various components necessary for a successful installation The G4 ObserverONE appliance box contains the following components 1 Head unit with RAID drives preinstalled...

Page 3: ...ance is very heavy Always use a server lift or work with a partner to install or remove the appliance from the cabinet to perform any maintenance 1 Mount the appliance in your cabinet Refer to the instructions on VIAVI Rail Kit page 9 Use a server lift if necessary Do not remove the drives from the chassis 2 Connect the cables Power Ethernet TAP Span IPMI optional 3 Insert the transceivers 4 Conne...

Page 4: ...NE Rear 5 Connect a monitor keyboard and mouse to the hardware appliance You can use a KVM switch if desired The KVM must be compatible with the operating system used on the appliance The user input devices or KVM switch are only temporarily needed to set the IP address so you can disconnect them after the IP address is set 6 Turn on the appliance and wait for the RAID to initialize After plugging...

Page 5: ...wn by IPMI or power button Press the power button once After a power loss The system will power up automatically approximately fifteen seconds after the power returns Power down Turn off the unit using a clean operating system shutdown from Windows 1 Release the power button after blue LED stops blinking and goes dark 2 The shutdown sequence will begin and shut down the system within ten seconds H...

Page 6: ... or KVM switch are only temporarily needed to set the IP address so you can disconnect them after the IP address is set The IP subnet and gateway or router addresses are available and known to you 1 Log in to the Windows operating system using the Administrator account and its default password admin You can change the Administrator account password after logging in See the Windows documentation if...

Page 7: ...Then you should change the administrator password to something different than the default 1 Connect an Ethernet cable from your router or switch to the IPMI or LOM port 2 When starting your appliance press Delete during POST to enter the BIOS setup 3 In the BIOS choose IPMI BMC network configuration Figure 6 BIOS IPMI tab 4 Set Update IPMI LAN configuration to Yes 5 Set Configuration Address sourc...

Page 8: ...k Modify User and change the password 11 Optional Set up alerts There is no audible alarm if there is an issue with a power supply unit Other alerting options are available Each must be configured separately using details from your environment To receive email alerts change the settings at Configuration SMTP To receive SNMP traps change the settings at Configuration SNMP To receive Syslog messages...

Page 9: ... rails The chassis package includes one pair of rack rail assemblies in the rack mounting kit Each assembly consists of an inner rail that secures to the chassis and an outer rail that is attached directly to the rack The inner rails are etched with L Left side and R Right side The rail is on the correct side and mounted correctly if the lettering if face up Figure 8 Rail kit inner assemblies 2 Id...

Page 10: ...s of the rack Figure 10 Extending and mounting outer rails 11 Hang the hooks of the rear section of the outer rail onto the square holes on the rear of the rack Take care that the proper holes are used so the rails are level If desired use screws and washers to secure the rear of the outer rail to the rear of the rack 12 Repeat for the other outer rail The rails are attached Next insert the server...

Page 11: ...rous for a single person to off load the heavy chassis from the rack without assistance Be sure to have sufficient assistance supporting the chassis when removing it from the rack Use a server lift 1 Pull the chassis forward out the front of the rack until it stops 2 Press the release latches on each of the inner rails downward simultaneously and move the chassis forward in the rack Figure 11 Remo...

Reviews: