VIA Technologies Viega, User Manual
Get your hands on the comprehensive User Manual for VIA Technologies Viega for free! This essential guide provides detailed instructions on how to maximize the potential of your product. Download it now from our website to unlock the full potential of VIA Technologies Viega.
Share
Download


Reviews:
No comments
Related manuals for Viega

PLAY
Brand: NATIVE UNION Pages: 12

e-medic Keyboard
Brand: Baaske Medical Pages: 20

SMART W102
Brand: Iget Pages: 33

VT32
Brand: ClearClick Pages: 18

Cintiq Pro 24 Pen
Brand: Wacom Pages: 71
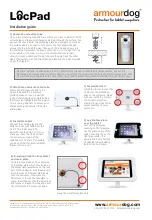
Armourdog LocPad ADLOC102W
Brand: Lente Designs Pages: 6

TVE1021G
Brand: TechVision Pages: 20

MID NB726A
Brand: Global Phoenix Pages: 25

IA83
Brand: Winmate Pages: 106

PS-100+
Brand: Block Pages: 26

PE 2525
Brand: PERPETUUM EBNER Pages: 16

ellipsis 10
Brand: Verizon Pages: 12

LS-500
Brand: LENCO Pages: 94

Classic Phono TT-41
Brand: LENCO Pages: 82

X10
Brand: Evolio Pages: 7

20004503
Brand: Comelit Pages: 24

RCT6103W46
Brand: RCA Pages: 20

Mars 8
Brand: RCA Pages: 21


