background image

The Complete Guide to the VAVA Dash Cam

Model: VA-CD001 

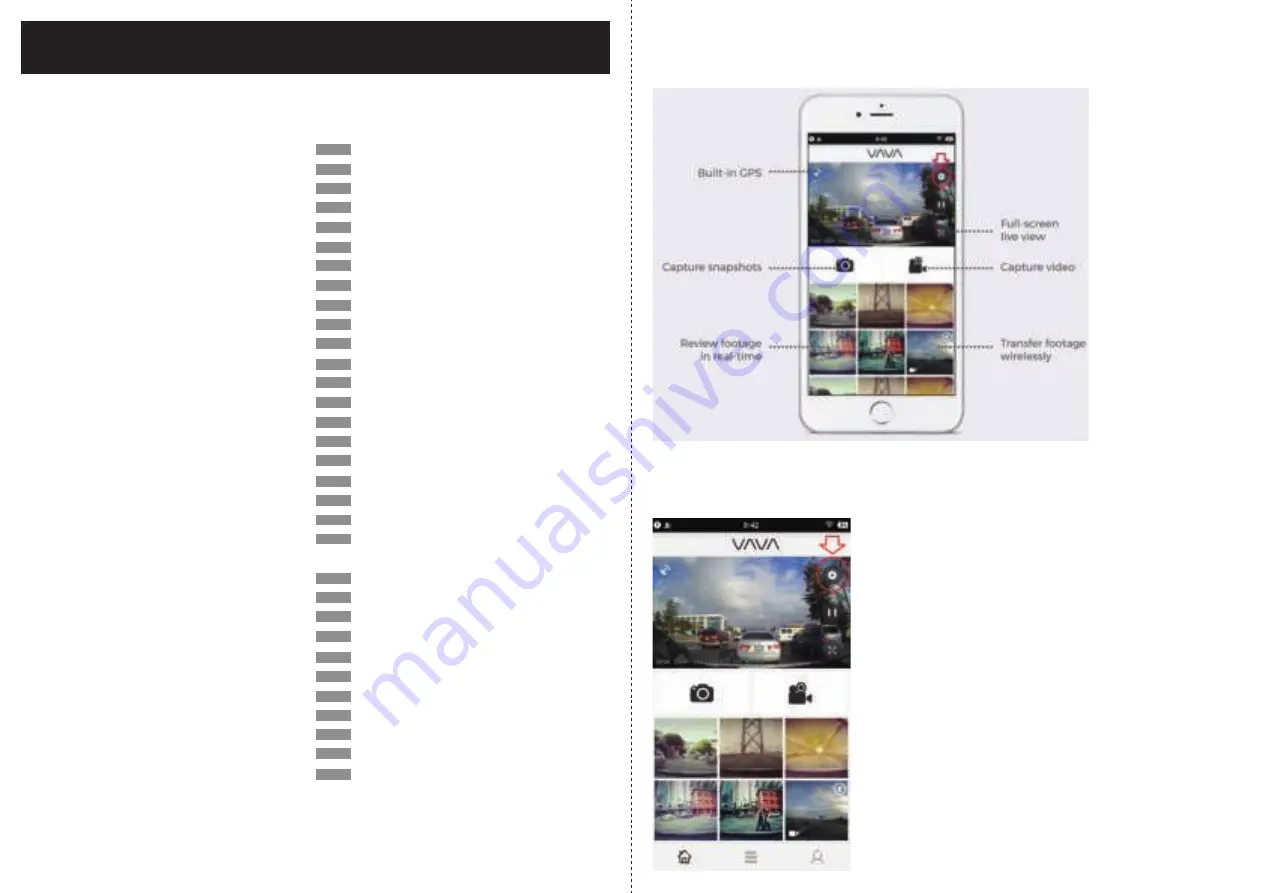
After connecting your phone with the VAVA Wi-Fi, open the app and connect the VAVA 
dash cam. Tap on the play icon to access the live feed, you will be routed to this home 
page. Here is an overview of VAVA dash cam app.

Table of Contents 

1. App Overview

2. Hardware Options Settings

2.1. Changing the Wi-Fi Name / Password

In the top right corner of the screen, there will show the icon for the hardware settings of 
the dash cam.

1. App Overview
2. Hardware Options Settings
    2.1. Changing the Wi-Fi Name / Password
    2-2. Automatic Recording Time
    2-3. Video Resolution
    2-4. G-Sensor Settings
    2-5. Parking Monitor
    2-6. Record Sound
    2-7. LED Indicator
    2-8. Record Sound
    3-2. Show Driving speed
    3-10. GPS
    3-11. Device Information
    3-12. Restore Factory Settings
    3-13. Format SD Card
4. Photo Filters with the VAVA Dash App
5. Create Video Clips with the Dash App
6. Travel Log
7. Help and Feedback Form
8. VAVA Dash App Settings 
9. Connection & Installation Guide and 
    Electronic User Manual
10. App and Firmware Version
11. Update the Firmware via App
12. Update the Firmware via TF Card 
13. FAQ
13.1 Wi-Fi & App Connection
13.2 Snapshot Button
13.3 Video Recording
13.4 Installation
13.5 Micro SD Card
13.6 Firmware Update
13.7 Other Issues

01

01

01-10

01-03

03

04

04

05-06

06

06

07

07

08

08-09

09

10

10-13

13-15

16-18

18-21

21-23

23-25

26

27-30

31-32

32-35

32-33

33

34

34

34-35

35

35

Summary of Contents for VA-CD001

Page 1: ...lution 2 4 G Sensor Settings 2 5 Parking Monitor 2 6 Record Sound 2 7 LED Indicator 2 8 Record Sound 3 2 Show Driving speed 3 10 GPS 3 11 Device Information 3 12 Restore Factory Settings 3 13 Format S...

Page 2: ...enu Tap on the current password setting to edit your dash cam s Wi Fi password Please note that changing the password will also disconnect you from the app and the dash cam s Wi Fi network We suggest...

Page 3: ...ings First enter the Hardware settings from the live feed in the app To adjust the G Sensor sensitivity tap on the G Sensor setting By default the sensitivity is set to Medium Setting to Never will tu...

Page 4: ...are a few more settings which can be switched on and off Record Sound Record audio when a video is taken with the dash cam 2 7 LED Indicator 2 8 Record Sound 3 2 Show Driving speed LED Indicator Switc...

Page 5: ...to the same hardware settings we explored previously Tap on Device Information to bring up stats for your VAVA Dash Cam This will show you how many Video and Photos are currently saved on your SD car...

Page 6: ...ken with the VAVA Dash Cam The VAVA Dash App is configured with 16 photo filters which can be applied to your photos We will be sharing here where to find these photo filters to edit your own photos t...

Page 7: ...the VAVA Dash Cam We hope this was informative and helpful Please do share the photos taken with the Dash Cam and apply filters to your photos We are excited to see some amazing photos our community...

Page 8: ...ideo is downloaded tap on the video to open up in the viewer At the bottom of the screen will show that magic wand icon here as well Tap on this icon to bring up the video clip edit feature Step Four...

Page 9: ...disconnect your phone from the VAVA Wi Fi make sure it can use your data network or a working Wi Fi so your phone can use the Google Map and show up the completed travel log For iOS phones you can als...

Page 10: ...d feedback or ask for help with an issue you are experiencing right through the app First tap on the App settings icon Second tap on the VAVA logo to bring up the login screen Third tap on Register to...

Page 11: ...he VAVA Dash App In this section we will be covering the Check Storage changing Units and the Auto Snapshot Download Toggle setting First tap on the icon on the lower right of the screen Any messages...

Page 12: ...Installation Guide and Electronic User Manual The user guides for the VAVA Dash Cam and the VAVA Dash App can be found within the app If you ever need to reference the owner s manual you can simply p...

Page 13: ...llation guide walks you through with installing the dash cam in your vehicle The Connection guide walks you through with how to connect your mobile device to the dash cam s Wi Fi signal The VAVA Dash...

Page 14: ...Dash App and the latest firmware version onto the VAVA Dash Cam Bust Icon to get into App settings Select Update option to view latest version First make sure that the VAVA Dash App is updated from th...

Page 15: ...Wi Fi off and then on again to connect to your home Wi Fi network Tap on update or on the firmware version if you had to go through app settings to bring up the download page Download progress Once c...

Page 16: ...cam will begin flashing Once the dash cam begins flashing a blue LED your device is ready to go Once the upload is finished you will receive a second firmware update popup Repeat the previous steps to...

Page 17: ...hot Button will automatically enter sleep mode press it again to wake it up Q2 What if the Snapshot Button does not work A Please use the SD Card ejector to open the snapshot button and peel off the t...

Page 18: ...the card before use to ensure the normal function of the dash cam A 32GB TF card can provide spaces for 4 to 5 hours of video recording in 1920 1080 60fps format Long time use of the card will compro...

Reviews: