

Juplink RX4-1500 08/2019
© 2019 Juplink All rights reserved.
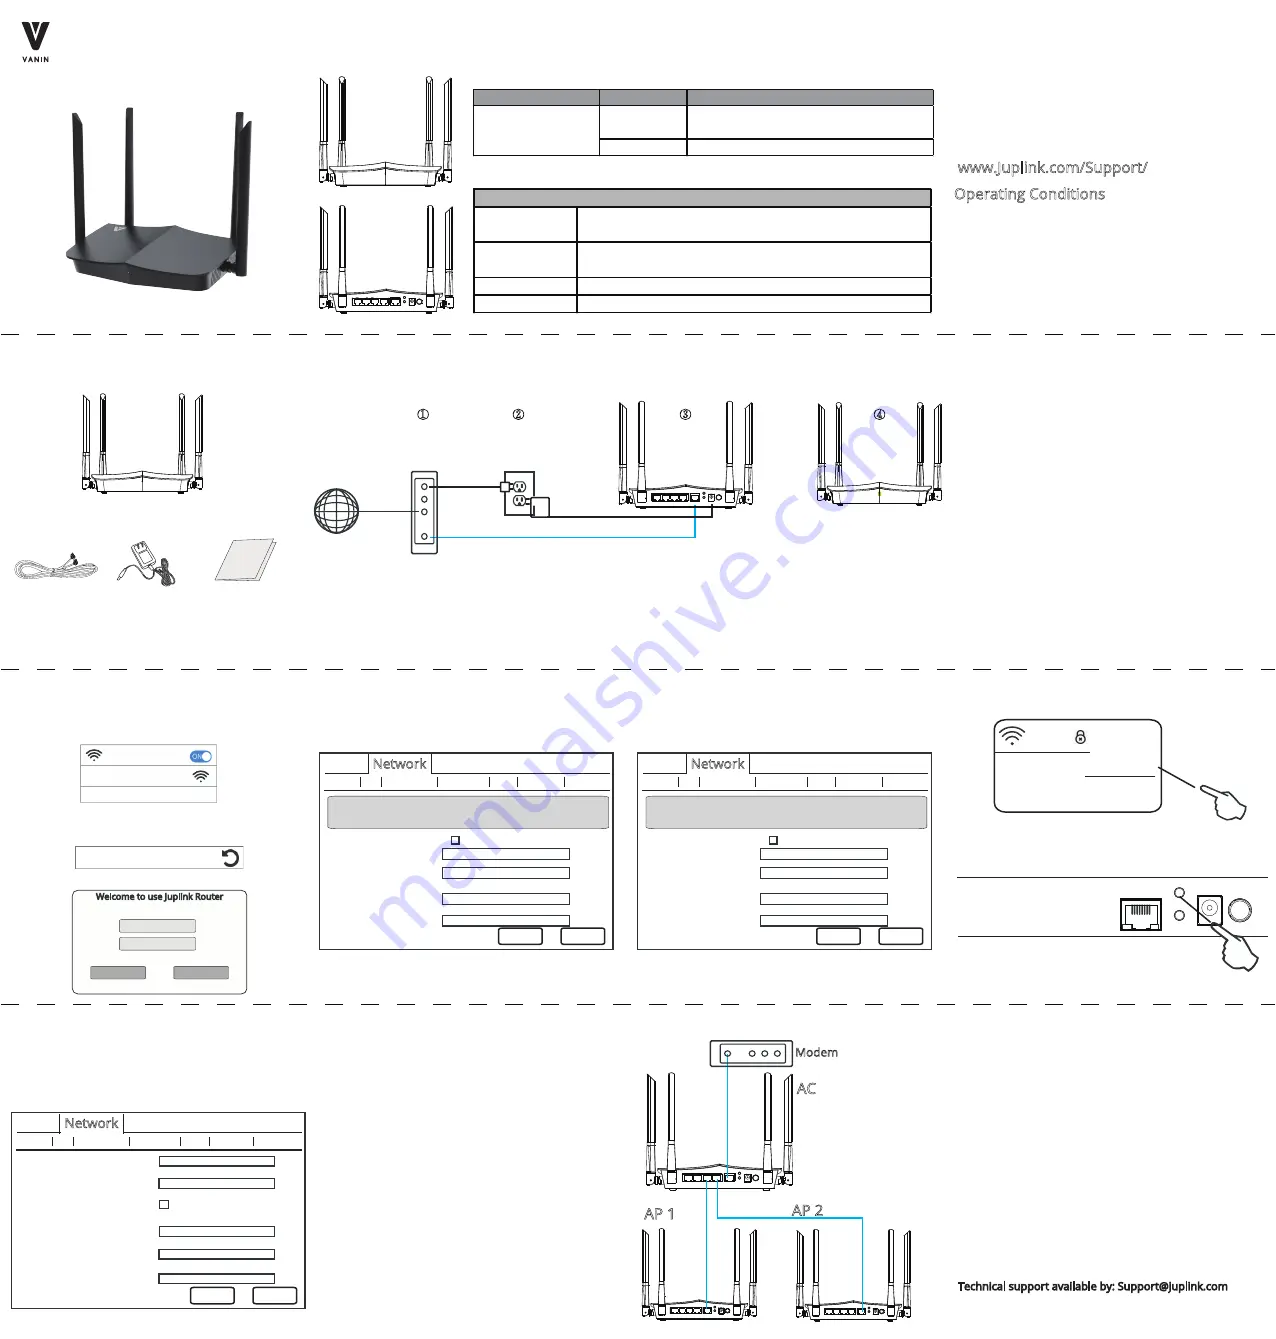
Juplink RX4-1500 Router
AC-DC Adapter
Ethernet cable
Quick Start Guide
RX4-1500
Quick Start Guide
Wi-Fi 6 Router
Front Panel LED Status Indicators
Front Panel LED
GREEN
To customize your wireless network
connection and other advanced router
settings, please go to this website to
download RX4-1500 User Guide for
more information.
www.Juplink.com/Support/
Operating Conditions
Working Temperature: 0~40°C / 32~104°F
Working Humidity: 10%~90% RH
(No condensation)
Storage Temperature:-10~70°C / 14~158°F
Storage Humidity: 5%~95% RH
(No condensation)
Before Setting
Step 2: Internet setting and wireless setting
Step 3:2.4G Network Setting
Step 4: 5 G Network Setting
①
Connect to the wireless Network name shown
on the back of the router ( you can change the
network name and password later )
②
③
Start a web browser on the device connected
to the router. Enter 192.168.0.1 in the address
bar and press enter.
Please input usename/password to login
username
Login
admin
admin
Cancel
password
Welcome to use Juplink Router
WLAN
Juplink RX4-1500
Username:admin / Password :admin
http://192.168.0.1
WPA-PSK/WPA2-PSK
Status
Network
Security App Manage Help
Network LAN 2.4G Setting 5G Setting
Noted this page allows you to set the wireless net
work name (SSID) and password
Enable Wireless
SSID
Juplink_RX4-1500
Authentication Mode
WPA-PSK/WPA2-PSK Authentication is recommended
Encryption
AES
Apply
Cancel
Wireless Pre-shared Key
*******
Wireless Basic Configuration
SNTP WiFi Sync Guest SSID
②
Customize your WiFi Name and WiFi Password, and
click Apply button.
WPS Pairing
Back of your router view
RX4-1500
WPS Connect
Reset
WPS
②
Press the WPS button for 3 seconds, the LED
indicator blinking and enable the WPS-supported
device within 2 minute to establish a WPS connection
the LED indicator solid on.
①
Click the WPS connect on your device
Device WLAN connection page
AC-DC power
cord
Internet
Modem
Modem
①
②
③
④
Ethernet WAN IN
LAN out
②
Use the included power adapter to connect the router to a power source. The LED indicator lights solid on.
①
Turn on the modem that is providing your internet connection, then let it register with your ISP.
③
Connect the WAN port of the router to a LAN port of your modem or to an Ethernet port.
④
When The LED indicator lights solid on connect your device to the router.
Step 1: Basic Installation
Packing List
AC Wall
LAN4
LAN3
LAN2
LAN1
WAN
Reset
WPS
POWER ON/OFF
③
The router will reboot and you can reconnect with
new wireless network name ( SSID ) and new
password after 10 seconds.
①
Select Network then select 2.4G setting.
WPA-PSK/WPA2-PSK
Status
Network
Security App Manage Help
Network LAN 2.4G Setting 5G Setting
Noted this page allows you to set the wireless net
work name (SSID) and password
Enable Wireless
SSID
Juplink_RX4-1500 5G
Authentication Mode
WPA-PSK/WPA2-PSK Authentication is recommended
Encryption
AES
Apply
Cancel
Wireless Pre-shared Key
*******
Wireless Basic Configuration
SNTP WiFi Sync Guest SSID
②
Customize your WiFi Name and WiFi Password, and
click Apply button.
③
The router will reboot and you can reconnect with
new wireless network name ( SSID ) and new
password after 10 seconds.
①
Select Network then select 5 G setting.
Before Installation Please complete the following settings
①
Connect your Modem out to your AC router WAN Port
②
Connect your AP router WAN Port to your AC router LAN Port
Nanjing Juplink Intelligent Technologies Co., Ltd.
Address : No. 757 Dixiu Road, Binjiang Economic
Development Zone, Jiangning District, Nanjing
Technical support available by: [email protected]
Website: www.juplink.com
Made in China
Other Wireless Modes Setting- AP Mode Setting
AP mode Installation
LAN1
LAN2
LAN3
LAN4
WAN
Reset
WPS
POWER
ON/OFF
LAN1
LAN2
LAN3
LAN4
WAN
Reset
WPS
POWER ON/OFF
LAN1
LAN2
LAN3
LAN4
WAN
Reset
WPS
POWER ON/OFF
Modem - LAN
AC- WAN
AP- WAN
AC1- LAN
AC2- LAN
AP- WAN
Modem
AC
AP 1
AP 2
①
Connect a computer to the Juplink AP router and
launch a web browser.
②
Visit http://192.168.0.1
,
you are prompted to enter
a username and password. The home page displays
:
③
Select Network and click LAN
④
Manually set IP address as the following format
:
192.168.0.XXX ( XXX is any number of 2~254)
⑤
Turn off DHCP function and click Apply button,
setting finished.
Note: If the default login credentials do not work, you
might have changed the admin password. If you cannot
remember your new password, you must perform a
factory reset to restore the router to its factory default
settings. For more information, see Restoring a Juplink
home router to the factory default settings.
Status
Network
Security App Manage Help
Network LAN 2.4G Setting 5G Setting
Apply
Cancel
SNTP WiFi Sync Guest SSID
IP Address:
Subnet Mask:
Enable DHCP Server
192.168.0.1
255.255.255.0
Start IP Address:
End IP Address:
Subnet Mask:
192.168.0.2
192.168.0.254
255.255.255.0
LED indicator
Status
Description
Solid on
The router is starting or successfully
connected to the internet.
Fast blin
k
ing The router is performing WPS negotiation
.
G
reen LED Indicator
LAN4
LAN3
LAN2
LAN1
WAN
Reset
WPS
POWER ON/OFF
V A N I N
Ports/ Buttons
Description
WPS/RST
Used to start the WPS negotiation process of the router, or
to reset the router
LA
N
1, 2,3,
4
They are LA
N
ports used to connect to the
w
ired device
such as computers or s
w
itches
WA
N
Port
Used to connect this router to the internet
POWER
Used to connect to the included po
w
er adapter
FCC ID:2AT9Z-RX4-1500


