background image

INSTRUCTION MANUAL

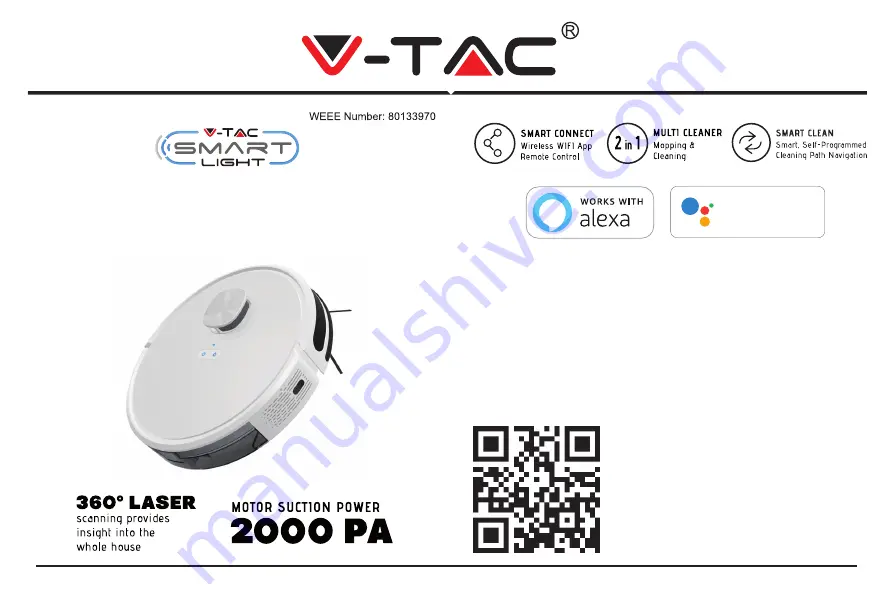
AUTO CHARGING LASER ROBOTIC 

VACUUM CLEANER (VT-5557)

INTRODUCTION

Thank you for selecting and buying V-TAC product. V-TAC 

will serve you the best. Please read these instructions 

carefully before starting the installation and keep this manual 

handy for future reference. If you have any another query

please contact our dealer or local vendor from whom you 

have purchased the product. They are trained and ready to 

serve you at the best. 

MULTI-LANGUAGE MANUAL 

QR CODE

Please scan the QR code to access 

the manual in multiple languages.


1

Ok Google

works with

Summary of Contents for VT-5557

Page 1: ...ructions carefully before starting the installation and keep this manual handy for future reference If you have any another query please contact our dealer or local vendor from whom you have purchased...

Page 2: ...ion Main Unit Product Composition Part Name APP Installation Usage Instruction Routine Maintenance Troubleshooting Product Parameters Common Problems Package Contents 7 8 9 11 15 22 26 29 30 32 Import...

Page 3: ...hall be disposed of This device is for indoor use only This device is not a toy Do not sit or stand on this device Small children and pets should be supervised when this device is operating Store and...

Page 4: ...nment 4 If the room to be cleaned has a balcony a physical barrier should be used to prevent access to the balcony and to ensure safe operation Do not place anything on top of this device Be aware tha...

Page 5: ...arging base shrapnel 5 Keep the hair clothes fingers and other parts of the human body away from the opening or operating parts of the product Do not use the product to vacuum any items that may block...

Page 6: ...he retailer is legally obliged to take back your old appliance for disposal at least free of charge Notice Dispose of used batteries properly and send them to profes sional recycling agencies If the p...

Page 7: ...Side Brush 2 sets Docking Station High Efficiency Filter Sponge Mop Holder Power Adapter Mop Pad 2in1 Dustbin Water Tank Robot Instruction manual Cleaning Brush Package Contents 7...

Page 8: ...g networked Normally on Wi Fi networked Recharge Pause Press it to recharge pause System reset button Use a needle to press this button to reset the device Power Clean Pause Press and hold the button...

Page 9: ...k side Sensor and Structure Product Composition Part Name 9 Infrared receiver sensor Bumper Button Laser radar Charging contact Universal wheel Side brush Battery cover Drive wheel Rolling brush Cli s...

Page 10: ...g Station Product Composition Part Name 10 Power status light Charging shrapnel Infrared signal emitter Power socket HEPA filter Sponge filter Primary filter Water tank plasticplug Dustbin button High...

Page 11: ...void being entangled stuck dragged or knocked down by the main unit otherwise personal injury or property damage may be caused 2 Do not use the robot to clean liquid 3 When used in a suspended circums...

Page 12: ...pter to the power supply connect it to the charging base and tidy up the redundant wires 4 Place the charging base on a flat ground against the wall and connect to the power supply Note Ensure a space...

Page 13: ...r charging when you hear the voice of Start charging it means that the robot is being charged successfully Note The sunlight may interfere the recharging signal which may cause the robot vacuum cleane...

Page 14: ...ection cover add appropriate amount of water and then cover tightly please do not add any detergent 2 Put the water tank back into the robot 3 Install the mop on the mop support 4 Install the mop supp...

Page 15: ...it means that the machine has entered the hotspot Networking mode Step 1 Turn the power button ON of the device Then follow the below instruction for the device Step 2 Scan the given QR code or downlo...

Page 16: ...the registration process Ref Fig 3 Once done you will be redirected to V TAC Smart Light Home page Step 6 Tap on Add Device or the sign Make sure the device is switched on Ref Fig 4 Step 4 A Mobile Nu...

Page 17: ...he APP Pairing Mode 1 Smart Mode Power ON the Robot and then press and hold Wi Fi button for 3 seconds the robot will notify with a beep sound and enters EZ Mode Smart Mode The Wi Fi icon will start f...

Page 18: ...seconds indicating the device has entered AP Mode The Wi Fi icon will start flashing slowly indicating the device is now ready for pairing with the V TAC Smart Light App 1 Tap on Other Mode Fig 8 2 T...

Page 19: ...me and password Fig 11 5 Tap on Go to Connect Fig 12 6 Select the Wi Fi name SmartLife XXXX hotspot No Password required 7 Upon successful connection of the Hotspot Smartlife XXX Return to the APP Fig...

Page 20: ...Once it is completed your device will be successfully paired Step 10 Once your device is successfully paired rename the device to your preference And then tap on completed Ref Fig 15 Step 11 You can...

Page 21: ...ace page allows you to control the device remotely offering multiple features Ref Fig 17 21 Fig 17 Fig 18 Forbidden cleaning setting Charging mode Selected area cleaning mode Spot cleaning mode Planne...

Page 22: ...wires may be dragged when the machine is cleaning which may cause power failure to electric appliances and damage items or wires CHARGE Automatic mode After finishing cleaning the robot vacuum cleaner...

Page 23: ...ap and the robot vacuum cleaner will move to the designated position and clean a 1 6m 1 6m square area with itself as the center NOTE Before using this function complete building of the map for the fi...

Page 24: ...area and this area cannot play a role of safety isolation RESTRICTED AREA SETTING Use the mobile APP to select the restricted area editing function select and set the restricted area of cleaning on t...

Page 25: ...which can be modified or closed in your mobile APP OTHER APP FUNCTIONS ROLLING BRUSH RECOMMENDED CLEANING FREQUENCY ONCE A WEEK 1 Turn over the machine press the buckle on the rolling brush cover and...

Page 26: ...DED CLEANING FREQUENCY ONCE A WEEK 1 Turn over the machine upward and pull out the side brush vertically 2 Clear the entangled hairs and dirt and install back the side brush 3 Align the side left brus...

Page 27: ...water tap the highefficiency filter cannot be washed with water 3 After washing shake off the water drops dry the filter and dust bin in the air and they can be used only after they are completely dr...

Page 28: ...lease maintain the main unit in charging state during daily use If the machine is not used for a long time it shall be shut down for storage and charged every three months to avoid damage to the batte...

Page 29: ...or collision sensor is stuck please push the bumper left and right to confirm that it is not stuck Error 5 Low battery please charge Put the main unit on the charging base for charging Error 6 The ma...

Page 30: ...ndicator of the docking station is on Make sure that both ends of the power adapter are properly connected The docking station is not in proper contact with the machine Please clean the docking statio...

Page 31: ...connect to the Wi Fi network again The password is incorrect This machine supports only the 2 4 GHz band Scheduled cleaning cannot be carried out The power is insufficient Scheduled cleaning will be s...

Page 32: ...rameters Battery 2600mah Lithium Battery Operation voltage w 14 4V Diameter 320x320mm Structural class Parameter Water tank capacity 250ml Cleaning mode Auto edge mop floor Working time 110 minutes Ro...

Reviews: