UTStarcom Sidekick ID, Reference Manual
The UTStarcom Sidekick ID Reference Manual is a comprehensive user guide for this popular device. Packed with valuable information and instructions, this manual is available for free download from manualshive.com. Discover all the features and functionalities of the Sidekick ID through this essential resource.
Share
Download


Reviews:
No comments
Related manuals for Sidekick ID

Pursuit
Brand: Pantech Pages: 47

M-1
Brand: i-MOBIL Pages: 52

C-1
Brand: i-MOBIL Pages: 38

AT&T Treo 680
Brand: Palm Pages: 52

SM-S926U1
Brand: Samsung Pages: 204
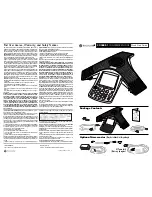
1725-15849-001
Brand: Polycom Pages: 2

W56B
Brand: Yealink Pages: 12

Diamond 2 Plus
Brand: Archos Pages: 75

ROSE100
Brand: HTC Pages: 226

c5017
Brand: PCD Pages: 62

YWH201
Brand: Yuxin Pages: 42

CDM-8100
Brand: Audiovox Pages: 52

FXS
Brand: TELNET Pages: 8

VERA F2401
Brand: ORA Pages: 26

27-00 16-02
Brand: T-Mobile Pages: 59

F953
Brand: Zte Pages: 46

CLEARSOUND ClearText
Brand: Geemarc Pages: 31

AQUOS ZETA SH-01G
Brand: NTT docomo Pages: 106


