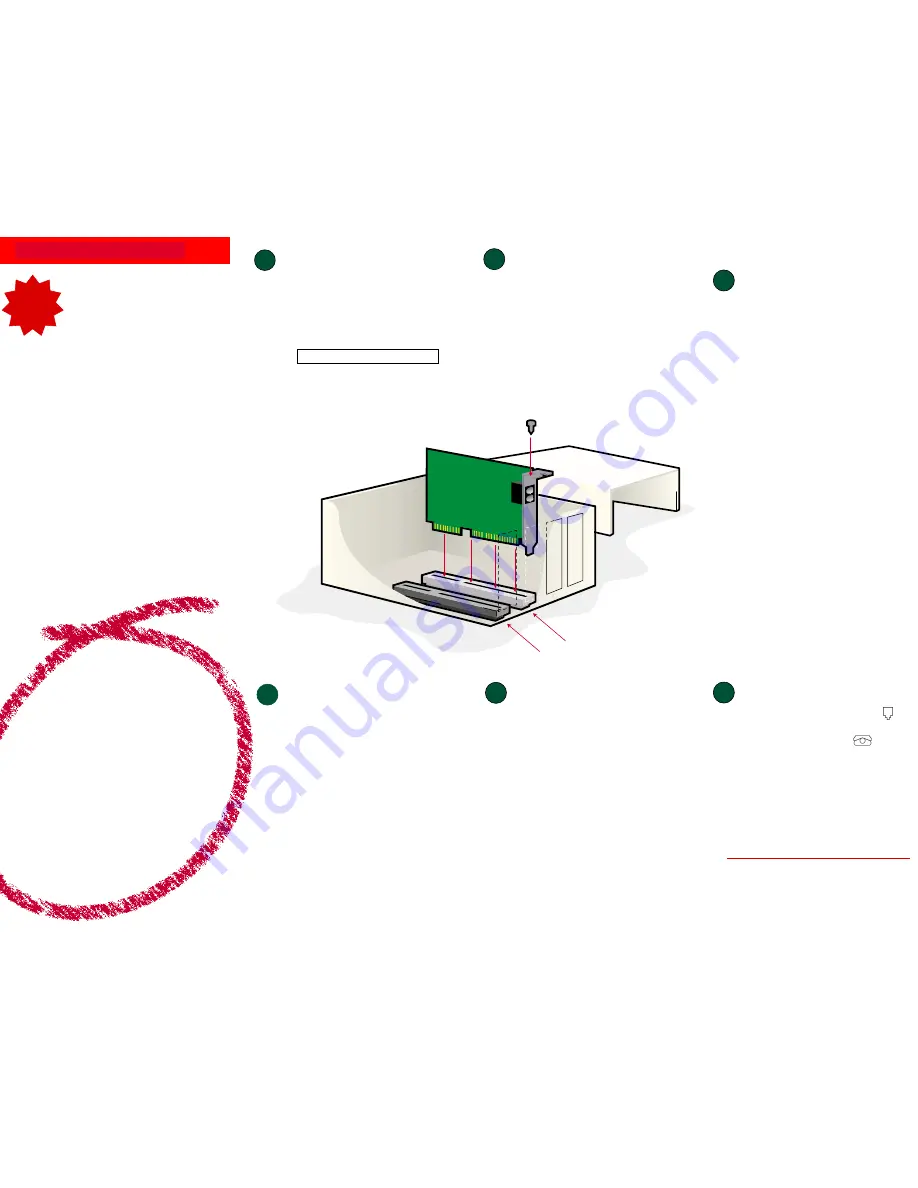
ISA expansion slot
PCI expansion slot
READ
ME
FIRST!
56K
56K
56K
56K
56K
*
**
**
P
P
P
P
Performance
erformance
erformance
erformance
erformance
P
P
P
P
Pro Modem
ro Modem
ro Modem
ro Modem
ro Modem
Installation Guide
for Windows
95, 98, 2000, and NT
part number R24.0004.00
Pr
Pr
Pr
Pr
Prepar
epar
epar
epar
epare for inst
e for inst
e for inst
e for inst
e for installation.
allation.
allation.
allation.
allation.
1
4
Conne
Conne
Conne
Conne
Connect the modem to an
ct the modem to an
ct the modem to an
ct the modem to an
ct the modem to an
analog phone line.
analog phone line.
analog phone line.
analog phone line.
analog phone line.
5
Windows installs the drivers and
installation is verified.
6
Register your modem and install
the
Connections
CD.
Remove the expansion slot cover.
Remove the expansion slot cover.
Remove the expansion slot cover.
Remove the expansion slot cover.
Remove the expansion slot cover.
2
3
Inser
Inser
Inser
Inser
Insert the modem into an
t the modem into an
t the modem into an
t the modem into an
t the modem into an
empty PCI expansion slot.
empty PCI expansion slot.
empty PCI expansion slot.
empty PCI expansion slot.
empty PCI expansion slot.
CAUTION:
To avoid the risk of electrical shock, make sure your com-
puter and all peripheral devices are turned off and unplugged.
Remove the screw and expansion slot cover at the back of an empty
PCI expansion slot. You will need this screw later to hold the modem in
place. The slot cover is located on the back of the computer and covers
an opening on the computer case. The opening lines up with the PCI
slot inside the computer, which is 3.5 inches long and usually made of
white plastic lined with metal.
CAUTION:
To avoid risk of electrical shock, make sure your
computer and all peripheral devices are turned off and unplugged
from electrical outlets. Disconnect any phone cords from the
wall jack.
Insert the modem, gold edge first, into the slot. The modem
should fit snugly into the slot. The modem’s metal bracket will
cover the opening on the back of the computer. Secure the
modem with the screw you removed. Replace the computer’s
cover. Reconnect and turn on all peripherals.
Plug one end of the provided phone cord into the modem’s
jack and plug the other end into an analog phone wall jack.
When you are not using the modem, you can use a telephone by
plugging the telephone’s cord into the modem’s
jack.
Windows 95 and 98 Users
Turn your PC on. Windows will detect your modem and install its
drivers. Reinsert your Installation CD and follow the onscreen
instructions.
Windows NT Users
Turn your PC on. Double-click the
My Computer
icon. Right-click
the
D:\
drive icon and select
Explore
. If your CD-ROM drive uses a
different letter, type that letter in place of “D.” Double-click the
WinNT4
folder. Double-click the
5610
folder. Double-click
setup.exe
. This
will start the Modem Setup Wizard. You can also start the Modem
Setup Wizard by clicking Windows
Start
, and pointing to
Run
. In
the
Open
field, type
D:\WinNT4\5610\setup.exe
and click
OK
.
When the “Modem Setup” screen appears, click
Install
. The “In-
stall Complete” message appears. Click
OK
and restart your com-
puter.
Windows 2000 Users
Turn your PC on. A “Digital Signature Not Found” screen will ap-
pear. Click
Yes
. When the “Found New Hardware Wizard” screen
appears, click
Next
Next
Next
Next
Next
. Follow the onscreen instructions.
The Installation CD includes communications and fax software and
the electronic User’s Guide and Reference for your modem. The
Connections
TM
CD contains a selection of Internet browsers, ISP
offers, and other valuable software.
When your desktop returns, register your modem. At the Installation CD
interface, click the
Support
link. Follow the onscreen instructions to register
your modem and to view the warranty information. (If the Installation CD
interface does not run automatically, click Windows
Start
and then click
Run
. In the “Run” dialog box, type
D:\setup.exe
. If your CD-ROM drive
uses a different letter, type that letter in place of “D.”)
Remove the Installation CD and insert the
Connections CD. The
Connections CD will start automatically once you have successfully
installed your modem. It will guide you through installing the
Connections
program group. If it does not start automatically, click Windows
Start
and
then click
Run
. In the “Run” dialog box, type
D:\setup.exe
. If your CD-
ROM drive uses a different letter, type that letter in place of “D.”
*Note:
If at any time during the installation you are prompted to select the
location of your installation drivers, the following are the correct locations
on the Installation CD (assumes D: is your CD-ROM drive).
Windows 95/98 drivers:
D:\Win9x
Windows 2000 drivers:
D:\Win2000
Windows NT drivers:
D:\WinNT4
For further troubleshooting information and information on contacting
technical support, see the other side of this Guide.
Windows 95 and 98 Users
Insert the Installation CD included with your modem into
your CD-ROM drive. It should run automatically. If it does
not, click Windows
Start
and then click
Run
. In the “Run”
dialog box, type
D:\setup.exe
. If your CD-ROM drive uses
a different letter, type that letter in place of “D.”
Follow the onscreen instructions. When you see the prompt
to shut down your computer, eject your CD, and refer to
Step One of this Guide to continue the installation process.
Windows NT and 2000 Users
Insert the Installation CD included with your modem into
your CD-ROM drive. Follow the onscreen instructions.
Shut down and leave the Installation CD in your CD-ROM
drive. Refer to Step One of this Guide to begin the
installation process.
Before You Begin
For troubleshooting help or to find out how to contact technical
support, see the other side of this Guide.
Copyright© 2000 U.S. Robotics Corporation. All rights reserved. U.S. Robotics and the U.S. Robotics logo are registered
trademarks;
Connections is a trademark of U.S. Robotics Corporation. Windows is a registered trademark of Microsoft Corp.
All other trademarks are used for identification purposes only and may be trademarks and/or registered trademarks of their
respective companies.
*IMPORTANT! In accordance with the ITU-T standard for 56K transmissions (V.90), this modem is capable of 56 Kbps down-
loads. However, the download speeds you experience may lower due to varying line conditions and other factors. Uploads
from users to server equipment travel at speeds up to 31.2 Kbps. An analog phone line compatible with the V.90 standard,
and an Internet provider or corporate host site compatible with the V.90 standard is necessary for these high-speed
downloads.
U.S. Robotics
NOTE:
Before you begin, we recommend you uninstall any other modems
you have in your system. Refer to your old modem’s documentation for
instructions.
Write the modem’s serial number in the box below. The serial number is
located on the white bar code sticker on the modem and on the modem’s
box.
NOTE:
It is very important that you have your serial number written down for
future reference. If you ever need to call our Technical Support department,
you will need this number to receive assistance.
Make sure that your computer is shut down. Turn off your computer and
all peripheral devices. Unplug your computer and remove the computer’s
cover. If you currently have an internal modem in your computer, remove
the telephone cord from the modem before removing your computer’s
cover.


