Unitron Z650HR Series, Manual
The Unitron Z650HR Series offers advanced features and exceptional performance for professional tasks. With its user-friendly interface, this product guarantees seamless operation. Download the free manual from our website to explore all the intricacies of this top-notch device.
Share
Download


Reviews:
No comments
Related manuals for Z650HR Series

Axiostar plus
Brand: Zeiss Pages: 102

VivaTome
Brand: Zeiss Pages: 24

Slit lamp BQ 900
Brand: Haag-Streit Pages: 18
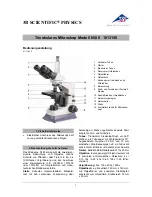
N180 1013150
Brand: 3B SCIENTIFIC PHYSICS Pages: 24

SM-LUX-POL
Brand: LEITZ Pages: 24

Science MTL-201
Brand: Bresser Pages: 16

National Geographic 9119100
Brand: Bresser Pages: 20

National Geographic 9039100
Brand: Bresser Pages: 32

TK2 Scope
Brand: Thames & Kosmos Pages: 52

Axio Zoom.V16
Brand: Zeiss Pages: 43

LSM 510 META
Brand: Zeiss Pages: 76

M834 Series
Brand: Omax Pages: 21

BX60M
Brand: Olympus Pages: 28

6211000
Brand: Labomed Pages: 36

Spotlight 200
Brand: PerkinElmer Pages: 132

RamanMicro 300 Series
Brand: PerkinElmer Pages: 102

CLD-01
Brand: Optica Pages: 10

B-150V Series
Brand: Optica Pages: 162


