Introduction
unitech PA962
First Steps with the Unitech PA962
NOTE: data you enter may not be properly stored until
the built-in backup battery has been adequately charged.
Please be remided to turn on the back up battery before
you charge the terminal
Tour of the unitech PA962
PA962 Front and Left Side
PA962 Back
Additional accessories are shipped separately.
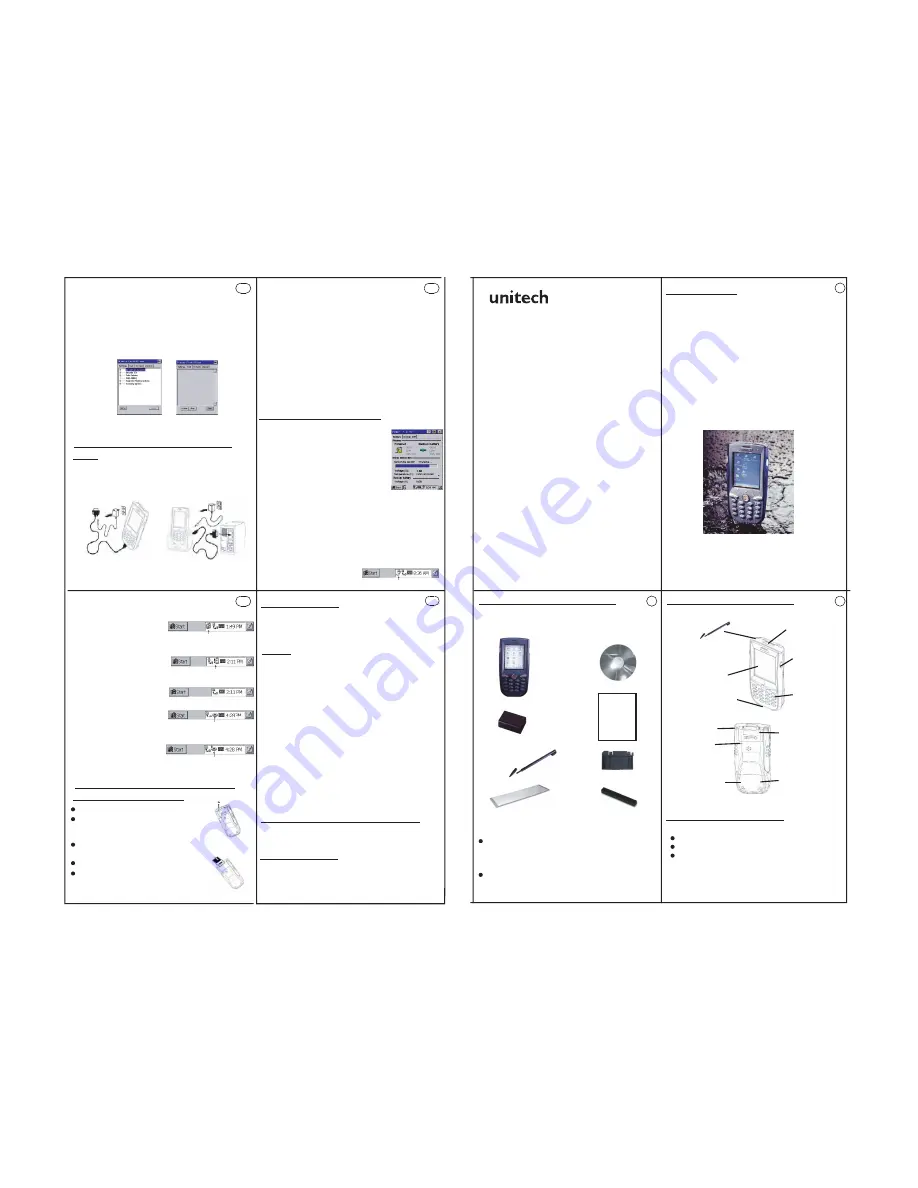
unitech PA962& Accessories
After opening the box, please make sure the
following accessories for the PA962 are present:
Pulling-tags
RF Card Cushion
PA962 Main Body
PA962
Quick Reference Guide
Power system
Power Status Indication
Unpack the box and save the packaging in the
event the unit needs to be stored or returned to
unitech for service.
Check the unit for shipping damage. If anything
is missing or damaged, notify your unitech sales
representative.
There are three ways to provide power to the PA962:
PA962 CD
Installing the Wireless Local Area
Network (WLAN) Card
1
2
3
12
14
13
15
400413 Rev . A
Your PA962 is a rugged, compact and lightweight
palm-size computer. It utilizes the Windows CE®
operating system, and incorporates an integral bar
code scanning laser device, color LCD with touch
screen, keypad, IrDA interface, and wireless
communication capability. It provides the user with
a standard Windows-based environment for
customizing and operating the device.
This PA962 product reference guide will guide you
to access your PA962.
Docking Station
RS232/Charging cable,USB/Charging cable
Rechargeable Lithium-Ion battery pack
Charging the Lithium-Ion Battery
Pack
The optional Docking Station is a convenient accessory for
daily use of the PA962. The charging will be completed
withing 3 hours. Or, when using the included Charging/RS232
Cable or Carging / USB cable the charging time of the battery
pack is about 3 hours.
Charging the Main and Backup Battery for the First Time
Operating the PA962 for the first time without the AC
adapter, and without fully charging the backup battery
may result in loss of data stored in RAM memory.
Note: Backing-up data by backup battery only without the
main battery installed in the battery compartment may take as
long as 8 hours. Therefore, in order to prevent data protection
failure due to backup battery failure, do not leave the PA962
without the rechargeable battery pack installed, or without
connection to AC power for an extended period of time.
It may take up to 72 hours to backup data when the PA962 is
automatically shut down because of very low battery power
while the depleted batteries are still installed in the battery
compartment.
Battery Very Low
Plug with power adapter
Battery Low
Four different icons are displayed on the status bar to indicate
the on-board power status.
“Plug” icon: When displayed, this icon indicates that the battery
is charging. The PA962 is either plugged-in via the DC 12V/2A
power adapter or in the
docking station.
“Battery Low” icon: When displayed indicates the
battery is low and needs to be charged. In other words,
there is no external power supply, the battery charge is low or
very low, and charging the
PA962 is recommended.
“Battery Very Low” icon: When displayed indicates the battery
is very low. Stopping the operation and charging the PA962
immediately is highly
recommended.
Backup Battery Low
Backup Battery Very Low or
Backup Battery is not turned on.
No icon: When displayed means there is no external power
supply to the PA962 but its
battery power status is good.
“Backup Battery Low” icon: When displayed indicates the
backup battery is low and
needs to be charged.
“Backup Battery Very Low” icon: When displayed indicates
the backup battery is very low. Stopping the operation and
charging the PA962
immediately is highly
recommended.
Troubleshooting
If the screen is blank or the unit fails to turn on, charge the
battery for 16 hours. If the battery is fully charged and the unit
still fails to turn on, reboot the device by inserting a pin in the
reset hole.
PCMCIA
card front side
Insert the RF card into the PCMCIA slot.
Attach pulling-tag to antenna.
Attach the snap-on antenna to the RF card if required (only
the Cisco card comes with a pre-installed antenna).
Remove the stylus, using the screw driver in
the stylus to remove the screw, and then
open the PCMCIA compartment
Power off the PA962
Laser
FCC Statement
The Unitech PA962 is certified in the U.S. to conform to the
requirements of DHHS/CDRH 21CFR Subchapter J and to the
requirements of IEC 825-1. Class II and Class 2 products are
not considered to be hazardous. The PA962 contains
internally a Visible Laser Diode (VLD) whose emissions do not
exceed the maximum limits as set forth in the above
regulations. The scanner is designed so that there is no
human access to harmful laser light during normal operation,
user maintenance or during prescribed service operations.
CAUTION
- Use of controls or adjustments or performance of
procedures other than those specified herein may result in
hazardous laser light. Use of optical instruments with the
scanner will increase eye hazard. Optical instruments include
binolulars, microscopes, and magnifying glasses. This does
not include eye glasses worn by the user.
The laser safety warning label required by the DHHS/IEC for
the PA962’s optional laser scanner module is located on the
memory compartment cover, on the back of the unit.
This is a FCC Part 15 Class B product. In a domestic
environment this product may cause radio interference,
in which case the user may be required to take adequate
measures.
www.unitech-adc.com
Battery pack
Stylus
Stylus
This stylus is design for tapping
screen and also for accessing
batter door via the screw driver
in the stylus.
Bar Code Laser Scanner
Right Side Scanner
Trigger
Press it to enable
laser sccanner to
read bar code.
Keypad
Touch Screen
RS232/USB/Charging Port
IrDA port
Reset Hole
Push enclosed
button for system
warm-start
CF slot compartment
Please remove the
battery door to access
CF slot.
Battery compartment
Install Lithium-ion battery
pack here.
PCMCIA compartment
Install PC card here.
Note: Before using the PA962 for the first time, charge
the unit for 16 hours to fully charge the empty backup battery.
Check Battery Status:
The battery menu item will show the status
of the main and backup batteries. There
are 3 kinds of status indicators — “Good”,
“Low” and “Very Low”. Bold characters
indicate the actual status, e.g. battery icons
in the illustration at right mean both the main
and backup batteries are “GOOD”.
It is necessary to charge the battery when “Low” or “Very Low”
are displayed in bold characters. If “Low” or “Very Low” are
still displayed after charging, please contact Unitech
Technical Support.
PA962
Quick Reference
Guide
Laser Scanner
The PA962 has an integrated laser scanner, which
reads all major bar code labels with excellent performance.
Trigger keys are located on the left and right sides of the unit.
Press either one to activate the laser scanner.
The PA962 also has a built-in Scanner Setting.exe program
that allows the user to test the barcode scan function.
Scanner Setting.exe is located in directory \Windows\Control
and is also accessible by shortcut via “Setting\Control” on the
Start menu.
European Conformity Statement
Declaration of Conformity with Regard to the R&TTE
1999/5/EC and EMC 89/336/EEC directives.
CF slot drawer for PA962