

SMP series
---UC40+ User Guide
Due to continuous improvement,
actual product may differ from
the manual.
Manual is for reference only.
Safety Reminding
1. Please read this manual carefully before using.
2. National standard power cable and power cord with grounding is
suggested, so as to ensure stable power supply.
3. No peeking into the lens while projector is working.
4. No cloth, blanket or any other material that could stock ventilation
holes should be placed around the projector while it is working.
5.No water-proof function for this projector, no such apparatus as vase
or cup should be put around the projector.
6. Projector should be stocked and used at dry and clean condition.
7. Please turn off the projector and cut off the power supply, if it is not
used for long time.
8. Please use factory original foam and other shockproof material while
transporting.
9.If found projector defected, do not attempt to repair it by yourself.
Please contact with your distributor or factory directly.
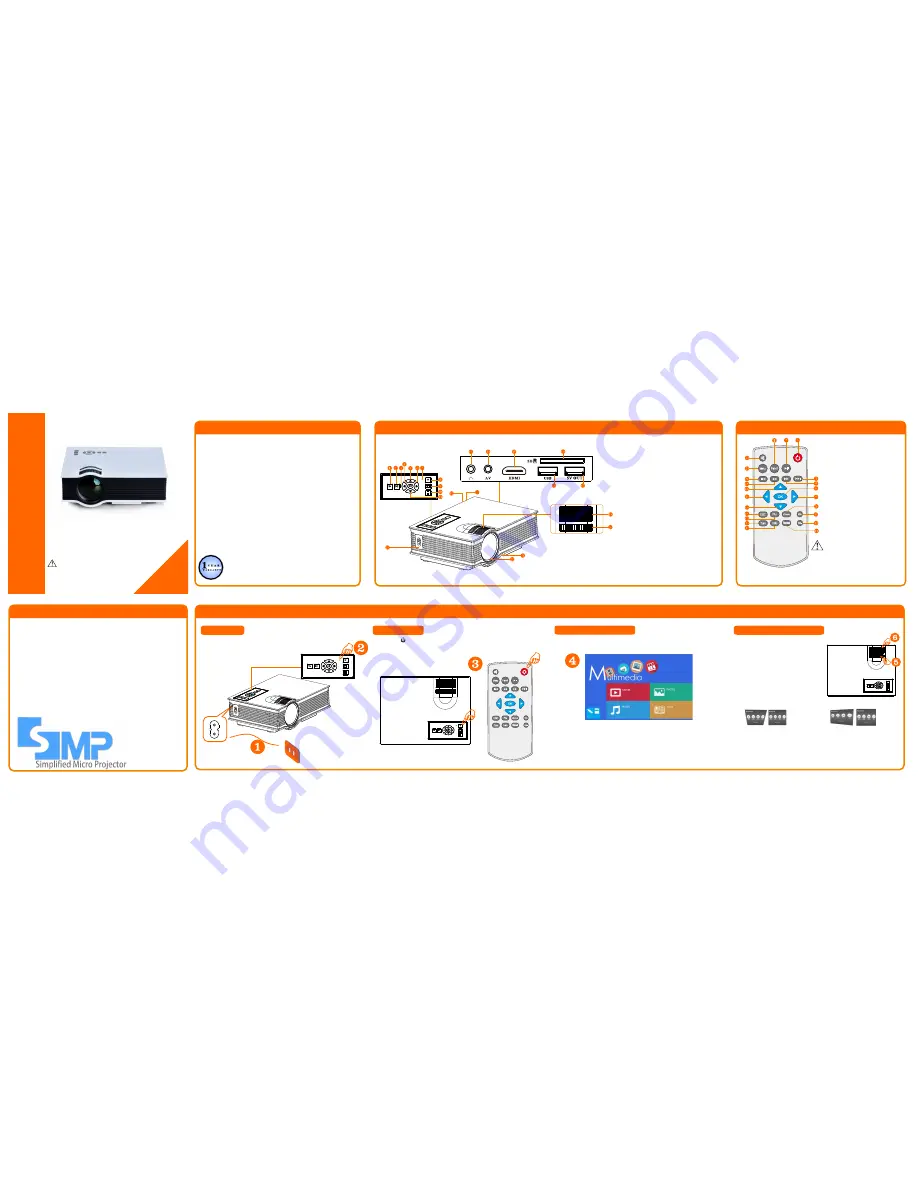
Product Details
1. Esc
2. Play/pause
3. Left
4. Ok
5. Up
6. Right
7. Indicating light
8. Power button
9. Input
10. Menu
11. Down
12. IR receiver
13. Earphone/ 3.5mm Audio-in
14. AV input
15. HDMI input
16. SD card slot
17. 5V out
18. USB input
19. Focus adjusting handle
20. Keystone correction
21. Height adjustment nut
22. Lens
23. Power input (100-240V)
24. VGA Input
Product Details
1.Input
2.Play/pause
3.Power
4.Next
5.FF
6.OK
7.Right
8.Zoom
9.
10.Volume-
11. no function
12.Info
13.no function
14.Picture mode
15.Return/esc
16.Down
17.Left
18.Up
19.FR
20.Previous
21.Menu
22.Mute
Do not mix use old and new batteries.
If remote is not used for long time,
batteries should be removed.
Remote should target at the IR receiver.
Connect
the
projector with power cord ( as pic 1 showed), then
plug the power cord into AC connector. When the indicator
light (as pic 2 showed) stops flashing,
projector is under standby status.
1.Preparation
Operation Instruction
2.Power on/off
Press the button on remote or projector (as pic 3 showed).
3.Multimedia boot screen
If choose USB and SD input, after open screen, a boot screen (as pic 4
showed)for multimedia will be showed.
Multimedia boot screen
4.Focus&Keystone correction
Focus
Put the projector with lens vertical to
the wall or screen, turn on the projector
and then adjust focus adjusting handle
(As showed in 6) until the picture is
clear.
Keystone Correction
If projector is not vertically or
horizontally placed, the image will
present trapezoid twist. Keystone
correction technology refers to a kind
normalizing the twisted image via digital or optical technology.
before after
Solution
Rotate the keystone correction nut as
NO.5 showed, until image twist be
corrected. keystone correction angel is
± 15º
before after
Solution
No solution for this kind of
image twist for this projector.
S
im
p
li
fi
e
d M
ic
ro P
ro
je
ct
o
r
U
se
r G
u
id
e
M
o
d
e
l: U
C
4
0
+
SMP illustration
SMP
is
short
for simplified micro projector.
It is one kind of projector which has simplified system structure
design, but with multifunction.(Also means easy handling micro
projector.) .
This kind of projectors use the simplified system to reduce cost
but at the same time supply end users with a projector with simple
setting thus can be easily used.
Simplified micro projector usually uses LCD as the image system
and LED as light source.
Remarks:
User Manual should be read carefully if you are
using the projector. If any difference between
user manual and actual projector. Please subject
to the actual projector.
24


