


Reviews:
No comments
Related manuals for DIMENSION4 Mini-tag

DVD55RWI
Brand: Cambridge Audio Pages: 4

GPS II+
Brand: Garmin Pages: 108

GPS 35 USB
Brand: Garmin Pages: 10

Forerunner 10
Brand: Garmin Pages: 6

eTrex 10
Brand: Garmin Pages: 12

GTM 60
Brand: Garmin Pages: 11

EZY Advanced
Brand: Navman Pages: 88

WA-100
Brand: TBIT Pages: 3
TRACKER 5100I
Brand: Navman Pages: 42

GT200
Brand: Sendum Pages: 10

UP103
Brand: UniGuard Pages: 14

UM206
Brand: UniGuard Pages: 14

QK-A026
Brand: Quark-Elec Pages: 5

Smartnav Touch Screen
Brand: Trafficmaster Pages: 12

GPS 280
Brand: THOMSON Pages: 109
BT-Q818
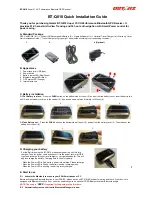
Brand: Qstarz Pages: 2
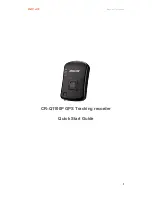
CR-Q1100P
Brand: Qstarz Pages: 4
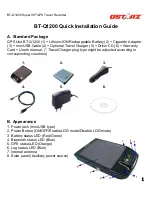
BT-Q1200 Super 99
Brand: Qstarz Pages: 7


