


© 2008 Trane All rights reserved
3270 3319 Rev B
®
Installing and Configuring the BACnet
®
/IP Router
Ordering number: 4950 0471 (ARCNET), 4950 0472 (Ethernet)
This document describes the installation and
configuration of the BACnet/IP Router. The router
enables you to connect two BACnet local area
networks (LANs) to create a BACnet inter-network.
The LANs may be either BACnet/IP Ethernet or
BACnet ARCNET
®
.
Before you begin
Before wiring or configuring the router, get the
TCP/IP information from the network administrator
for the site. Figure 1 on page 2 shows a sample letter
of request. Ensure that the TCP/IP information
includes: IP address, subnet mask, default gateway,
and user datagram protocol (UDP) port.
In addition to the TCP/IP information, you may also
need the following information to help with the
network system setup:
•
Capability of enabling and disabling a BACnet
broadcast messaging device (BBMD)
•
IP addresses of remote BBMDs, routers, and
gateways in the TCP/IP networks
•
BACnet network numbers for each of the direct
LAN interfaces
•
Information about the LAN to which the router
will be connected, such as other devices connected
to it: BACnet routers, BBMDs, TCP/IP routers,
gateways, switches, and hubs
Note:
Since the router holds configuration information
indefinitely, you can configure the router before
travelling to the site.
For more information about BACnet/IP network
installations, see engineering bulletin
Tracer
Summit
®
BACnet/IP Network Installations
(BAS-
PRB004-EN).
When you have the TCP/IP information, refer to the
topics that follow. The topics provide router
specifications and wiring information. They also
provide information and procedures for connecting,
configuring, and troubleshooting the router.
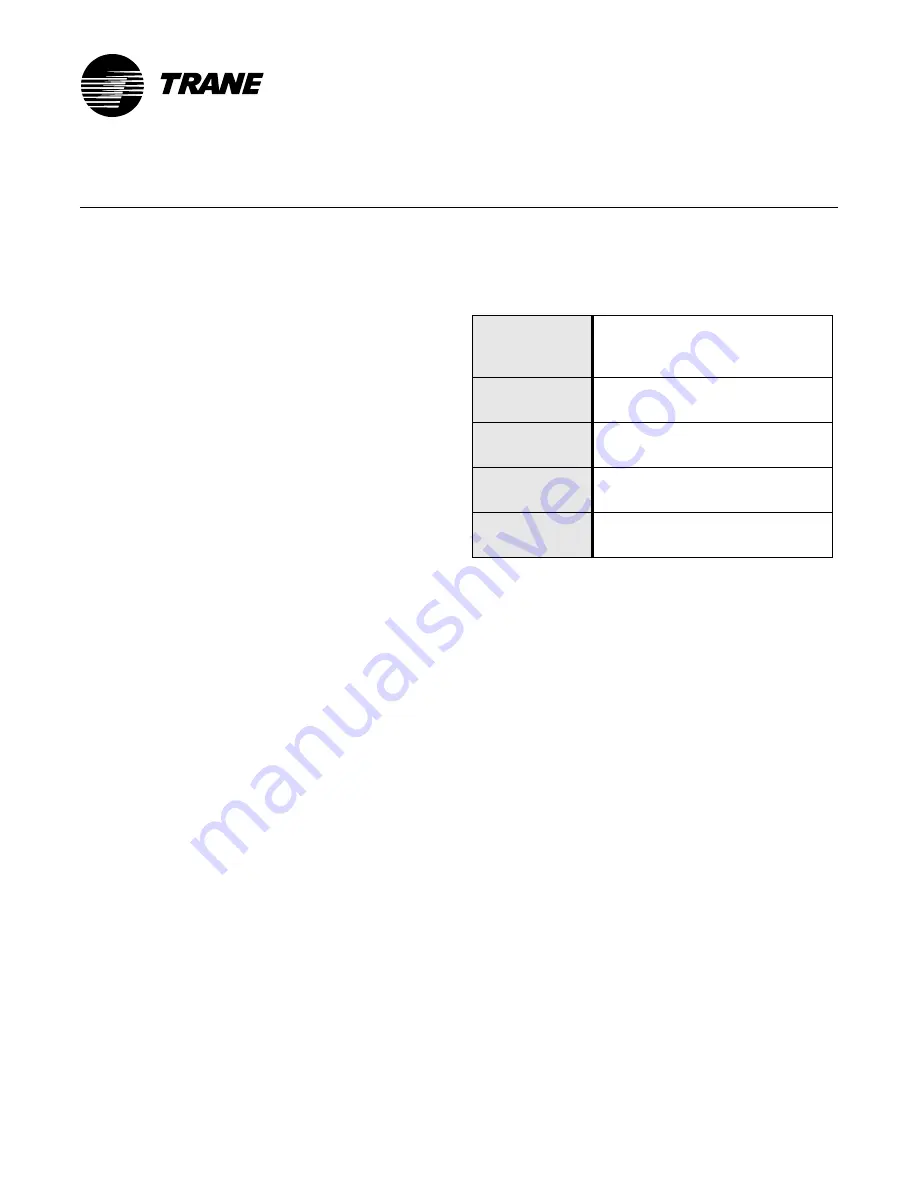
Router specifications
Table 1 shows the specifications for the Router.
Wire the router
When wiring the router and the hub to the Ethernet
LAN, use any combination of straight (patch) cables
and crossover category (CAT) 5 cables. Using CAT 5
cables enables you to connect other devices, such as
a BMTW building control unit (BCU) to the LAN.
Use straight cables when there is a hub; use
crossover cables when there is no hub.
Figure 2 on page 3 shows a router connected to a
typical LAN topology.
Note:
If you are using coax cable, prior to wiring the
router, verify that each LAN cable is terminated
with the appropriate resistor. Ethernet RG58 coax
cable needs a 50 ohm resistor. ARCNET RG62 coax
cable needs a 93 ohm resistor.
To wire the configuration shown in
Figure 2 on page 3:
1.
Using straight CAT 5 cables, connect the
workstation to the Ethernet LAN and the
Ethernet LAN to the hub.
Table 1:
Router specifications
Electrical
requirements
100 Vac at 50–60 Hz
(240 Vac at 50–60 Hz)
45 W
Operating
temperature
32–158° F
(0–70° C)
Dimensions
3 in. × 7.5 in. × 13 in.
(8 cm × 19 cm × 35 cm)
Weight
54 oz
(1.5 kg)
Mounting
Screw slots for wall mounting
Optional rack mount ears


