background image

EN

I

ENGLISH

SAFETY INFORMATION

Mains connection

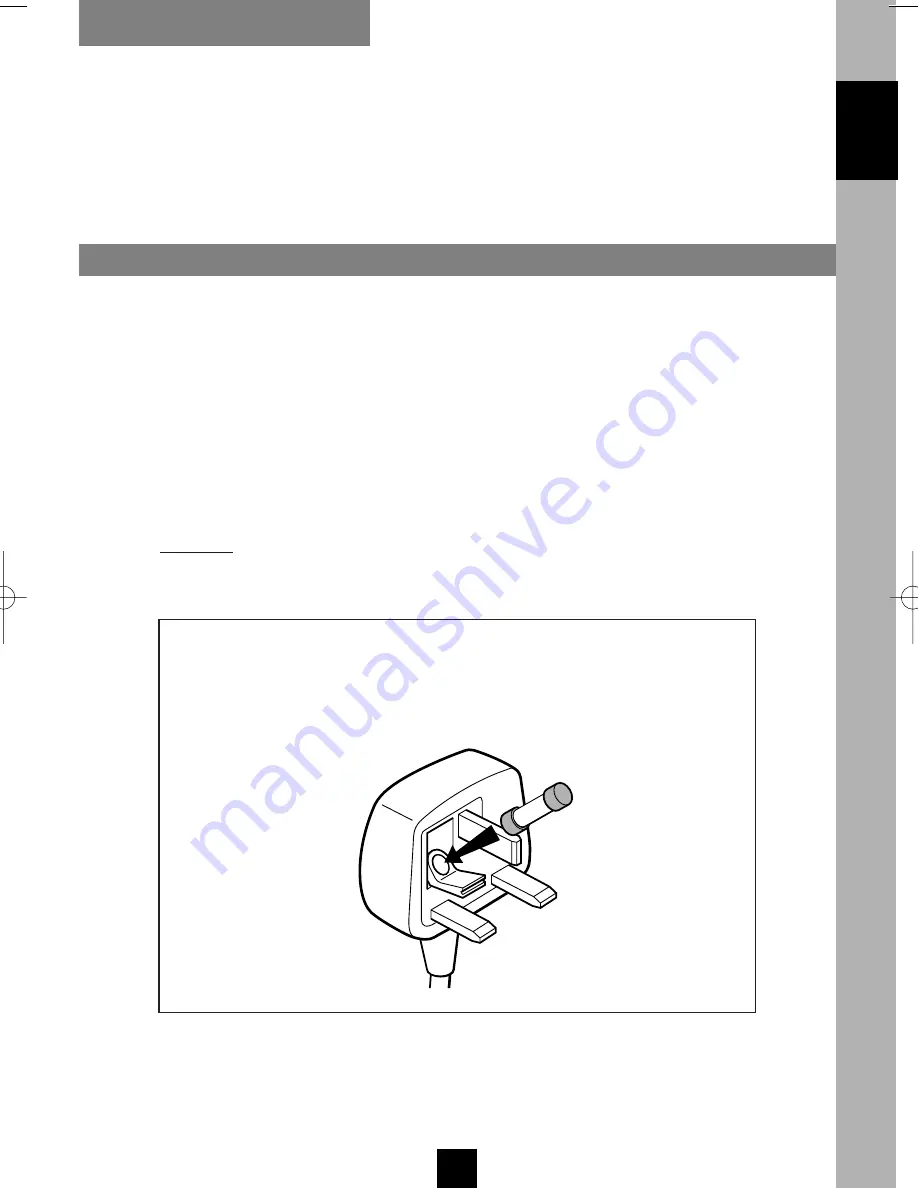
A fused plug must be fitted with a 3A fuse approved by ASTA or

BSI to BS 1362 and fuse covers must always be securely replaced.

If your Video Recorder does not work, the fuse may be blown.

This video is suitable for use on 

A.C.

mains supply, 

220-240 V

50 Hz

only.

It must not be connected to 

D.C.

mains.

Note: The mains lead of the video is fitted with a moulded plug. 
Because the lead is detachable and because it contains safety
components we cannot recommend re-wiring.

Do NOT under any circumstances plug the severed plug into any
mains socket as this could result in electric shock.

3A

!

The OFF button 

B

on the remote control does not completely disconnect

the unit from the mains supply but switches operating power on and off.

U-T7089PE-GB/BEI/906  21/07/99 9:47  Page I

Summary of Contents for VPH7090- - SETUP

Page 1: ...y 220 240 V 50 Hz only It must not be connected to D C mains Note The mains lead of the video is fitted with a moulded plug Because the lead is detachable and because it contains safety components we cannot recommend re wiring Do NOT under any circumstances plug the severed plug into any mains socket as this could result in electric shock 3A The OFF button B on the remote control does not complete...

Page 2: ... industrial purposes It is intended for domestic use only Cleaning Use a soft dry and clean cloth Do not use any stripper abrasive or solvent products If an object or liquid penetrates into the video recorder disconnect it immediately and have it checked by an authorised technician To avoid deterioration of your video recorder s heads never use a cleaning tape If you place your video recorder in a...

Page 3: ...O S record feature 12 13 Subtitle feature 14 Tape Library 15 17 Configuration Use Programming a recording 18 19 With Videoplus codes Without Videoplus codes Tape control while playing 20 21 Adjusting the picture 22 23 Preferences 24 25 HI FI functions 26 27 In the play mode In the recording mode Sound dubbing 28 Splicing by insertion 29 Sequence editing 30 Additional information 31 Understanding 3...

Page 4: ...ound volume To switch the TV set on or to select a channel To switch your TV set on or off To select a SCART socket and view the pictures of the AV unit connected to this socket To change the channel To increase the image size zoom To decrease the image size zoom Depending on the type of TV set you own this remote control may not be compatible or certain functions may not be available These two fu...

Page 5: ... PHILIPS 019 020 021 PHONOLA 019 020 021 PIONEER 001 005 POLYTRON 020 027 029 RADIOLA 019 020 021 RADIOMARELLI 019 REX 005 SABA 001 000 005 010 019 SALORA 005 SAMSUNG 020 030 SANYO 008 018 SCHAUB LORENZ 005 016 020 SCHNEIDER 019 020 021 SELECO 005 SHARP 022 018 SIEMENS 023 SINGER 001 002 019 SINUDYNE 019 SONITRON 008 SONY 014 018 TELEAVIA 001 010 020 TELEFUNKEN 001 002 000 010 020 THOMSON 001 000 ...

Page 6: ...rder To switch the video recorder on and off To double the recording time of a tape with LP To start instant recording of what you are watching only with compatible TV To add or remove an index To navigate through the menus and to validate with OK To select the VPS function To call up the NAVICLICK menu To display the subtitles To display the information screen To display the SUMMARY menu To leave...

Page 7: ... 002 059 010 DAEWOO 040 041 042 043 044 045 046 047 FERGUSON 001 002 060 012 053 055 057 059 FISHER 035 036 037 FUNAI 030 GOLDSTAR 023 034 GRUNDIG 061 069 070 HITACHI 010 012 022 023 JVC 06 010 011 012 013 MITSUBISHI 048 049 NEC 039 NOKIA 003 010 035 038 NORDMENDE 001 002 012 054 057 058 059 010 ORION 024 025 026 027 028 029 PANASONIC 008 009 062 PHILIPS 061 062 063 064 065 066 RADIOLA 061 062 063...

Page 8: ...Reverse Accelerated play Variable slow motion Tape eject Sound dubbing Stop See page 28 See page 29 Stereo Mono Selector Channel selection Source selection THE KEYS ON THE FRONT Add an index Remove an index See page 20 Reset the counter in copy mode page 21 in insertion mode page 29 To switch the video recorder on and off ...

Page 9: ...d to the cinch sockets AUDIO VIDEO at the rear of the VCR SA Picture and sound from a satellite channel 01 15 35 Tape counter 09 53 Time Display of the clock or of the time the length of the tape played since the beginning during play or record the time remaining until the end of the tape r in STOP SP Play record at standard speed Standard Play LP Play record in long play Long Play SLP Very long p...

Page 10: ...VCR With the status key you can select the image to be displayed on your TV screen Press this key successively to display 1 the current TV programme image 2 the VCR image including display of VCR status 3 the VCR image 1 the TV programme image When VCR is displayed on the screen you re watching the VCR image When pressing the status key the name of the current programme is displayed at the bottom ...

Page 11: ...age 22 menu PICTURE In case of poor quality PAL sources or old PAL tapes please turn MESECAM off To view a tape and explore the recordings on it freeze a frame find precise sequences with the fast search rewind to the start or the end of the tape Freeze frame Pause Variable slow motion Fast search Play Forward or reverse Stop If you don t want this menu to come up every time you load a tape deacti...

Page 12: ...ording Pause then resume recording Finish the recording Record with automatic stop Press the key twice Enter the time of the end of the current programme with the digital keys Recording will stop at the programmed time INS R Choose a channel or a AV unit connected to the audio video sockets AV1 AV2 AV3 AV4 or SA Select the sockets with AV For 2 digit channels press 0 first example 0 1 2 for Pr12 C...

Page 13: ...Tab REC Pr 6 To control the video recorder switch to vcr a The VCR is switched on and selects by itself the same channel as the current TV programme to start recording To record the programme you are watching just press the s o s record key the remote control selector must be on vcr a You can record the TV channel you are watching at any moment The option S O S RECORD is available only if your TV ...

Page 14: ...nction is available on most channels with Teletext for satellite channels select SA with the AV key Channel change is not possible on satellite channels Choose the station on your VCR Scroll the programmes one by one and with key V or W select the programme you wish to record Press OK to validate your selection The menu TIMER REVIEW comes up see boxed text on page 13 Press exit your programming is...

Page 15: ...ontinue to operate in this case unless the structure of the Teletext is completely changed just select the menu NAVICLICK SET UP call up the menu SUMMARY and INSTALLATION and update the number of the first Teletext page assigned to the TV guide along with the page assigned to the subtitles you can also make use of this feature when setting up a new channel You should know that the channel displaye...

Page 16: ...ubtitles in the RECORD TIMER menu select Subtitle Yes to record the subtitles of the programme To always record subtitles in your timer recordings To activate this function tick this box þ off OK key See page 24 More information can be found on page 15 menu RECORD TIMER and 20 menu PREFERENCES NOTE Subtitles in colour available in certain programmes will be recorded and reproduced in black and whi...

Page 17: ...brary of your VPH7090 Don t forget to label your tape with the number given by the video recorder when you eject it Press exit to leave Now you can record one or more broadcasts on your tape Load a tape which is already listed in your library into your VPH7090 This makes the same menu appear as above Now enter the number assigned to the tape and confirm with ok Note If you previously de activated ...

Page 18: ...elete title To delete this title from the tape contents Press exit to leave MANAGEMENT OF YOUR TAPE LIBRARY IMPORTANT Your VPH7090 will automatically give the broadcast title to all recordings from channels with the NAVICLICK function active When you have tapes recorded on another video recorder you may integrate them in your tape library but only with one title as the detailed contents cannot be ...

Page 19: ...to each title is displayed in the right column To see the contents of all tapes stored in your tape library choose Tape number To skip from one tape to another use the keys C B To select a title use the keys V W To edit or delete a title Go to the line concerned and press ok Follow the instructions displayed on the bottom of the screen Press exit to leave LISTING ALL YOUR RECORDINGS WITHOUT LOADIN...

Page 20: ...e Validate with OK The menu RECORD TIMER comes up The line Stop time is selected You can use a certain number of options to complete programming If you wish to check your programming press OK see the boxed menu TIMER REVIEW see page 13 if not press exit When programming some channels the first time the VCR positions itself on Programme N and prompts you to enter the channel number 1 2 3 Switch off...

Page 21: ...n your video recorder depending on the language of the menus 3 1 2 3 In the case of error or to quit press the key Prior to any recording we recommend that you check the menus Preferences and Picture Via HiFi controls you may also modify the sound of the channels to be recorded Select Record timer in the menu SUMMARY Programme the recording of the pictures of a given channel by entering or with B ...

Page 22: ...k as explained above The VCR then stops before the index mark Select the line Clear index with W Validate with key OK the VCR must be on STOP CLEAR INDEX Enter a value with key C or B Validate with the OK key The video recorder immediately rewinds to the required position and starts to play at this point if you have ended your entry by pressing PLAY GO TO COUNTER GO TO REMAINING TIME With W select...

Page 23: ...ecording times 5 THE COUNTERS The counter indicates the time elapsed in hours minutes and seconds status menu copy mode Counting starts upon loading of the cassette or the position 00h00m00s of the counter If you know how many hours and minutes separate the required position from the end of the tape select Go to remaining 4 It is impossible to use the index marks See if the safety tab of the casse...

Page 24: ...y mode with the OK key and start the recording by pressing PLAY REC C appears on the display COPY MODE If the pictures of the film you wish to record are of poor quality scrambled TV reception if the film is in black and white or if wish to give your recording an old film effect tick off the box þ Black white with the OK key BLACK WHITE for SECAM If you want to exchange tapes with people living in...

Page 25: ... Hz TV set the NTSC TV function should not be selected in the menu NTSC PAL appears on the display SLP in the video recorder display indicates that the tape has been recorded in Super Long Play 6 COPY See the connections described on page 22 of the installation manual In the case of error or to quit press the key Note NTSC recording is only possible from a read NTSC source e g American or second V...

Page 26: ...er has an Auto Long Play function If you have programmed a recording which exceeds the recording time remaining on the tape the video recorder automatically transfers to Long Play mode LP Tick off this box OK key to activate the function þ SHOWVIEW 10 mins Select this option to add 10 minutes to the end time of your Videoplus recordings So you will avoid defective recordings due to programme time ...

Page 27: ...reset after about 15 seconds MY VIDEO RECORDER PERSONAL CODE NUMBER IS Please keep in a safe place In the case of error or to quit press the key ENGLISH EXTERNAL TIMER Recording of a programme can be started by a satellite receiver or another set Tick this box þ off OK key so that you have to programme only one set your satellite receiver EXTERNAL TIMER recording programmed via an external set con...

Page 28: ...omes up Select the sound tracks with key C or B If the tape has been recorded in Dolby Surround or Dolby Pro Logic Surround connection of a special audio video amplifier will allow you to reproduce these sound effects STEREO stereo sound on the Hi fi track MONO mono sound on the linear track TRACK 1 Sound on the left track TRACK 2 Sound on the right track MIX Sound on the mixed hi fi band mono tra...

Page 29: ... the video recorder will distribute the sound on these different tracks 3 Load a tape and press the REC key With the menu key call up the SUMMARY menu and with W or V select the line HiFi controls Validate with OK The sound level of the channels varies If the quality of the sound of one of your recordings is poor you should adjust the level A more precise adjustment is possible for the channels re...

Page 30: ...DIO DUBBING on the front of the video recorder to activate the dubbing feature DUB P appears on the VCR display and select the connected set Au3 if you use the front side sockets white red yellow cinch Au1 Au2 or Au4 for the rear sockets refer to the installation manual page 20 MIC if you use a high impedance microphone for dubbing of a silent film connected to the MICROPHONE socket on the VCR fro...

Page 31: ...ed and press STOP Reset the counter Position the tape at the beginning of the sequence to be replaced Activate the insertion mode Start the source PLAY and start the insertion on your VPH7090 The insertion ends when the counter reaches 0000 VPH7090 currently recording Before insertion After insertion Camcorder or other playing video recorder EDIT EDIT EDIT is displayed during insertion Sequence to...

Page 32: ...ate with OK and press B Now look for the end OUT and validate with OK Repeat this operation while observing the order of the sequences 1 2 3 etc To start the editing select the line Start assembling with W and validate with OK Connect the two VCR s with the editing cable provided plug the connectors into the CAM PAUSE sockets of the video recorders IN OUT IN OUT IN IN OUT OUT 1 3 4 2 1 4 3 2 Bande...

Page 33: ...Video Programme System or PDC Programme Delivery Control These signals precisely start or stop the recording even when there is a delay in the programme schedule Your video recorder can recognise these signals VPS or PDC is displayed when the programme you are watching is broadcast in VPS or PDC In this case you can use the functions below Recording stopped by VPS During the recording of a VPS pro...

Page 34: ...hat start the programmed video recorder when the programme actually starts SP Standard Play Standard recording speed E240 4 hours LP Long Play Long play recording speed E240 8 hours SLP Super Long Play To play NTSC tapes only EUROCONNECTOR SCART A connector including 21 pins to link up to a TV set video recorder decoder but other sources of pictures satellite games console camcorder computer VIDEO...

Page 35: ... Ensure the power On Off switch is on 2 Check the antenna connection Recording is impossible 1 See if the safety tab of the cassette isn t broken 2 Check if you have properly performed the steps for the preparation of your recording as set out on page 10 Mains supply 200 to 240 V 10 50 60 Hz Consumed power 22 W when ON 3 W in the eco mode Clock autonomy approx 30 minutes Dimensions W H D 440 x 99 ...

Reviews: