1
TROUBLE-SHOOTING
If you’ve followed the instructions carefully and your faucet still
does not work properly, take these corrective steps.
PROBLEM
Leaks underneath handle.
CAUSE
Retainer nut has come loose or O-Ring on cartridge is dirty or
twisted.
ACTION
1. Move the handle to the “off” position. Remove index (#1),
unscrew the handle screw (#2) and remove the handle (#3)
(figure A).
2. Tighten the retainer nut (#4) by turning it clockwise (figure B).
Move the cartridge stem to the “on” position. The leak should
stop draining out from around the cartridge stem.
3. If the leak does not stop, shut off the water supply. Remove
the retainer nut by turning it counter clockwise. Lift out the
cartridge valve (#6) (figure C). Inspect the larger O-Ring on
the cartridge bonnet and the smaller O-Ring on the cartridge
stem. Remove any debris from the O-Rings. If either O-Ring
is twisted, straighten it out. If either O-Ring is damaged,
replace it.
4. Position the cartridge back to the faucet body (figure D).
Make sure the wings on the two sides of the cartridge bonnet
fit into the cuts on the two sides of the faucet body. Tightly
screw the retainer nut onto the faucet body.
5. Re-install the handle.
PROBLEM
Water does not completely shut off.
CAUSE
Rubber valve seat is dirty, stuck or broken.
ACTION
1. Shut off the cold water supply. If leakage stops, the prob-
lem is on the cold side. If leakage continues, the problem is
on the hot side. Shut off the hot water supply to determine
if both the cold and hot sides have a problem.
2. Remove the handle on the problem side. Loosen the
retainer nut (#4) by turning it counter-clockwise (figure E).
Lift out the cartridge assembly (#6).
3. Inspect the rubber valve seat (#7) on the spring (#8).
Remove any debris from the valve seat. If the rubber valve
seat is stuck or broken, replace it.
4. Re-position the cartridge back to the faucet body. Make
sure that the wings on the two sides of the cartridge bonnet
fit well into the cuts on the two sides of the faucet body
(figure F). Tightly screw the retainer nut onto the faucet
body.
5. Re-install the handle.
PROBLEM
Improper water pattern.
CAUSE
Aerator dirty or small parts inside aerator improperly installed.
ACTION
1. Remove the aerator (#12) from the spout end by turning it
counter clockwise.
2. Gently flush the small parts inside the aerator to clear away
any debris
3. Re-install the small parts as shown in the diagram (figure
H). Metal screens must be flat and plastic supporter must
be straight.
4. Screw the aerator onto the spout end and tighten.
TWO HANDLE BATHROOM FAUCET
06-4472H
TOOLS REQUIRED
· Pipe wrench
· Basin wrench
· Crescent wrench
· Teflon tape
· Plumber putty
· Screwdriver
· Braided supply lines
· Flashlight
· Safety goggles
Maintenance
Your new Bathroom faucet is designed for
years of trouble-free performance. Keep it
looking new by cleaning it periodically with
a soft cloth. Avoid abrasive cleaners, steel
wool and harsh chemicals as these will
dull the finish and void your warranty.
INSTRUCTIONS
® REGISTERED TRADEMARK OF TAYMOR INDUSTRIES LTD.
VANCOUVER, BC V3M 6K8 • TORONTO, ON M3J 2R1
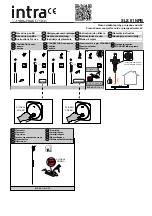
INSTALL FAUCET
Shut off water supply. Remove old faucet, taking care not
to damage existing water lines. Clean surface in prepa-
ration for new faucet. Always wrap metal threads with
Teflon tape before connecting water lines.
1
1 - INDEX
A
B
C
D
E
F
G
H
2 - HANDLE SCREW
3 - HANDLE
4 - RETAINER NUT
5 - WASHER
6 - CARTRIDGE
7 - RUBBER VALVE SEAT
8 - SPRING
9 - CAP
12 - AERATOR
13 - BASE PLATE
14 - MOUNTING NUT
CUSTOMER SERVICE
WEST
1-800-267-4774
EAST
1-800-387-7064
www.taymor.com
SI
LI
CO
NE
4
5
6
Apply a bead of plumber’s putty or silicone caulk around
the faucet openings.
2
From underneath the sink, secure the faucet to the
sink using mounting nuts (1) provided.
Make connections to water lines. Use 1/2” IPS faucet
connections (1) and tighten connections with wrench.
Or use the supplied plastic coupling nuts (3) with 3/8”
O.D. ball-nose risers (2), hand tighten only. Do not over-
tighten. Do not use metal coupling nuts (4).
Do not use plumber’s putty, pipe dope, or any other
type of sealing compound on water inlet or threads.
Additional compound is not necessary.
Remove the aerator by turning it counterclockwise.
Remove the internal parts of the aerator by pushing
them out with your fingers. Remove any debris.
Install faucet shanks through the holes of the sink.
Centre the faucet body on the sink.
3
7
Turn faucet handles all the way on an run water
through the spout for about a minute to remove
debris.
10 - ESCUTCHEON
11 - BODY
15 - COUPLING NUT
2
3
1
4