background image


E

ng

lis

Fr

an

ça

is


Ita

lia

no


D

eu

ts

ch


E

sp

ol


N

ed

er

la

nd


V26MMFJ EN        12/13/2007_ver.A-PD.paula   

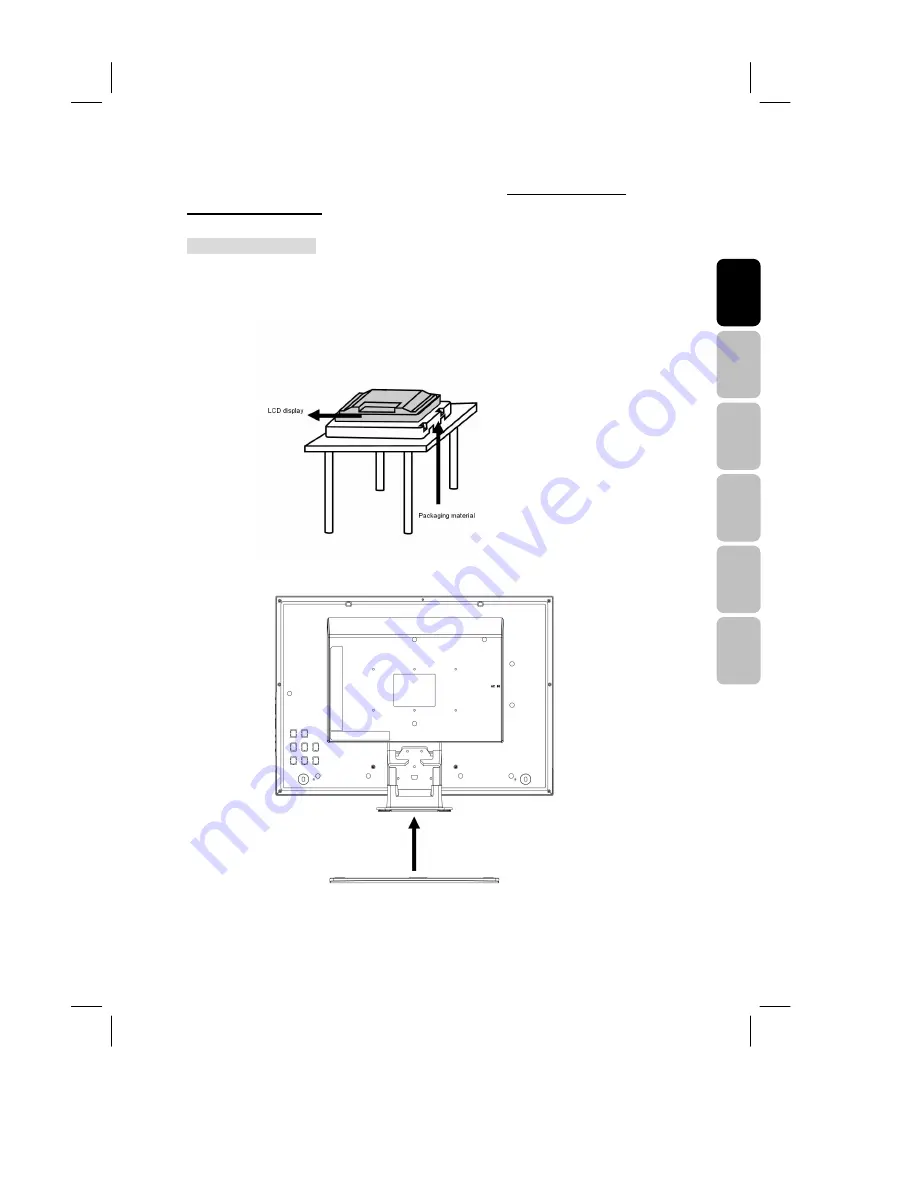
After unpacking TV, please read this section carefully to assemble the stand or 
remove the base neck.   
   
Assemble the Stand   
 
Step 1: To prevent TV from being damaged or falling, place TV on a stable, level and 
vibration-free surface with packaging materials or soft cloth.     


Step 2: Slide the base plate to TV.   


base plate 

base neck 

Summary of Contents for V26MMFJ

Page 1: ...ng TV please read this section carefully to assemble the stand or remove the base neck Assemble the Stand Step 1 To prevent TV from being damaged or falling place TV on a stable level and vibration fr...

Page 2: ...ffered screwdriver Remove the Base Neck To mount your LCD TV 1 do not assemble the base plate and 2 remove the neck from the TV Refer to the instructions in your wall mounting kit not included Step 1...

Page 3: ...is Italiano Deutsch Espa ol Nederlands V26MMFJ EN 12 13 2007_ver A PD paula Step 2 Remove screws securing the stand to the base shown in marked circles in anti clockwise Remove the base and put aside...

Page 4: ...ROL 9 SETTING UP 11 CONNECTIONS 11 Connecting video devices via AV cables 11 Connecting a video device via HDMI HDMI 13 Connecting a PC via VGA cable 14 WATCHING TV 15 Turning the LCD Display On and O...

Page 5: ...n 30 Setup 31 New Service Alert 32 Parental Control 32 VIEWING THE BANNER OF DIGITAL TV 33 EPG ELECTRONIC PROGRAMME GUIDE IN DTV 34 PREFERENCES 36 Child Lock 37 On Timer 38 CONNECTIVITY PC SETTING 39...

Page 6: ......

Page 7: ...Do not insert any objects through the slots and openings of the monitor This may lead to an electrical short circuit or even fire resulting in damage to your LCD display Slots and openings in the LCD...

Page 8: ...sulting from voltage surges or lightning To remove the LCD display from the power supply disconnect the plug from the AC outlet Where the main plug is used as the disconnect device the power outlet mu...

Page 9: ...which can be serviced or cleaned inside of the TV display housing You can increase the life of your LCD display by taking the following precautions Before cleaning always disconnect the power line an...

Page 10: ...dition to your statutory rights This manual contains a separate chapter on Troubleshooting on page 47 Performance Characteristics Advantages relating to CRT cathode ray tube display Less space require...

Page 11: ...al channel speakers Built in NICAM A2 IGR sound decoder for stereo and bilingual listening Automatic sleep timer ranges from 10 to 120 minutes in 10 minute increments Provided component video input fo...

Page 12: ...dby passive Red Power on TV Video PC mode Blue Standby active only available in PC mode Purple A blue indicator lights when the power is on and a purple indicator lights when in the standby PC mode A...

Page 13: ...splay the OSD main menu Return to previous menu when in OSD menu INPUT Select input source TV DTV SCART1 SCART2 SCART2S CVBS S VIDEO YUV HDMI 1 HDMI 2 VGA When OSD MENU is invoked it will function as...

Page 14: ...the LCD display Please turn off the LCD display before inserting or removing a CI module Audio out L R The level of audio output cannot be changed using the volume control on your display This connect...

Page 15: ...ing for the required text page REVEAL To display concealed information such as solutions of riddles puzzles or a quiz EXPAND Press EXPAND button to enlarge the top half or bottom half of the TELETEXT...

Page 16: ...e to access menu items 12 MENU Display the On Screen Display OSD menu or return to a layer of menu 13 TV Select the TV DTV mode 14 PC HD Switch to VGA HDMI1 HDMI2 mode 15 VIDEO Switch to CVBS S VIDEO...

Page 17: ...tting Up Connections Connecting video devices via AV cables This TV accepts different Video Inputs Connecting to device connectors with better video quality will bring you better viewing enjoyment The...

Page 18: ...12 NOTE ANT IN Antenna aerial In Connecting cables above are not supplied...

Page 19: ...pplied only if there is an HDMI Output connector on the external device NOTE Video Device DVD Player Set top Box Game Box etc HDMI High Definition Multimedia Interface No audio cable is needed when vi...

Page 20: ...a display connect a VGA cable between the D SUB connector on the TV and the VGA connector on a PC To receive a sound connect an audio cable between the PC AUDIO IN jack on the TV and AUDIO OUT jack o...

Page 21: ...on your LCD DISPLAY Follow the instructions below to turn the display on Step 1 Place supplied two AAA batteries into the remote control make sure the batteries are oriented correctly Step 2 Connect t...

Page 22: ...ned off the indicator on the front will light up red If you go away for a few days or will not use your TV for a long period of time please unplug the power cord to turn the main power off Step 3 Pres...

Page 23: ...connected 1 Press or to highlight Country and then press OK 2 Press or to choose your country in the Message Bar then press OK 3 Press or to highlight Language then press OK to enter the Adjustment Ba...

Page 24: ...elect an input source as described below Source buttons TV switch to Analogue Digital mode PC HD switch to VGA HDMI 1 HDMI 2 mode VIDEO switch to CVBS S VIDEO YUV mode Composite Y C and Component sign...

Page 25: ...temporarily turn off the sound by pressing the MUTE button 1 Press MUTE and the sound cuts off 2 Press MUTE again or VOL VOL to turn the sound back to the previous level Setting the Sleep Timer You ca...

Page 26: ...of 4 3 broadcasts evenly to fill the 16 9 screen PANORAMIC Expands 4 3 broadcasts to fit the 16 9 screen by expanding the image at the edges of the screen This creates less distortion at the centre o...

Page 27: ...rent language sources Under different systems broadcast function will show differently Sound A sends the primary broadcast language to the loudspeakers Sound B sends the secondary broadcast language t...

Page 28: ...r by pressing buttons either on remote control or the right side of the TV 1 You can use the remote control buttons to open the OSD main menu and change the settings for the TV 2 You can also use the...

Page 29: ...elect the option Sub menu Please press OK on the remote control after selecting your preferred item in sub menu How to use main menu and sub menu in OSD 1 With the power on press MENU on the remote Th...

Page 30: ...ress EXIT to exit the menu Video Backlight Adjust the backlight level of the screen Contrast Increase and decrease the picture contrast Brightness Darken and brighten the picture brightness Colour Dee...

Page 31: ...fects for your TV AVC Auto Volume Correction This feature allows you to automatically adjust the volume by lowering the speaker output when the volume is high or by raising the speaker output when the...

Page 32: ...IT to exit the menu Service A P S and Service Management are only offered in ATV mode A P S This function is to search and store all available channels Country Choose a country Start Service Scan Star...

Page 33: ...nt Press OK to enter the sub menu 4 Press to highlight Rename Press OK to enter the Service Naming 5 In the Service Naming press or to select the programme you want to rename and then press OK to edit...

Page 34: ...exit the menu Service Recording Settings You can use this function to record all available channels Service Scan Start scanning all channels Country Choose a country Confirm Begin to scan and erase ol...

Page 35: ...mode 1 Press Source button to choose desired source 2 Press MENU 3 Press or to select Service and press 4 Press or to highlight Recording Settings Press OK to enter the setting mode 5 Press MENU to r...

Page 36: ...5 Press to highlight Country and press OK 6 Press or to choose the country and press OK 7 Press to highlight Confirm and press OK If you are sure to do the DTV service scan then press OK to start DTV...

Page 37: ...btitle Language Choose your preferred subtitle language Audio Language Choose your preferred audio language Common Interface To use pay per view services Signal Strength To show the signal strength fo...

Page 38: ...return to the previous menu or press EXIT to exit the menu Parental Control With the power on in DTV mode 1 Press Source button to choose desired source 2 Press MENU 3 Press or to select Service and...

Page 39: ...selected channel Press the SUB TITLE button to display the DTV SUBTITLE Press to display the more details information about the selected channel Press the GREEN button to select the DTV multi audio P...

Page 40: ...evision programmes With the power on in DTV mode 1 Press Source button to choose desired source 2 Press the GUIDE button on the remote to display the EPG 3 The EPG is on the screen then Press the GUID...

Page 41: ...Press RED on the remote control to enter User Profile to edit The maximum number of user profiles is no more than three users Press BLUE on the remote to rename or edit User Profiles see picture 3 3 P...

Page 42: ...the OSD OSD Contrast Adjusts the contrast of the OSD OSD Brightness Adjusts the brightness of the OSD Transparency Adjusts the transparency of the OSD Sub menu Return Return to the previous menu Chil...

Page 43: ...ress or to change the current status to ON 6 Enter your preferred PIN Personal Identification Number by using numeric buttons 0 9 To exit the menu press EXIT 1 To set up child lock for the first time...

Page 44: ...o enter the Sub menu 5 Press to highlight TV on after Press OK to set up time 6 Enter desired hours minutes by using numeric buttons 0 9 press OK 7 Press to highlight Confirm press OK and then the TV...

Page 45: ...make adjustments then press OK 7 Press MENU to return to the Main menu or press EXIT to exit the menu Connectivity PC The item of PC in the main menu of Connectivity only appears in VGA mode Auto ima...

Page 46: ...connected With the power on with PC connected Press or in the remote control to highlight one item Press OK in the remote control Note 1 The picture of Wide mode selection will appear in some specific...

Page 47: ...mation 4 Press OK or MENU or EXIT to exit the menu You can also use the SUB TITLE key on remote control to invoke the Information Information Panel Res Displays the panel resolution of the TV Main Sou...

Page 48: ...eset With the power on in any mode 1 Press MENU 2 Press or to select Service and press 3 Press or to highlight Reset Press OK then finished 4 If you want to exit the menu press EXIT in TV mode in DTV...

Page 49: ...es and so on This TV has 100 Teletext page number memories TELETEXT Operation Step1 Select a TV station on which TELETEXT is being transmitted Step2 Press TELETEXT on the remote to make the TELETEXT s...

Page 50: ...ber is located so that the desired page is displayed on the screen Step2 The CH button can be used to select the preceding or following page Step3 Fastext movement by the 4 coloured buttons on the rem...

Page 51: ...rent time information will be displayed on the upper centre corner of the screen Step2 The time information will disappear after pressing the button again Sub Page Press the button to stop the running...

Page 52: ...in the upper left corner Step3 When the required text page is found the required page number appears in the blue box Step4 Press the button again to revert to TELETEXT mode EXPAND Select double height...

Page 53: ...ontact your nearby retailer directly There is no picture and sound Make sure the power cord is properly connected Make sure the input mode is set correctly There is no picture in AV mode Make sure the...

Page 54: ...may be weak Make sure the aerial is not disconnected The picture is too bright Check Contrast Brightness adjustment Check the APC Auto Picture Control function setting The picture is too dark Check th...

Page 55: ...e control does not work Check the batteries in the remote control are not flat Make sure the remote control sensor of TV set is not under strong lighting There are stripes on the screen or colours fad...

Page 56: ...able wear an antistatic wrist strap or touch a highly conductive metal object We can repair damage sustained by inappropriate handling for a fee Use only original spare parts Environmental conditions...

Page 57: ...SVGA 60HZ 800 600 35 16 56 25 36 0 1024 800 128 72 625 600 22 2 4 SVGA 60HZ 800 600 37 879 60 317 40 0 1056 800 88 128 628 600 23 4 5 XGA 60HZ 1024 768 48 363 60 004 65 0 1344 1024 160 136 806 768 29...

Page 58: ...ace CVBS Power Supply AC 100V 240V 50 60Hz Power consumption 100 W Standby power consumption 1 W Width 674 5 mm Height 526 mm Set dimensions with stand Depth 102 mm Net Weight with stand 13 2 kg Opera...

Reviews: