

Note:
Please allow 10~15 minutes for the DDNS
service to update with your new DDNS
address. This is normal for the DDNS system.
Open Internet Explorer and enter the host
name (e.g. Http://MyDVR.no-ip.org ) in the
address bar to access it.
For other detailed operation like mobile phone
remote view,please refer to the user manual.
3. Enable DDNS on the DVR.
STEP3
STEP4
STEP4
SETUP LOCAL VIEWING ON
YOUR COMPUTER
INTERNET REMOTE
MONITORING
INTERNET REMOTE
MONITORING
4. Accessing your DVR remotely.
STEP 3 SETUP LOCAL VIEWING
ON YOUR COMPUTER
1a. Go to Main menu->System->Network to get
the IP address, TCP port and HTTP port.
Note:
The IP address of the DVR should be in the
same field as your computer. And a static
(fixed) IP address is recommended. E.g. if
your router is set for the 192.168.1.x network,
and you computer is 192.168.1.8, then the IP
address of your DVR can be 192.168.1.10.
Default IP address is 192.168.1.10, TCP
port: 5000, HTTP port: 80.
Note:
You may want to use a different port than the
default HTTP port 80. If so, you need to
configure your DVR to use the port you want.
When configured, remember that you have to
specify its port number in the URL (e.g. if you
select port 88, you access it using 192.168.
1.10:88).
1. Retrieve the network parameters.
2. Accessing your DVR locally
(ON YOUR LOCAL COMPUTER).
Open Internet Explorer and enter http://192.
168.1.10:80 in the address bar to access it.
2d. Add a host or domain to your account
1a. Accessing your router by entering the gate
way address, e.g. http://192.168.1.1
Note:
Port forwarding guides for various routers on
www.portforward.com
1. Port forward.
2b. Confirm your account
Once you have submitted your account
information into the new user form, it will
send a confirmation email to the address
you provided. You will need to check that
account and look for the email from No-
IP.com. The email contains a link you
must click in order to confirm your
account.
2c. Login to your account
2a. Create an account.
Open the web browser (Internet Explorer by
default) and enter http://www.no-ip.com in
the address bar.
2. DDNS (Dynamic Domain Name System)
register on the third party website.
(no-ip for example).
Fill in the required fields on the new
account form. Once you've filled in the
required information and agreed to our
Terms of Service, click the "Sign Up
Now!" button at the bottom of the page.
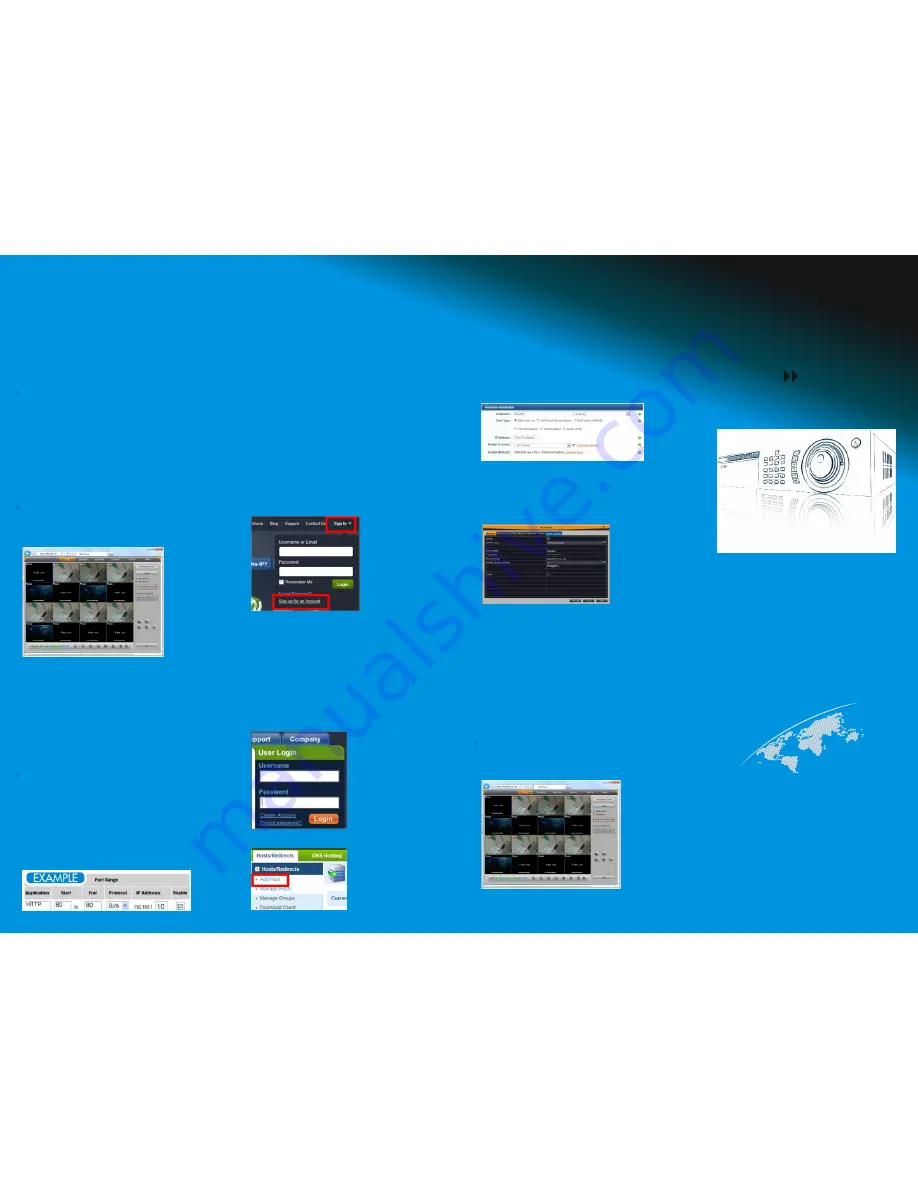
Go to Main menu->Setup->Network->Other
Setttings to type in the host info.e.g.
Under DDNS: tick off;
Under DDNS type: choose www.no-ip.com;
Under User Name: the account you created
at no-ip.com;
Under Password: the password of your
account at no-ip.com.
Under Host Domain: enter the host name
you created at no-ip.com;
DDNS Update: Choose the DDNS update period.
In order to add a host to your account, select
the "Add" link from the "Hosts/Redirects"
menu. This will bring up the Add a Host page.
And now you're ready to fill in the details of
your new hostname.
Note:
For more detailed guide of No-ip service,
please visit http://support.no-ip.com/
STEP4 INTERNET REMOTE
MONITORING
1b. Find the option called port mapping or
port forwarding.
1c. Specify the HTTP port (default is 80) and
TCP port (default is 5000) to be forwarded
from the internal/local IP address of your
DVR(e.g. 192.168.1.10) to the Internet.