background image

Kodiak

TM

NE 5010

Swing•N•Slide  •  1212 Barberry Drive  •  Janesville, Wisconsin  53545 

Visit our web site at: www.swing-n-slide.com or call us at 1-800-888-1232

ASSEMBLY INSTRUCTIONS

PROJECT 512

check out http://www.swing-n-slide.com/planupdates.htm

for updates to these instructions.

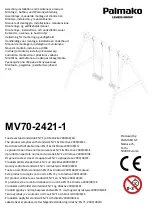
No. of Children: Up to 10

Min. Use Zone: 30' x 33-1/2'

Set Dim. 17'W x 21-1/2'L x 13'H

Est. Building Time: 4-6 hr.

30'

33-1/2'

Summary of Contents for Kodiak PROJECT 512

Page 1: ...ite at www swing n slide com or call us at 1 800 888 1232 ASSEMBLY INSTRUCTIONS PROJECT 512 check out http www swing n slide com planupdates htm for updates to these instructions No of Children Up to...

Page 2: ...cause a strangulation hazard Not to use equipment in a manner other than intended Not to get off equipment while it is in motion Not to climb on the equipment when it is wet Determined that only one...

Page 3: ...posants les plus loign s Par exemple une glissoire qui se prolonge au del de la plate forme doit tre pourvue d une surface de protection d au moins 1 828 m 6 pieds de chaque c t ainsi qu l extr mit En...

Page 4: ...ead screws 8 1 3 4 panhead screws 2 5 1 2 Bolts 4 1 Truss Screw 111 2 lag screw 64 1 1 4 screws 453 2 1 2 screws 127 2 screws PURCHASED SEPARATELY CIRCULAR SAW ELECTRIC DRILL 1 2 SOCKET WRENCH HAMMER...

Page 5: ...rry Drive Janesville WI 53545 1 800 888 1232 www swing n slide com PROCESS BLACK PANTONE NEWCO RED R R R 1 Name Plate 8 Step Brackets Note 4 Left 4 Right 1 Plan 4 Safety Handles 1 T30 Torx Bit 2 EZ Fr...

Page 6: ...4 2 X4 X120 3 54 54 56 56 2 X4 X120 2 96 2 X4 X120 1 20 2 X4 X120 1 57 30 30 2 X4 X120 1 40 3 4 40 3 4 36 2 X4 X120 1 72 46 3 4 48 1 2 2 X4 X120 1 43 1 2 25 54 54 36 1 4 36 1 4 36 1 4 39 1 2 39 1 2 3...

Page 7: ...1 4 48 96 48 48 48 36 36 36 36 54 40 3 4 36 54 40 3 4 39 1 2 47 47 30 6 4 X4 X96 96 4 X4 X96 1 56 36 4 X4 X96 1 73 4 X4 X120 1 73 30 4 X4 X120 1 120 4 X6 X144 1 OR 2 X6 X144 1 144 OPTIONAL LADDER 2 X...

Page 8: ...to attach them Base of unit 5 4 x 6 to 4 x 4 2 x 4 to 4 x 4 5 4 x 6 to 2 x 4 1 2 lag screw After attaching the 2 1 2 screws apply the center 1 2 lag screw as shown for additional support 3 2 1 2 scre...

Page 9: ...r NEVER position in a non interlocking position Top of bracket Bottom of bracket Hole locations close to bottom Example of a Shelf Loc bracket connection Wrap Loc Shelf Loc Bracket 1 2 3 4 Wrap Loc CO...

Page 10: ...g Screws only at this time Frame 1 Frame 1 Use a 2 lag screw to hold bracket in place for later use Look for TOP stamp on brackets while installing TOP GAP on this side Fig 1 47 2 4 x 4 x 96 Frame 1 C...

Page 11: ...on 4 x 4 x 120 as shown in Fig 2 2 Attach upper 2 x 4 and lower 5 4 boards as shown in Fig 2 Note Secure Shelf Lock with 2 Lag Screws only at this time Fig 2 2 x 4 x 54 5 4 x 6 x 54 Frame 2 Constructi...

Page 12: ...n in Fig 3 2 Attach upper 2 x 4 and lower 5 4 boards as shown in Fig 3 Note Secure Shelf Lock with 2 Lag Screws only at this time Fig 3 2 x 4 x 54 2 x 4 x 54 2 x 4 x 54 5 4 x 6 x 54 Frame 3 Constructi...

Page 13: ...13 PROJECT 512 2 Lag screw Frame 1 D Frame Construction 1 Install 5 4 boards as shown above Fig 4 5 4 x 6 x 96 5 4 x 6 x 96 1 2 lag screw 4 2 1 2 screws 2 1 2 screw...

Page 14: ...x 56 4 2 lag screw 1 2 1 2 screws 3 2 1 2 screws 74 1 2 2 Lag screw Double check to make sure structure is square D Frame Construction cont 1 Install 2 x 4 and 5 4 boards as shown above 2 Attach Frame...

Page 15: ...Flex brackets to make installation of 4 x 4 easier Fig 6a Approx 1 4 4 x 4 x 96 4 x 4 x 96 F Install 4x4s 1 Work 2 4 x 4 into brackets as shown in Fig 6 Fig 6a 2 Secure brackets Fig 6b 2 Lag screw x 4...

Page 16: ...2 Fig 7 2 Lag screw Frame 3 Frame 2 Frame 1 F Attach Frame 3 1 Attach and secure Frame 3 to rest of unit as shown above Fig 8 4 2 lag screw 1 2 1 2 screws Double check to make sure structure is square...

Page 17: ...all Deck Boards 1 Install 5 4 deck boards to structure as shown Fig 9 2 Use two 2 1 2 screws at center and each end of deck boards Note For 5 4 x 6 x 47 boards align 2 1 2 screws horizontally to avoid...

Page 18: ...30 J Install Middle Rail Boards 1 Secure 4 x 4 support from above Fig 10 and and below deck as shown 2 Secure 2 x 4 x 48 1 2 as shown in Fig 10 3 2 1 2 screws per board 3 2 1 2 screws 2 x 4 x 48 1 2 4...

Page 19: ...46 3 4 22 1 2 H Center Entrance Support Boards 1 Construct support boards as shown in Fig 11 2 Secure center of floor boards as shown in Fig 11a 2 2 1 2 screws Fig 11a 2 2 1 2 screws UNDER DECK VIEW 4...

Page 20: ...hown in Fig 12 Flush with the sides of 4 x 4 deck supports Bottom of 2 x 4 to be flush with the bottom of deck board NOTE The bottom screws in the 2 x 4 board should secure into the side of the 5 4 x...

Page 21: ...PROJECT 512 Fig 13 2 x 4 x 56 2 x 4 x 96 J Install Upper Rail Boards 1 Install upper 2 x 4 rail boards as shown in Fig 13 Flush with the top of 4 x 4 deck supports 3 2 1 2 screws per joint 2 1 2 scre...

Page 22: ...Fig 14 Tip Flex brackets to make installation of 4 x 4 easier Fig 15 Approx 1 4 4 x 4 x 73 4 x 4 x 73 K Install 4x4s 1 Work 2 4 x 4 into brackets as shown in Fig 14 Fig 15 2 Secure brackets Fig 15a 4...

Page 23: ...Install Deck Boards 1 Install 5 4 deck boards to structure as shown Fig 16 2 Use two 2 1 2 screws at the end of each deck board 2 2 1 2 Deck Screws 2 per joint Center 5 4 x 6 boards over Shelf loc In...

Page 24: ...M Install supports 1 Install 4 x 4 from above and bellow as shown in Fig 17 2 Install 2 x 4 as shown in Fig17a 6 2 1 2 Deck Screws 3 per joint 4 2 Deck Screws Fig 17a UNDER DECK VIEW 2 x 4 x 46 3 4 3...

Page 25: ...25 PROJECT 512 Fig 18 2 x 4 x 72 21 1 2 M Install supports cont 1 Install 2 x 4 as shown in Fig 18 2 2 1 2 Screws 2 per joint 2 1 2 screw...

Page 26: ...26 PROJECT 512 Fig 19 36 2 x 4 x 43 M Install supports cont 1 Install 2 x 4 as shown in Fig 19 3 2 1 2 Screws 2 1 2 screw...

Page 27: ...27 PROJECT 512 Fig 20 2 x 4 x 43 1 2 M Install supports cont 1 Install 2 x 4 as shown in Fig 20 3 2 1 2 Screws 2 x 4 x 43 1 2 2 x 4 x 43 1 2 NOTE Make 2 x 4 flush with top of Wrap Loc 2 1 2 screw...

Page 28: ...1 4 x 4 x 56 2 Lag screw x 4 O Install 4x4s 1 Work 1 4 x 4 into brackets as shown in Fig 22 Fig 21 2 Secure brackets Fig 22a Tip Flex brackets to make installation of 4 x 4 easier Fig 22 Approx 1 4 2...

Page 29: ...lumber together to create the beam 2 Lay the lumber on a flat surface and align all of the edges NOTE Make sure each piece of lumber is the same length If it is not trim board s 3 From the end of each...

Page 30: ...it to drill a 3 8 hole through the beam at each location shown in Fig 24 2 Install Swing Hangers onto swing beam at locations shown Note Swing Hangers must be installed on same side dimensions were or...

Page 31: ...and thread it into the T nut until it is flush or near flush with the top of the T nut A screwdriver may be used to twist the hanger Fig 25 Orient swing hanger as shown in Fig 25 4 Use 4 1 1 4 screws...

Page 32: ...g 26a S A Frame Assembly 1 layout 4 x 4 s as shown in Fig 26 2 Allign EZ Frame Bracket with face of 4 x 4 s 3 Secure EZ Frame Bracket with 8 2 1 2 screws to 4 x 4 s making sure they are flush with eac...

Page 33: ...Tap T nut into 3 8 hole as shown in Fig 27 Note If using Laminated Swing Beam make sure T nut teeth do not fall between seams of 2 x 6 s 2 Attach A Frame beam to Swing Beam using 2 5 1 2 hex bolts and...

Page 34: ...ew x 8 each bracket 14 1 4 U A Frame Assembly cont 1 Position Split Brackets on 4 x 4 x 56 Fig 28 2 With the help of others lift A Frame and Swing Beam Assembly and center onto unit as shown in Fig 28...

Page 35: ...35 PROJECT 512 Fig 29...

Page 36: ...12 Fig 30 6 5 4 x 4 x 48 5 4 x 6 x 40 3 4 2 2 Deck Screws 2 per joint V Barrier Boards 1 Install 5 4 barrier boards evenly spaced in the opening Use 2 1 2 screws to secure to 5 4 x 6 to 4 x 4 2 1 2 sc...

Page 37: ...nt 1 Install 5 4 and 2 x 4 barrier boards as shown in Fig 31 and Fig 32 2 2 Deck Screws 2 per joint Fig 32 5 4 x 6 x 30 2 x 4 x 30 2 2 Deck Screws 2 per joint 2 2 1 2 Deck Screws 2 per joint on 2 x 4...

Page 38: ...x 40 3 4 2 x 4 x 40 3 4 2 x 4 x 39 1 2 2 x 4 x 39 1 2 2 x 4 x 20 W Support Boards 1 Constuct 2 x 4 s as shown in Fig 33 Fig 33a 2 1 2 Deck Screws 3 per joint 2 1 2 Deck Screws 2 per joint 2 1 2 Deck S...

Page 39: ...CT 512 Fig 34 Fig 34a 4 5 4 x 6 x 40 3 4 5 5 4 x 6 x 36 X Rail Boards 1 Install 5 4 boards evenly spaced in the opening as shown in Fig 34 Fig 34a 2 Deck Screws 2 per joint 2 2 Deck Screws 2 per joint...

Page 40: ...8 43 5 8 42 1 8 29 1 2 17 4 3 8 2 3 4 15 1 4 27 7 8 40 3 8 40 3 8 27 7 8 15 1 4 2 3 4 4 3 8 17 29 1 2 42 1 8 2 2 1 2 Screws 2 2 1 2 Screws 2 2 1 2 Screws 2 2 1 2 Screws 2 2 1 2 Screws 2 2 1 2 Screws 2...

Page 41: ...Draw an angle line connecting measurements for each ladder rung alignment Fig 35 2 Align top of step bracket with line and screw in place Install a ladder rung at each of the four locations Fig 35 and...

Page 42: ...1 4 screw Fig 39 Fig 39a Y Install Tarp 1 Install tarp as shown in Fig 39 2 Secure tarp in six locations Fig 39a 2 1 2 Deck Screws 3 per joint 2 x 4 x 54 2 x 4 x 36 2 x 4 x 36 2 1 2 Deck Screws 2 per...

Page 43: ...ead screws included with Kit 1 Truss Screw Use truss head screws to to secure slide to deck Fig 41 THIS PRODUCT IS INTENDED FOR USE BY CHILDREN FROM AGES 2 10 YEARS For Home Residential Use ONLY 1212...

Page 44: ...and near the corners of your activity center at the bottom of the legs on swing sets and twist the auger style stakes into the ground until only the loop is exposed 3 Place the metal strap through the...

Page 45: ...45 PROJECT 512 Swing Guard 1 Install 5 4 x 6 Swing Guard as shown in Fig 43 9 2 1 2 Deck Screws 3 per joint 30 1 4 Fig 43 5 4 x 6 x 96 2 1 2 screw...

Page 46: ...all Climbing Wall Frame as shown in Fig 44 Fig 44a 2 Attach 11 5 4 x6 boards to 2 2 x 4 boards and install on unit as shown in Fig 44b Note Make sure the 2 x 4 supports do not interfere with the mount...

Page 47: ...of wall supports before drilling 2 Drill holes through the wall at the desired locations using a 3 8 drill bit Install Climbing Rocks as shown in Fig 45 3 Make sure the Climbing Wall and Climbing Rock...

Page 48: ...PlayCore Inc 2007 Printed In USA LA 5820 Questions Call our Customer Service Department at 1 800 888 1232...

Reviews: