

1
www.supercircuits.com
LE_COVCMSD_SQ
Camera Lens
Status LED
(Here on DVRs
without audio)
SD Card
IR LEDs
•
Switch on the DVR. When the DVR is on, the Status LED will light and indicate
the DVR status:
Fast blink
– No SD card is installed or no video input (camera failure).
Constant
(not blinking) – The DVR is ready to record.
Slow blink
– The DVR is recording.
Verify that the LED is on and is not blinking.
•
Switch off the DVR.
•
To remove the SD card, push in the card until it disengages, then pull it out.
Step 3. DVR setup
Before using your DVR to record, setup the login password, date and time, and
video quality. To view the DVR setup menus, connect your DVR to a monitor with a
composite video input.
•
Connect an RCA cable between the yellow RCA connector on the DVR and the
composite video input on your monitor.
•
Switch on your DVR. The DVR LED should light.
•
Configure your monitor to display the composite video input. An image from the
camera, with a timestamp, should appear.
•
Point the Remote Control at the DVR IR sensor and press the
MENU
button.
MENU
pqtu
(Navigation)
Enter
RECORD
IR Sensor
To navigate DVR menus, use the up,
p
, and down,
q
, directional buttons to
change the value of a number or field, and
ENT
to accept the value and move to
the next number or field.
•
To enter the DVR configuration menus, you must enter a password. The default
password is
0000
. If the default password was not changed, press
ENT
four
times to login. A
SETUP MODE
menu will open.
Continue
➥
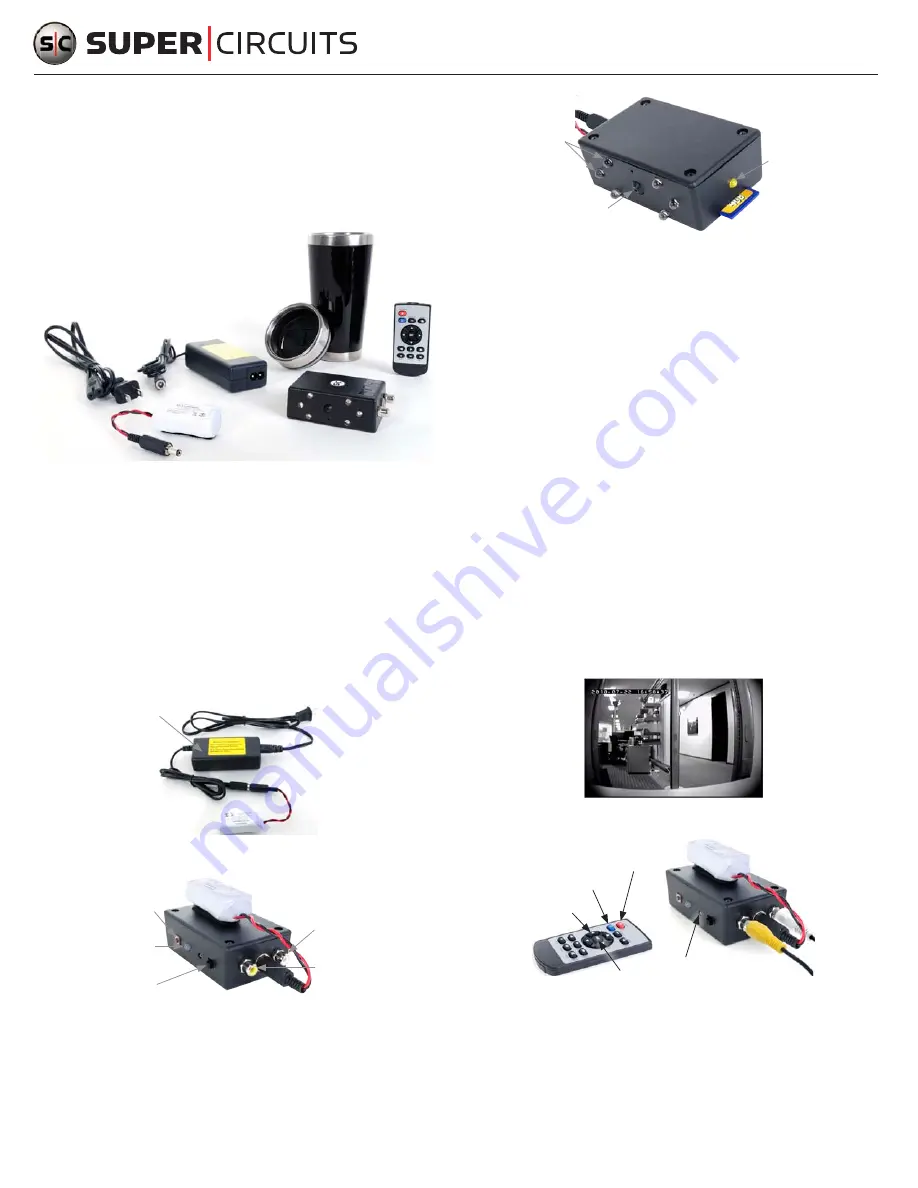
Covert Coffee Mug with DVR
System Quick Setup Guide
This setup guide for the Covert Coffee Mug with DVR System includes the basic
steps necessary to use your camera and recorder system. The DVR is available with
(SKU: COVCMSDA) or without (SKU: COVCMSD) audio recording capability.
Base
Cover
DVR
Power
Adapter
Power
Cord
Remote
Control
Battery
COVCMSD/COVCMSDA Components
Step 1. Charging the internal battery
The battery must be charged before use. To charge the battery:
•
Pull the cover from the coffee mug base, then remove the battery and DVR.
•
Disconnect the battery from the DVR.
•
Connect the power adapter to the mating connector on the battery, then plug the
power cord into the adapter and into a standard 120 VAC outlet. While charging,
the LED on the adapter is red. When the LED turns green, the DVR is fully
charged; disconnect the adapter promptly.
Battery
Charging
LED
Power
Cord
Power Adapter
•
Plug the battery into the DVR, then press it onto the Velcro
®
patch.
Video Connector
(Yellow)
Audio Connector
(White. Only on
DVRs with audio)
Power Switch
Record Button
Status LED
(Here on DVRs
with audio)
Step 2. Install the SD card
•
If the DVR is powered on, switch it off. When the DVR is off, no LED is lit.
•
Install an SD card (not provided) into the card slot on the end of the DVR. Insert
the card connector end first, facing up as shown in the following picture. Push
the card in until it clicks into place.
NOTE
: The DVR supports SD cards up to
4GB, manufactured by Sandisk
®
or Transcend
®
only.


