background image


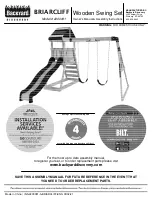
Assembly Instructions 

Item# D-DNC506PST 


Warranty:


1.  This swing must be assembled by two adults or more.   

2.  Tools are not included  in packaging. The expected  time required for assembly is usually 

1-2hours. 

3.  Before assembly, ensure all parts are present and not damaged.   

4.  Assembly on a flat, hard, and debris-free surface. 

5.  Keep canopy swing away from fire or inflammable objects. 

6.  There  are  small  parts  are  present  in  the  packaging,  do  keeping  small  parts  away  from 

children.     

7.  Children should be accompanied under the adults when use the swing. 

8.  Do not repack your swing until it is completely dry.   

9.  This swing must not be left erect in high wind conditions.   


Summary of Contents for D-DNC506PST

Page 1: ... all parts are present and not damaged 4 Assembly on a flat hard and debris free surface 5 Keep canopy swing away from fire or inflammable objects 6 There are small parts are present in the packaging do keeping small parts away from children 7 Children should be accompanied under the adults when use the swing 8 Do not repack your swing until it is completely dry 9 This swing must not be left erect...

Page 2: ...1 K Top connect bar 2 L Top side support bar 2 AA M6 plastic cap 16 BB Bolt M6 70 8 MM Bolt M6 75 4 CC M6 washer 28 DD M6 nut 12 EE M8 plastic cap 10 FF Bolt M8 75 6 GG M8 washer 20 HH M8 nut 10 II Bolt M8 80 2 SS Bolt M8 55 2 JJ Bolt M6 35 4 KK Hook 2 LL Adjust bolt plastic 2 Step 1 Insert Foot connector A to Foot connect bar B fix them by bolt BB washer CC and nut DD then cover Plastic cap AA ...

Page 3: ...her CC and nut DD then cover Plastic cap AA Step 3 Connect Top beam D to Front foot C1 Back foot C2 by using bolt FF washer GG and nut HH then cover Plastic cap EE as Fig 1 Connect Foot connect bar F to Back foot C2 by using bolt MM washer CC nut DD then cover Plastic cap AA as Fig 2 ...

Page 4: ...r Plastic cap EE as Fig 1 Hang Hook KK to the Swing bar E as Fig 2 Step 4 Connect Armrest H and Seat G by using bolt FF washer GG and nut HH then cover Plastic cap EE as Fig 1 Connect Seat G Armrest H and Swing bar E by using bolt II washer GG and nut HH then cover Plastic cap EE as Fig 2 ...

Page 5: ...Step 6 Hang another end of Hook KK to Top beam D Step 7 Insert Top connect bar K into Canopy J ...

Page 6: ... L to Top beam D by using Adjust bolt LL as Fig 1 Fix the mortise lock of Seat G into the hole of Back foot C2 as Fig 2 Step 9 Connect Top side support bar L and Top connect bar K by using bolt JJ and washer GG then cover plastic cap EE ...

Page 7: ...Step 11 Place Seat cushion I onto the seat Step 10 Stretch the canopy to fit wrap Top side support bar L as well and stick the canopy velcro ...

Page 8: ...not covered Proof of purchase dated register receipt is required for warranty claims Warranty is to the original purchaser and is non transferable Any replacement of warranted items will be in the original style and color or a similar style and color if the original is unavailable or has been discontinued As some states do not allow exclusions or limitations on an implied warranty the above exclus...

Reviews: