background image

Part Number

02250116---296

E

Sullair Corporation

OPERATOR’S

MANUAL AND

PARTS LIST

KEEP FOR

FUTURE

REFERENCE

DR---13

AIR COMPRESSOR

INDUSTRIAL

100---200 HP

Preliminary

Copy
2006

Summary of Contents for DR-13 Series

Page 1: ...Part Number 02250116 296 ESullair Corporation OPERATOR S MANUAL AND PARTS LIST KEEP FOR FUTURE REFERENCE DR 13 AIR COMPRESSOR INDUSTRIAL 100 200 HP Preliminary Copy 2006 ...

Page 2: ...at Sullair s corporate headquarters in Michigan City Indiana Instruction includes discussion of the function and installation of Sullair service parts troubleshooting of the most common problems and actual equipment operation The seminars are recommended for maintenance and service personnel For detailed course outlines schedule and cost information contact Sullair Corporate Training Department 1 ...

Page 3: ...G 5 2 3 SERVICE AIR CONDENSATE PIPING 6 2 4 SHAFT COUPLING ALIGNMENT CHECK 6 2 5 FLUID LEVEL CHECK 6 2 6 ELECTRICAL PREPARATION 6 2 7 MOTOR ROTATION CHECK Section 3 SPECIFICATIONS 7 3 1 SULLAIR DR 13 COMPRESSOR PACKAGE 7 3 2 LUBRICATION GUIDE Section 4 COMPRESSOR SYSTEMS 9 4 1 INTRODUCTION 9 4 2 DESCRIPTION OF COMPONENTS 9 4 3 COMPRESSOR UNIT FUNCTIONAL DESCRIPTION 10 4 4 AIR INLET SYSTEM FUNCTION...

Page 4: ...UBSEQUENT START UP PROCEDURE 25 6 7 SHUTDOWN PROCEDURE Section 7 MAINTENANCE 27 7 1 GENERAL 27 7 2 DAILY OPERATION 27 7 3INITIAL MAINTENANCE AFTER 50 HOURS OF OPERATION 27 7 4 MAINTENANCE EVERY 8000 HOURS OF OPERATION 27 7 5 MAINTENANCE EVERY 16000 HOURS OF OPERATION 27 7 6 DIAGNOSTIC SERVICE OPTIONAL 27 7 7 PARTS REPLACEMENT AND ADJUSTMENT PROCEDURES 27 7 7 1 AIR FILTER INSPECTION MAINTENANCE 28 ...

Page 5: ...OTING 37 8 1 INTRODUCTION 37 8 2 TROUBLESHOOTING 39 8 3 CALIBRATION Section 9 PARTS LIST 41 9 1 PROCEDURE FOR ORDERING PARTS 41 9 2 RECOMMENDED SPARE PARTS LIST 42 9 3 COMPRESSOR MOTOR AND FRAME 44 9 4 AIR INLET SYSTEM 46 9 5 COOLER ASSEMBLY 48 9 6 LP HOT LP COLD 50 9 7 HP DISCHARGE 52 9 8 LUBE SYSTEM 54 9 9 ELECTRICAL BOX 56 9 10 CONTROL SYSTEM CONDENSATE DRAIN 58 9 11 CANOPY 60 9 12 DECALS 66 9 ...

Page 6: ...NOTES ...

Page 7: ...compressor or at any other point along the air line when an air hose exceeding 1 2 13mm inside diameter is to be connected to the shut off throttle valve to reduce pressure in case of hose failure per OSHA Standard 29 CFR 1926 302 b 7 and or any applicable Federal State and Local codes standards and regulations B When the hose is to be used to supply a mani fold install an additional appropriate f...

Page 8: ... and confine long hair when working around this compressor especially when exposed to hot or moving parts D Keep access doors if any closed except when making repairs or adjustments E Make sure all personnel are out of and or clear of the compressor prior to attempting to start or oper ate it F Disconnect and lock out all power at source and verify at the compressor that all circuits are de en erg...

Page 9: ...n grounded conductors 1 9 LIFTING A If the compressor is provided with a lifting bail then lift by the bail provided If no bail is provided then lift by sling Compressors to be air lifted by helicopter must not be supported by the lifting bail but by slings instead In any event lift and or han dle only in full compliance with OSHA standards 29 CFR 1910 subpart N and or any applicable Feder al Stat...

Page 10: ... enter it to perform service adjustments inform other per sonnel before doing so or else secure and tag the access door in the open position to avoid the possi bility of others closing and possibly latching the door with personnel inside B Make sure all personnel are out of compressor before closing and latching enclosure doors ...

Page 11: ...000 CFM The maximum allow able ambient temperature is 115_F 46_C Heat rejection to the surrounding environment will be up to 20 greater than the motor horsepower this is because of the latent heat of condensation of the moisture removed from the intake air and the heat from the motor inefficiency The 200HP model will discharge up to 615 000 BTU hr to the surrounding environment smaller models corr...

Page 12: ...on and periodically thereafter 2 6 ELECTRICAL PREPARATION Interior electrical wiring is assembled at the factory Required customer wiring is minimal i e isolation switches fusible disconnects etc but should be done by a qualified electrician in compliance with OSHA NEC and any other applicable codes A wiring diagram is provided with the package docu mentation DANGER Lethal shock hazard inside Disc...

Page 13: ...splacement Oil Free Twin Rotary Screws Configuration Two stages Driven by Single Increaser Gear Box Bearing Type Anti Friction Lubrication Pressurize System for Bearings Gears and Cooling Jackets Sump Capacity 10 gallons 37 9 liters Duty Temperature 115_F 46_C Max Control Electro hydro pneumatic Discharge Pressure Maximum see Table 3 1 Minimum 70 psi 4 8 bar MOTOR Type TEFC Enclosure NEMA Frames 3...

Page 14: ...8 NOTES ...

Page 15: ...at tenuating enclosure all mounted on a fabricated steel frame Air cooled heat exchangers are used on all mod els A motor driven fan is used to ventilate the interi or of the sound attenuating enclosure The Super visor II assembly is easily accessible for servicing behind a hinged and locked separate enclosure panel door 4 3 COMPRESSOR UNIT FUNCTIONAL DESCRIP TION Sullair DR 13 compressors feature...

Page 16: ... gear box through a rigid castadap tor which maintains the gear box and motor shafts in optimum alignment and allows the driveline as sembly to be supported by soft vibration isolating rubberized mounts 4 4 AIR INLET SYSTEM FUNCTIONAL DESCRIP TION Refer to Figure 4 2 The compressor inlet system consists of a heavy duty three stage dry type air filter with inertial dust separation and dust collec t...

Page 17: ...Supervisor II The dif ferent phases of operation are described below for illustration purposes 100 psi service operation will be used START MODE 0 TO 5 PSIG 0 TO 0 34 BAR When the I or pads are depressed the unit starts The inlet valve cylinder control solenoid valve is deenergized The blowdown valve remains open reducing air compression at the HP pipe work and the inlet valve remains nearly close...

Page 18: ...Section 4 COMPRESSOR SYSTEMS 12 Figure 4 5 Piping and Instrumentation Diagram Air cooled ...

Page 19: ...d of this peri od When the line pressure P2 falls below the 90 psig 6 2 bar setting a Start Mode automatically takes place followed by package operation in the Full Load Mode 4 6 COOLING AND SILENCING SYSTEM FUNC TIONAL DESCRIPTION Refer to Figure 4 4 and 4 5 As air is discharged by each compressor stage it is sequentially routed to S a silencer to reduce noise caused by the dis charged air S heat...

Page 20: ... addition if the pressure drop across the filter ports exceeds 10 psig 6 9 bar the Supervisor II displays a maintenance re quirement message All lubed points return the oil to the sump by gravity Vents on the compressor timing gear covers and the gear box are also piped into the sump to avoid releasing oil vapor The sump is vented to atmo sphere via a breather which includes an oil vapor trap 4 8 ...

Page 21: ...Section 5 SUPERVISOR II 15 Figure 5 1 Supervisor II Panel ...

Page 22: ...displays and in parameter setup mode to increment a value S Down arrow lamp test Used in status displays to change displays and in param eter setup mode to increment a value When in the default display the key will light all the lamps for three seconds 5 3 STATUS DISPLAYS By default the line pressure P2 and discharge temperature T2 are shown on the bottom line of the display and machine status on ...

Page 23: ...occur T5 100 MAX 160 S Total hours that the compressor has been running HRS RUN 001234 0 S Total hours that the compressor has been loaded HRS LOAD 000987 0 S Last fault log This shows the fault on the first line and the run hours when the fault occcured T1 HI 1 234 S Next to last fault log This shows the fault on the first line and the run hours when the fault occcured T1 HI 2 204 5 4 LAMP INDICA...

Page 24: ...For example if the un load pressure is set to 110 psi 7 6 bar and the load differential is set to 10 psid 0 7 bar the machine will load when the line pressure goes below 100 psi 6 9 bar LOAD 10 PSI S P1 Max Maximum oil sump pressure An alarm and shut down will occur when the oil sump pressure rises above this pressure P1 MAX 135 PSI S Wye to delta transition timer For the full voltage starters and...

Page 25: ...ntacts are not tripped Press ing the I will turn on the compressor and put it in manual mode If the compressor is already run ning but in automatic mode pressing I will switch operation to manual Pressing I while al ready running in manual mode will cause the Su pervisor to turn off the common fault relay if en gaged and clear any maintenance indicators To stop the compressor press O If the compre...

Page 26: ...o by a message This mode is used to control the machine from a master computer S HOURS Sends status message about once a second starts loads and unloads machines based on sequencing hours S COM ID Sends status message about once a second starts loads and un loads machines based on machine Com ID 5 7 SUPERVISOR II OUTPUT RELAYS RELAY OPERATION RUN RELAY K1 Contact closure energizes the compressor s...

Page 27: ...let Pressure psig bar N A 25 1 7 Lo P4 Oil Filter Inlet Pressure psig bar N A N A N A Dp1 Inet Filter Vacuum inches H2O 15 N A Hi Dp2 Oil Filter Differential P4 P3 psig bar 20 1 4 N A Hi T1 1st Stage Discharge Air Temp F C 435 224 445 229 Hi T2 2nd Stage Discharge Air Temp F C 435 224 445 229 Hi T3 Oil Filter Outlet Temp F C 155 68 160 71 Hi T4 2nd Stage Inlet Air Temp F C 155 68 160 71 Hi T5 Afte...

Page 28: ...22 NOTES ...

Page 29: ... be aware that the elements must be allowed to cool sufficiently before resetting LIMIT SWITCH Operates blowdown valve DISCHARGE CHECK VALVE Isolates compressor from field pipework when shut down Located between the HPsilencer and the after cooler PRESS RELIEF VALVES Found on the discharge pipework of both LP and HP stages they vent the compressed air to atmosphere in case of an over pressure cond...

Page 30: ...higher than 135 F 57 C or 20 F 11 C above the ambient temperature Ob serve the operating temperature T3 and press P3 tube oil filter discharge When T3 reaches approximately 100 F 38 C P3 should be approximately 40 psig 2 8 bar This is con trolled by the constant bypass pressure relief valve setting 9 Close service valve to air net system 10 Check the buffer supply pressure The buffer supply regula...

Page 31: ...ages is no longer present The compressor will not run if any of these mes sages are still present P1 HI P1 was greater than 52 psig 3 6 bar P1 prealarm occurs at 49 psig 3 4 bar T1 HI T1 was greater than 445_F 229_C T1 prealarm occurs at 435_F 224_C T2 HI T2 was greater than 445_F 229_C T2 prealarm occurs at 435_F 224_C E STOP The emergency stop pushbutton was pushed in MOTOR OL The motor overload...

Page 32: ...26 NOTES ...

Page 33: ...those items covered by the 8000 hour or one year maintenance interval the following items must also be checked every 16000 hours of opera tion or two years depending upon conditions of ser vice 1 Operate test all safety devices 2 Check clean heat exchangers 3 Check clean blowdown valve 4 Check clean check valves 5 Check condition of isolation mounts under com pressor unit and motor 6 Check clean s...

Page 34: ...psig 1 4 barg Your oil filter in cludes a proprietary replaceable element P N 02250049 821 available solely from Sullair and its agents DO NOT substitute 1 Using a strap wrench remove the old element and gasket 2 Clean the gasket seating surfaces 3 Apply a light film of fresh oil to the new gasket and hand tighten new element until gasket contacts the seat 4 Continue tightening element by hand an ...

Page 35: ...ten the nut 10 Re connect the body and bowl assemblies 7 7 4 INLET CONTROL SOLENOID VALVE P N 250025 516 MAINTENANCE Refer to Figure 7 4 Solenoid valve P N 250025 516 maintenance is quite minimal but a pe riodic cleaning is desirable The time between clean ings will vary depending on operating conditions In general if the voltage to the coils is correct sluggish valve operation or excessive leakag...

Page 36: ...irs 1 Remove retaining clip and pull entire solenoid en closure off solenoid base sub assembly CAUTION When metal retaining clip disengages it will spring upward 2 Unscrew solenoid base sub assembly and re move core spring guide and core spring 3 Unscrew capscrews 4 and remove end cap and end cap gasket from body 4 Pull inner disc sub assembly disc spring sleeve and outer disc sub assembly from va...

Page 37: ... disc spring and install into sleeve Install remaining disc sub assembly from the opposite end The disc sub assemblies will snap onto the disc spring if pushed evenly and twisted slightly 4 Install the sleeve with disc assemblies and disc spring engaged into the valve body and onto core at the same time 5 Install the end cap assembly consisting of end cap end cap gasket end cap seat seat gasket an...

Page 38: ...e gasket 3 Install core insert sub assembly into body cavity and push it gently down until the gasket of the in sert just seals in the cavity of the body 4 Install core spring in top of core insert into top of core insert sub assembly Close end of core spring protrudes from top of core 5 Install solenoid base gasket and solenoid base sub assembly Torque solenoid base sub assem bly to 260 25 in lbs...

Page 39: ...ket and install manual operator assembly in valve body Torque manual operator body to 175 25 in lbs 19 8 2 8 Nm 5 Replace solenoid base gasket and solenoid base sub assembly Torque solenoid base sub assem bly to 175 25 in lbs 19 8 2 8 Nm External Spring Type Solenoid SPACER STEM RETAINER Spacer Location Figure 7 7 Solenoid Valve P N 02250044 392 6 Check manual operator for proper operation Turn st...

Page 40: ... with the new filter Replacement Element P N 02250118 258 P N 022500118 025 Figure 7 9 Sump Breather Filter Repair Kit P N 02250122 079 Figure 7 10 Blowdown Valve P N 02250119 178 7 7 9 OIL SUMP STRAINER MAINTENANCE The suction line of the oil pump is fItted with a 100 mesh stainless steel strainer to protect its internals from foreign matter To service the cleanable strain er proceed as follows 1...

Page 41: ...move to allow access to the coupling assembly 2 Loosen and remove all bolts securing each flexible element half to the shaft hubs 3 Inspect each element body for signs of tears or separation away from the metal flanges if any faults are found elements must be replaced and Sullair contacted for further assistance 4 Re assemble in reverse order Bolts must be re torqued to 30 ft lbs 41 Nm dry Please ...

Page 42: ...Section 7 MAINTENANCE 36 Table 1 Installation Data ...

Page 43: ...ould trouble persist check whether motor starter contacts are functioning properly Low Incoming Line Voltage Check voltage Should voltage check low consult power company T 1 T 2 T 3 Temperature Transducer Failure Check connections from T 4 T 5 FAIL transducer If adequate replace transducer P 1 P 2 P 3 Pressure Transducer Failure Check connections from P 4 FAIL transducer If adequate replace transd...

Page 44: ... transducer Blowdown Valve Failed to Open Refer to Component Manual for valve or Operated Sluggishly maintenance T2 HI Intercooler Core Fouled Clean finning Discharge Check Valve Leaking Refer to compressor s Operators Manual During Unloaded Operation for check valve maintenance Inlet Throttling Valve Not Fully Open See inlet valve adjustment During Loaded Operation Low oil pressure defective cont...

Page 45: ...e of action is to measure the signal pres sure temperature etc with an alternate cali brated instrument and compare readings If readings conflict the electrical and or tubing connections should be inspected and if no faults are evident then replace the sensor and re evaluate against the calibrated instrument 8 3 CALIBRATION The Supervisor II has software calibration of the pressure and temperature...

Page 46: ...40 NOTES ...

Page 47: ...49 821 1 kit control line filter element and seals for filter 02250112 032 02250112 031 1 element oil sump breather 02250118 025 02250118 258 1 lubricant oil free compressor 5 gallons 02250057 198 10 gal INSURANCE SPARE PARTS kit control line filter element and seals for filter 02250112 032 02250112 031 1 kit repair for V type strainer 241771 241772 1 replacement buffer air silencer 250009 221 1 r...

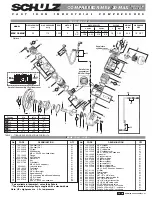
Page 48: ...Section 9 ILLUSTRATIONS AND PARTS LIST 42 9 3 COMPRESSOR MOTOR AND FRAME ...

Page 49: ...250118 572 1 Sadaptor motor compressor 365 405 tsc 02250118 571 1 5 hub coupling E 50 50mm 250042 754 1 6 element coupling 406631 1 7 hub coupling E 50 2 375 dia 407988 1 Shub coupling 2 125 dia 407986 1 Shub coupling 1 875 dia 250033 538 1 8 motor I 1 9 block mounting 224511 I 10 frame 02250114 747 1 11 kit replacement for drive coupling I 1 I Consult factory for information PLEASE NOTE WHEN ORDE...

Page 50: ...Section 9 ILLUSTRATIONS AND PARTS LIST 44 9 4 AIR INLET SYSTEM ...

Page 51: ...gasket 040696 3 8 valve butterfly 6 040336 1 9 spacer inlet 250026 509 1 10 support inlet control valve 02250106 135 1 11 lever inlet valve 02250106 137 1 12 rod end spherical RH 5 16 040136 1 13 cylinder hydraulic 1 1 2 02250049 631 1 14 rod end spherical LH 5 16 042004 1 15 spacer tube 1 2 02250106 136 1 16 hose hydraulic 02250107 882 2 17 isolator vibration 3 8 16 02250106 601 2 I For maintenan...

Page 52: ...Section 9 ILLUSTRATIONS AND PARTS LIST 46 9 5 COOLER ASSEMBLY ...

Page 53: ...107 842 2 4 panel lower fan box 02250105 471 1 5 plate venturi 40 02250105 475 1 6 panel RH fan box 02250105 472 1 7 panel upper fan box 02250105 473 1 8 fan 12 blade 40 60hz 02250109 349 1 9 guard fan 42 02250107 833 1 10 motor fan 7 5HP 460 60hz 02250108 627 1 11 support motor 02250105 476 1 12 support bracket HP hot I 02250106 633 1 PLEASE NOTE WHEN ORDERING PARTS INDICATE SERIAL NUMBER OF COMP...

Page 54: ...Section 9 ILLUSTRATIONS AND PARTS LIST 48 9 6 LP HOT LP COLD ...

Page 55: ...on 3 8 16 02250106 601 3 9 support bracket LP hot 02250107 478 2 10 pipe assembly hot 02250116 964 1 11 manifold assy 3 x 8 02250116 968 1 12 gasket flange 4 240621 010 2 13 pipe assembly LP cold 02250105 262 1 14 pipe assembly LP cold intermediate 02250107 547 1 15 pipe assembly LP cold 02250105 263 1 16 pipe assembly LP cold flex 02250106 468 1 17 support bracket LP cold L 02250107 019 1 18 kit ...

Page 56: ...Section 9 ILLUSTRATIONS AND PARTS LIST 50 9 7 HP DISCHARGE ...

Page 57: ... assembly HP hot 02250119 269 1 11 silencer blowdown 1 1 2 I 405815 005 1 12 valve check 3 02250108 623 1 13 silencer air 02250117 406 1 14 pipe assembly blowdown 02250118 646 1 15 valve relief 1 250042 767 1 16 support bracket manifold 02250119 440 1 17 valve blowdown 1 1 2 II 02250119 178 1 18 support air filter 02250106 215 1 19 support pipe assembly 02250117 561 1 20 kit insulation thermal pip...

Page 58: ...Section 9 ILLUSTRATIONS AND PARTS LIST 52 9 8 LUBE SYSTEM ...

Page 59: ...plate cover sump 02250106 159 1 12 gasket cover plate 02250092 588 1 13 strainer suction 1 02250105 982 1 14 hose assembly flex 1 02250107 876 1 15 hose assembly flex 3 4 02250107 877 1 16 heater sump 02250114 687 1 17 valve ball 1 2 047117 1 18 tank oil sump 02250106 020 1 19 plug glass oil level 1 7 8 02250097 611 1 20 plug fill 250042 628 1 I For maintenance on oil filter no 02250049 820 order ...

Page 60: ...Section 9 ILLUSTRATIONS AND PARTS LIST 54 9 9 ELECTRICAL BOX ...

Page 61: ...1 13 starter consult factory 1 14 disconnect 02250114 874 1 15 block terminal 250041 102 26 Send terminal block 250041 103 2 Sjumper terminal 02250055 172 19 16 heater enclosure 50W consult factory 1 17 breaker circuit 120V 20A 02250116 385 1 18 transformer 40VA 120 24 250016 280 1 19 bezel 02250089 302 1 Sgasket bezel 02250090 872 1 20 light 250027 122 1 Slens red 250027 113 1 21 plate auxillary ...

Page 62: ...Section 9 ILLUSTRATIONS AND PARTS LIST 56 9 10 CONTROL SYSTEM CONDENSATE DRAIN ...

Page 63: ...intenance on 2 way solenoid valve no 02250044 392 order repair kit no 02250044 391 and replace ment coil no 250031 738 II For maintenance on V type strainer no 241771 order repair kit no 241772 III For maintenance on pressure transducer no 02250078 933 order replacement transducer no 02250078 933 IV For maintenance on vacuum switch no 02250078 249 order replacement switch no 02250078 249 V For mai...

Page 64: ...Section 9 ILLUSTRATIONS AND PARTS LIST 58 9 11 CANOPY ...

Page 65: ... CANOPY key part number description number quantity assembly enclosure I 02250114 748 1 I For replacement enclosure parts consult factory with drawing part number shown on page 54 PLEASE NOTE WHEN ORDERING PARTS INDICATE SERIAL NUMBER OF COMPRESSOR ...

Page 66: ...Section 9 ILLUSTRATIONS AND PARTS LIST 60 9 12 DECALS ...

Page 67: ...tion 250021 286 1 7 decal fluid Mobil DTE 02250069 390 1 8 decal earth ground 02250075 046 4 9 decal protective earth ground 02250075 045 1 10 decal PE designation 02250075 540 1 11 decal warning auto start 041065 1 12 sign danger air breathing 250027 935 1 13 sign food grade lube 250003 144 1 Continued on Page 63 I Voltage decal varies with voltage of machine To determine correct voltage decal co...

Page 68: ...Section 9 ILLUSTRATIONS AND PARTS LIST 62 9 12 DECALS ...

Page 69: ...1 15 decal danger high voltage 042218 1 16 decal electrical component ID 250038 457 1 17 decal ISO 9001 02250057 624 1 18 decal water drain 250022 810 1 19 decal water in 250019 107 1 20 decal water out 250019 108 1 21 decal fork lifting 241814 4 Continued on page 65 PLEASE NOTE WHEN ORDERING PARTS INDICATE SERIAL NUMBER OF COMPRESSOR ...

Page 70: ...Section 9 ILLUSTRATIONS AND PARTS LIST 64 9 12 DECALS ...

Page 71: ...ning hot surfaces 407408 1 23 decal electrocution hazard 02250077 472 1 24 decal oil fill cap DS 13 02250115 652 1 25 decal Supervisor II I 02250044 204 1 I For detailed view of decal no 02250073 286 consult Section 5 Supervisor II Figure 5 1 PLEASE NOTE WHEN ORDERING PARTS INDICATE SERIAL NUMBER OF COMPRESSOR ...

Page 72: ...Section 9 ILLUSTRATIONS AND PARTS LIST 66 9 13 DECAL LOCATIONS ...

Page 73: ... cap DS 13 02250115 652 1 2 decal fluid Mobil DTE 02250069 390 1 3 decal fork lifting 241814 4 5 sign warning sever fan port 049965 2 6 sign warning sever fan 049855 2 7 decal rotation 250021 286 1 8 sign warning hot surfaces 407408 1 Continued on page 69 PLEASE NOTE WHEN ORDERING PARTS INDICATE SERIAL NUMBER OF COMPRESSOR ...

Page 74: ...Section 9 ILLUSTRATIONS AND PARTS LIST 68 9 13 DECAL LOCATIONS ...

Page 75: ... designation 02250075 540 1 14 decal protective earth ground 02250075 045 1 15 sign warning ground fault 049852 1 16 decal danger high voltage 042218 1 17 decal voltage 460 3 60 international I 02250069 399 1 Continued on page 71 I Voltage decal varies with voltage of machine To determine correct voltage decal consult factory with serial number of your machine PLEASE NOTE WHEN ORDERING PARTS INDIC...

Page 76: ...Section 9 ILLUSTRATIONS AND PARTS LIST 70 9 13 DECAL LOCATIONS ...

Page 77: ...decal ISO 9001 02250057 624 1 4 decal electrocution hazard 02250077 472 1 5 decal warning auto start 041065 1 6 sign food grade lube 250003 144 1 7 sign danger air breathing 250027 935 1 8 decal water drain 250022 810 1 9 decal water in 250019 107 1 10 decal water out 250019 108 1 11 decal earth ground 02250075 046 4 PLEASE NOTE WHEN ORDERING PARTS INDICATE SERIAL NUMBER OF COMPRESSOR ...

Page 78: ...Section 9 ILLUSTRATIONS AND PARTS LIST 72 9 14 WIRING DIAGRAM ...

Page 79: ...NOTES ...

Page 80: ...Michigan City Indiana 46360 U S A Telephone 1 800 SULLAIR U S A Only or 1 219 879 5451 Fax 219 874 1273 Fax 219 874 1835 Parts SULLAIR ASIA LTD Sullair Road No 1 Chiwan Shekou Shenzhen Guangdong PRV PRC POST CODE 518068 Telephone 755 6851686 Fax 755 6853473 Zone Des Granges BP 82 42602 Montbrison Cedex France Telephone 33 477968470 Fax 33 477968499 Fax 219 874 1205 Service ...

Reviews: