SRT D85W
- Instructions
www.strong-technologies.com
1
SRT D85W
- INSTRUCTIONS
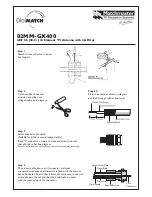
1. Stand Mounting
1.1. Terrace Mounting
Place the Pipe Mount Fixer on the ground pointing to the
North & South,
Place two
1/4 "*1-2/2" Anchor Bolts
into the
Pipe
Mount Fixer
and screw them.
Place and screw the
45° Pipe
into the
Pipe Mount Fixer
using one
M8*65 hex-head cap screw
and a
M8 nut,
The top of the
45° Pipe
has to point to the North.
Warning:
Do not follow the instruction provided on the below
guide regarding the position of the pipe:
Place and screw the two
Side Supporting Rods (R) & (L)
on the
45° Pipe
using a
M8*65 hex-head cap screw
& a
M8 nut
.
Warning:
You have to use the first hole, the hole circled in green
on the picture.
Place and screw two
1/4 "*1-2/2" Anchor Bolts
into the
two
Side Supporting Rods (R) & (L)
.