Steelcase 2003173001, User Manual
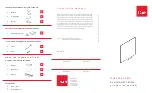
The Steelcase 2003173001 User Manual is a comprehensive guide to help you set up and maximize the functionality of your office furniture. Download the manual for free from manualshive.com to easily access important information on how to use and care for your Steelcase product.
Share
Download


Reviews:
No comments