background image

Manual Revision: 06/15/2021

User Manual

For the latest information and specifications visit 

www.startech.com/RKCONS17HD

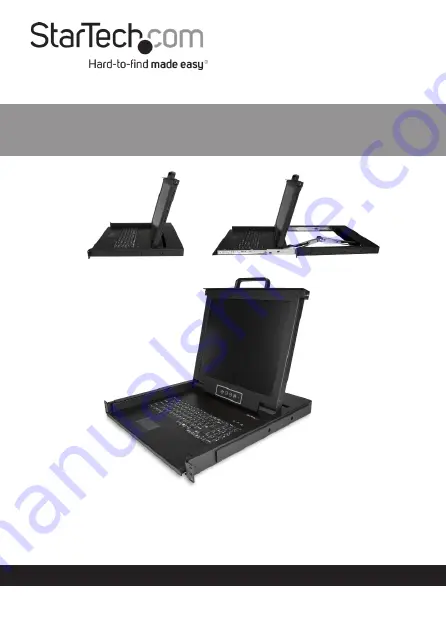
1-Port VGA Rackmount LCD Console 

| 17 in. | 1080p | 1U

SKU#: 

RKCONS17HD

Actual product may vary from photos

Summary of Contents for RKCONS17HD

Page 1: ...evision 06 15 2021 User Manual For the latest information and specifications visit www startech com RKCONS17HD 1 Port VGA Rackmount LCD Console 17 in 1080p 1U SKU RKCONS17HD Actual product may vary from photos ...

Page 2: ... Reorient or relocate the receiving antenna Increase the separation between the equipment and receiver Connect the equipment into an outlet on a circuit different from that to which the receiver is connected Consult the dealer or an experienced radio TV technician for help Industry Canada Statement This Class B digital apparatus complies with Canadian ICES 003 Cet appareil numérique de la classe B...

Page 3: ...m Where they occur these references are for illustrative purposes only and do not represent an endorsement of a product or service by StarTech com or an endorsement of the product s to which this manual applies by the third party company in question Regardless of any direct acknowledgement elsewhere in the body of this document StarTech com hereby acknowledges that all trademarks registered tradem...

Page 4: ...certifié et dans le respect des normes locales et du code de construction local Les câbles y compris les câbles d alimentation et de chargement doivent être placés et acheminés de façon à éviter tout risque électrique de chute ou de sécurité 安全対策 電源が入っている状態の製品または電線の終端処理を行わないでくださ い 製品の設置やマウントは 使用地域の安全ガイドラインおよび建築基準に 従い 有資格の専門業者が行うようにしてください ケーブル 電源ケーブルと充電ケーブルを含む は 適切な配置と引き回し を行い 電気障害やつまづきの危険性など 安全上のリ...

Page 5: ... endast göras av behöriga yrkespersoner och enligt gällande lokala förordningar för säkerhet och byggnormer Kablar inklusive elkablar och laddningskablar ska dras och placeras på så sätt att risk för snubblingsolyckor och andra olyckor kan undvikas Warning Statements Make sure to assemble this product according to the instructions Failure to do so might result in personal injury or property damage...

Page 6: ... 9 Packaging Contents 9 Hardware Kit Contents 9 Requirements 9 Installation 10 Mounting the Rack Console Drawer 10 Grounding the LCD Console 11 Connecting the LCD Console 11 Opening the LCD Console 12 Closing the LCD Console 13 Panel Controls and On Screen Display OSD Functions 14 LCD Console Panel Menu 14 Auto Tuning the Display 14 Adjusting the Display s Brightness 15 Adjusting the Display s Con...

Page 7: ...ech com support Adjusting the Image or OSD Position 17 Adjusting the Language 17 Resetting the LCD Console to Factory Settings 18 Exiting the OSD 18 LED Indicator 19 Configuration 19 Testing the LCD Console 19 Configuring Display Settings 20 Specifications 20 Important Considerations 21 ...

Page 8: ...anuals videos drivers downloads technical drawings and more visit www startech com support Product Diagram RKCONS17HD Front Handle Release Switch Display Console Panel Mounting Brackets 2 Rails 2 Keyboard Touchpad ...

Page 9: ...8 To view manuals videos drivers downloads technical drawings and more visit www startech com support Rear Power Connection Port Power Switch Ground Connection Screw Host Port ...

Page 10: ...e Drawer x 1 Console Cable Kit x 1 Mounting Rails Set x 1 Power Adapter x 1 Hardware Kit Contents Side Rails with Brackets x 2 Keys x 2 Screw Kit x 1 Requirements Requirements are subject to change For the latest requirements please visit www startech com RKCONS17HD 1U of Rack Space Grounding Wire Power Source Computer Server or KVM Phillips Head Screwdriver ...

Page 11: ...ack you want to install the Rack Console Drawer 3 Insert the M5 Cage Nuts two per mounting post into the square mounting holes on the Rack s mounting posts 4 Align the Rear Mounting Brackets rails with the M5 Cage Nuts on the corresponding Rack mounting post 5 Insert an M5 Screw two per mounting post through the Rear Mounting Bracket rail and into the M5 Cage Nut Do not tighten the M5 Screws 6 Wit...

Page 12: ...ction Screw making sure not to over tighten 4 Attach the other end of the Grounding Wire not connected to the LCD Console to a proper earth ground connection Connecting the LCD Console To connect the LCD Console to a Computer or KVM perform the following steps 1 Turn off the Computer or KVM Switch 2 Connect the 15 pin Host KVM Connector on the KVM Cable to the Host Port on the LCD Console and to a...

Page 13: ... The LCD Console will power On 3 The LED Indicator on the left of the monitor panel changes from orange to green 4 Adjust the Display into the desired position Closing the LCD Console 1 Lower the Display until it s flush against the Keyboard 2 Slide and hold the two Switches located on the sides of the LCD Console forward and push the LCD Console in towards the rear of the rack 3 Release the two S...

Page 14: ...nizes and scales down the display to any valid factory preset timings Exits the OSD SL Press to scroll to the function you want to adjust SL Press to scroll to the function you want to adjust Menu Select Opens the OSD menu Used to select an option on the OSD Auto Tuning the Display The Auto button automatically adjusts the display size and tunes the Display to its optimal state 1 On the Console Pa...

Page 15: ...sting the Display s Brightness 1 On the Console Panel press the Menu Select button 2 On the OSD use the SL down and SL up on the Console Panel buttons to highlight Menu then press the Menu Select button 3 On the Menu list select Brightness and press the Menu Select button 4 Use the SL down and SL up on the Console Panel buttons to adjust the brightness on the display 5 Press the Menu Select button...

Page 16: ...ole Panel buttons to adjust the contrast on the display 5 Press the Menu Select button to save your selection Adjusting the Display s Color Settings 1 On the Console Panel press the Menu Select button 2 On the OSD use the SL down and SL up on the Console Panel buttons to higlight Menu then press the Menu Select button 3 On the Menu list select Color then press the Menu Select button 4 Select one o...

Page 17: ...e Menu list select Position then press the Menu Select button on the Console Panel 4 Select one of the following Color options Image Pos Adjusts the position of the image OSD Pos Adjusts the position of the OSD Return Returns to the OSD Menu without making any changes 5 Press the Menu Select button on the Console Panel to save your selection Adjusting the Language 1 On the LCD Console Panel press ...

Page 18: ... the LCD Console to Factory Settings 1 On the Console Panel press the Menu Select button 2 On the OSD use the SL down and SL up on the Console Panel to highlight Menu then press the Menu Select button 3 On the Menu list select Misc and press the Menu Select button on the Console Panel 4 Select one of the following recall options Yes Reset No Returns to the OSD Menu without resetting Exiting the OS...

Page 19: ...D Console is working properly perform the following steps 1 Power up the Rack Console and then turn on the Computer 2 Make sure that the video image is centered on the screen If the image is not centered use the OSD controls to adjust the image see Panel Controls and OSD Functions or press the Auto button on the Console Panel Note If the unit does not power up when the Display is pulled up try pus...

Page 20: ...owing display settings Display mode also called desktop area or video resolution Refresh rate also called vertical scan rate or vertical sync Color depth also called color palette or number of colors Specifications Specification Description Panel Type Active Matrix TFT LCD Max Resolution 1920 x 1080 Supported Colors 16M Colors 6 bit with FRC Response Time Rising Time 8ms Decay Time 8ms System Cabl...

Page 21: ... assembly ensure that the environmental conditions are within the LCD Console s maximum and minimum specifications Installing the LCD Console in a rack or cabinet may reduce airflow Consider your airflow requirement when selecting a location for installation It s recommended that the LCD Console be connected to a power source with over current protection and supply wiring Appropriate consideration...

Page 22: ... damages whether direct or indirect special punitive incidental consequential or otherwise loss of profits loss of business or any pecuniary loss arising out of or related to the use of the product exceed the actual price paid for the product Some states do not allow the exclusion or limitation of incidental or consequential damages If such laws apply the limitations or exclusions contained in thi...

Page 23: ... tools StarTech com is an ISO 9001 Registered manufacturer of connectivity and technology parts StarTech com was founded in 1985 and has operations in the United States Canada the United Kingdom and Taiwan servicing a worldwide market Reviews Share your experiences using StarTech com products including product applications and setup what you love about the products and areas for improvement StarTe...

Reviews: