

Quick-start guide
FR:
Guide de l’utilisateur - fr.startech.com
DE:
Bedienungsanleitung - de.startech.com
ES:
Guía del usuario - es.startech.com
NL:
Gebruiksaanwijzing - nl.startech.com
PT:
Guia do usuário - pt.startech.com
IT:
Guida per l’uso - it.startech.com
Manual Revision: 03/09/2017
For the latest information, technical specifications, and support for
this product, please visit www.StarTech.com/HSB1SATSASBA.
Package contents
• 1 x backplane
• 2 x keys
• 4 x drive-mounting screws
• 1 x quick-start guide
Requirements
• 5.25” drive bay
• 3.5” SATA or SAS hard drive
Requirements are subject to change. For the latest requirements,
HSB1SATSASBA
3.5” SATA/SAS Hard Drive Backplane for 5.25” Bay - Trayless, Hot-Swap
*actual product may vary from photos
Introduction
The HSB1SATSASBA trayless hard drive backplane supports 3.5”
SATA I/II/III or SAS I/II hard drives and fits a 5.25” bay. The lock and
key security feature helps to secure your hard drive by preventing
unauthorized access. The HSB1SATSASBA includes mounting screw
holes that you can use to connect an optional 40 mm fan to dissipate
any generated heat.
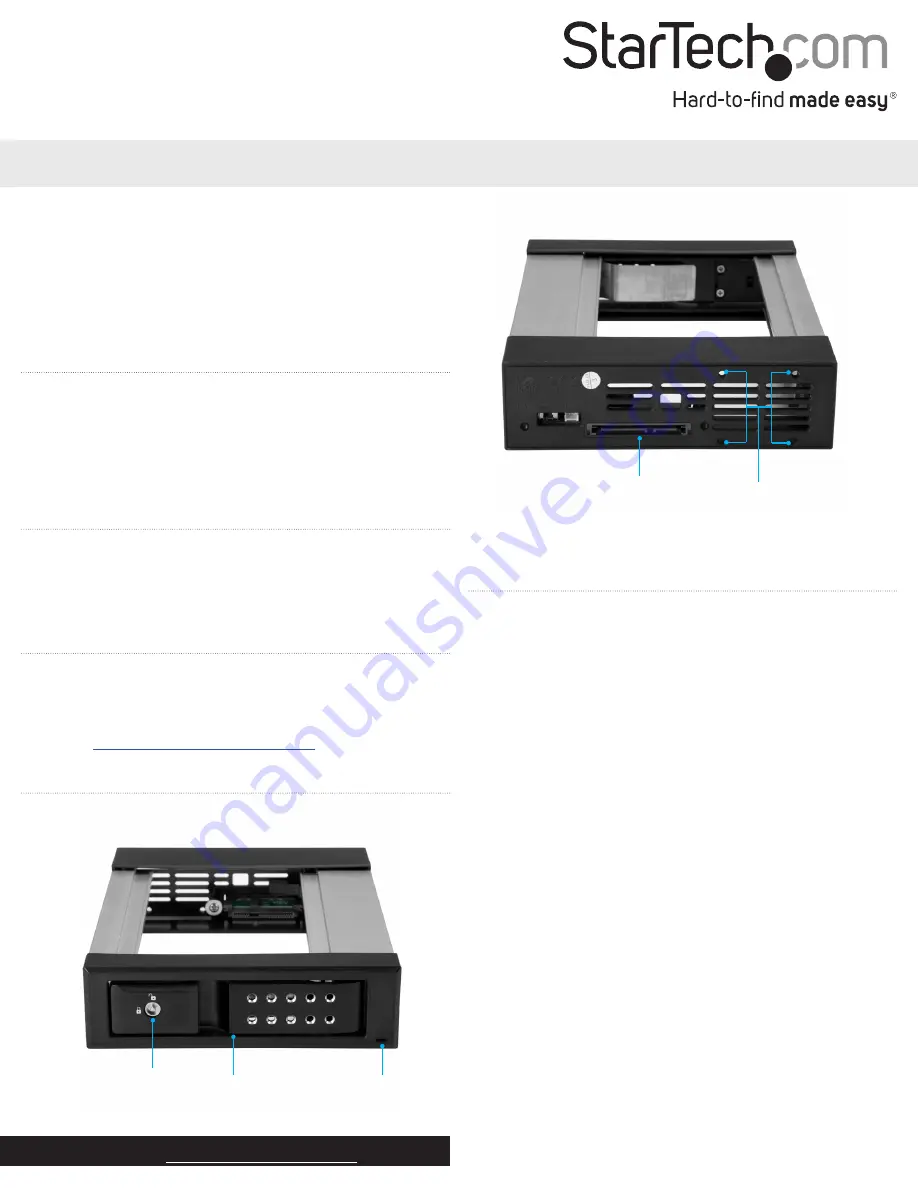
Product diagram
Front view
Back view
Security lock
Power and activity LED
Door
SATA or SAS connector Mounting holes
for optional fan
Install the backplane
Warning!
Always handle storage devices with caution. Make sure
that you’re properly grounded by wearing an anti-static strap when
you install any computer component. If an anti-static strap isn’t
available, touch a large, grounded metal surface for several seconds
to discharge any built-up static electricity.
1. Turn off your computer and any devices or peripherals that are
connected to it.
2. Unplug the power cable from the back of your computer.
3. Disconnect any peripheral devices that are connected to your
computer.
4. Open your computer case. For more information about how
to do this, consult the documentation that came with your
computer system.
5. Remove the cover of an empty drive bay.
6. Insert the backplane into the empty drive bay slot, making sure
that the screw holes on the backplane are aligned with the holes
in the drive bay.
7. Use the provided screws to secure the backplane to the drive
bay.
8. Connect the SATA or SAS power and data cables to the SATA or
SAS connector on the backplane.
9. Place the cover back onto your computer case.
10. Reconnect the power cable to the back of your computer.
11. Reconnect any devices or peripherals that were connected to
your computer.
12. Turn on your computer.


