

Instruction Manual
DE:
Bedienungsanleitung - de.startech.com
FR:
Guide de l'utilisateur - fr.startech.com
ES:
Guía del usuario - es.startech.com
IT:
Guida per l'uso - it.startech.com
NL:
Gebruiksaanwijzing - nl.startech.com
PT:
Guia do usuário - pt.startech.com
Manual Revision: 12/17/2018
For the most up-to-date information, please visit: www.startech.com
Packaging Contents
• 1x 2 HDD Dock Duplicator/Eraser
• 1x USB 3.0 Cable
• 1x Power Adapter
• 3x Power Adapter Clips (NA/UK/EU)
• 1x Instruction Manual
System Requirements
For Drive Duplication
• Source and Destination 2.5” or 3.5” HDDs
For Interfacing with PC
• USB enabled computer system with available USB port
Warning!
Hard drives and storage docks require careful handling,
especially when being transported. If you are not careful with
your hard disk, lost data may result. Always handle your hard drive
and storage device with caution. Be sure that you are properly
grounded by wearing an anti-static strap when handling computer
components or discharge yourself of any static electricity build-up
by touching a large grounded metal surface (such as the computer
case) for several seconds.
Hardware Installation
1. Ensure the power switch is set in the off position. Connect the
power adapter (included) from an available AC power outlet to
the Power Adapter Port on the back of the SATDOCK2REU3.
2. Connect the included USB 3.0 cable from the USB 3.0 Port on the
SATDOCK2REU3 to the USB port on your computer system.
Note:
If you intend to use the duplicator or erase functions, you need
to disconnect the dock from the host and power cycle the dock (turn
the power switch to the off position, disconnect the USB cable and
turn the power switch to the on position).
3. Connect the 2.5” or 3.5” HDD you would like to create a duplicate
of in the HDD 1 Dock port.
4. Connect the 2.5” or 3.5” HDD you would like to have over written
to the HDD 2 Dock port.
5. Press the power switch to the “On” position, the SATDOCK2REU3
is now ready to use.
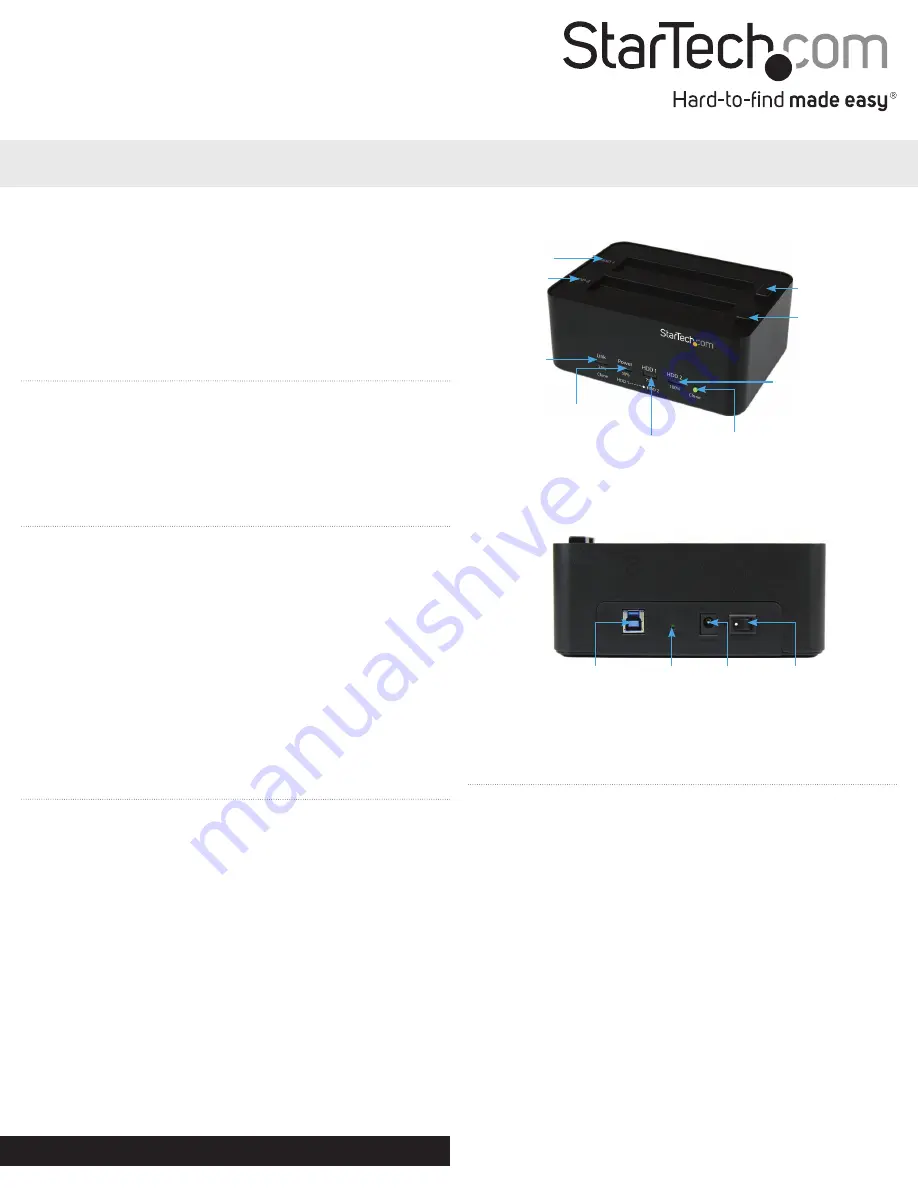
SATDOCK2REU3
USB 3.0 SATA HDD/SSD Dock- 1:1 Duplicator
*actual product may vary from photos
Link LED 25%
Clone/Erase
Completed
Indicator
Power LED 50%
Clone/Erase
Completed
Indicator
HDD 1 Activity
LED 75%
Clone/Erase
Completed
Indicator
HDD 2 Activity LED
100% Clone/Erase
Completed Indicator
Clone
Button
HDD1 2.5/3.5”
Source Slot with
Eject Button
Source
Destination
HDD2 2.5”/3.5”
Destination
Port with Eject
Button
USB 3.0
Port
Erase
Button
Power
Adapter
Port
Power
Switch
Hardware Operation
Duplicating a Hard Drive
Warning!
Any Data remaining on the target drive will be
over written.
Note:
Destination drive must be the same size or larger than the
source drive.
1. Disconnect the dock from the PC and power cycle the dock.
2. Press and hold the clone button on the front of the
SATDOCK2REU3, for several seconds until the progress bar LEDs
flash Amber.
3. The Hard Drive Duplication process begins. The process will be
completed when the LED indicator reaches 100%.
4. The destination drive now contains the same data as the
source drive.
5. To check the drive, the dock will need to be powered off and back
on to enter PC mode again.


