SUB-3 User Manual Sheet 1 of 2
Setting Up
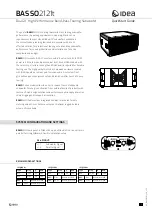
The Sub-Woofer is equipped with a 3 pin IEC mains inlet combined with a voltage selector.
It is essential that the correct mains voltage is selected by the fuse carrier before you make any attempt
to connect this device to the mains supply. Failure to follow the detailed instructions below may result
in damage to this equipment.
The voltage selected is indicated by the legend at the top of the fuse drawer. To change voltage, pull out the
draw and rotate so the desired voltage is at the top, insert the correct fuse and push the drawer back in. Single
voltage versions are available for countries where this is a requirement.
For voltages from 200 to 240 a 1.6amp fuse should be used, and a 3.15amp fuse for voltages between 100 and
120. A ‘T’ type delay fuse should be used in all cases.
For safety reasons it is essential that the correct value fuse is used and that the amplifier is earthed via the
mains connector.
Signal Input is via a pair of RCA Phono Sockets; these should be connected to the pre-amplifier output.
Feet
Screw each foot assembly ‘finger tight’ into the four insert positions in the base of the cabinet.
Tighten three of the nuts using the spanner provided.
Adjust the fourth foot, turning the spike so that the Sub-Woofer sits flat on the floor. Tighten the fourth nut.
Loudspeaker positioning
Because they reproduce only non-directional low bass, Sub-Woofers do not contribute to sound localisation,
and therefore do not need to be in the line of sight to the viewer. The accuracy and smoothness with which they
reproduce low bass, however, does depend on placement.
First, temporarily, put the Sub-Woofer near your favourite listening position. Then, as you play program material
with significant low bass content, go stand & listen at likely Sub-Woofer locations in the room. That location
which delivers best bass sound clean and full, but not ‘boomy’ or ‘thuddy’ will be the best for final placement.
Important Note:
Ensure that air can circulate freely around the amplifier section of the Sub-Woofer, this allows
the amplifier to cool naturally. Failure to do so could result in thermal protection circuits operating and shut-down
of the Sub-Woofer system. If this happens you should allow 15 minutes before the Sub-Woofer system will start
operating again.
As soon as you are familiar with your new loudspeaker spend a little time experimenting with different
positioning while listening to some of your favourite films or music. A small adjustment can often result in a large
improvement. Adjust the spacing and toe-in of the main loudspeakers until you obtain the most convincing and
seamless surround sound in the main listening area.
For multi-channel surround sound or home theatre installations it is often beneficial to position the loudspeakers
(including the centre channel and Sub-Woofer) assymetrically relative to the room main axis, your Spendor
dealer/installer will advise.
Phase
This control changes the phase from 0º to 180º. This is to account for the fact that a
Switch
Sub-Woofer and the other speakers are often at a different distance from the listener. The
phase change introduced by this distance difference needs to be allowed for to give better
integration at the crossover point between the main speakers and the Sub-Woofer.
A good test signal for this would be source material with low level bass, organ music is usually
good for this and even some decoders generate a low level bass signal. Adjust the phase until
maximum level is achieved. Set the correct phase before the volume is finally set.
Volume
This controls the sound level of the Sub-Woofer only.
Crossover
This controls the upper cut-off frequency of the Sub-Woofer. For best results it should be set to
Frequency
suit the main speakers. Although loudspeaker size and room acoustics will change the sound
significantly, as a starting point the settings for Spendor speakers could be:
S6e, SP2/3E and larger
50Hz
SP3/1P
60Hz
S3/5,
S3e
70Hz