background image

MicroMod Main Board Hookup Guide

Introduction

The MicroMod Main Board - Single and Double are specialized carrier boards that allow you to interface a
Processor Board with a Function Board(s). The modular system allows you to add an additional feature(s) to a
Processor Board with the help of a Function Board(s).

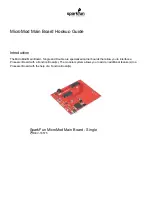
SparkFun MicroMod Main Board - Single

 DEV-18575

YOUR ACCOUNT

LOG IN

REGISTER

Summary of Contents for MicroMod DEV-18575

Page 1: ...ized carrier boards that allow you to interface a Processor Board with a Function Board s The modular system allows you to add an additional feature s to a Processor Board with the help of a Function Board s SparkFun MicroMod Main Board Single DEV 18575 Y O U R A C C O U N T L O G I N R E G I S T E R ...

Page 2: ...imum You may not need everything though depending on what you have Add it to your cart read through the guide and adjust the cart as necessary SparkFun MicroMod Main Board Double DEV 18576 Product Showcase SparkFun MicroMod Main and Function Boa Product Showcase SparkFun MicroMod Main and Function Boa ...

Page 3: ...either one or two function boards SparkFun MicroMod Environmental Function Board SEN 18632 SparkFun MicroMod Main Board Single DEV 18575 SparkFun MicroMod WiFi Function Board ESP32 WRL 18430 Reversible USB A to C Cable 2m CAB 15424 SparkFun MicroMod Artemis Processor DEV 16401 Pocket Screwdriver Set TOL 12891 microSD Card 1GB Class 4 COM 15107 ...

Page 4: ...nal functionality to your Processor Board you ll want to include one or two function boards when connecting them to the Main Board Make sure to check out the catalog for other function boards SparkFun MicroMod Main Board Single DEV 18575 SparkFun MicroMod Main Board Double DEV 18576 SparkFun MicroMod Artemis Processor DEV 16401 SparkFun MicroMod ESP32 Processor WRL 16781 SparkFun MicroMod nRF52840...

Page 5: ...set is an excellent option For users using a microSD card and want to easily read the contents of the memory card you will need a microSD card adapter or USB reader Suggested Reading SparkFun MicroMod Environmental Function Board SEN 18632 SparkFun MicroMod WiFi Function Board ESP32 WRL 18430 microSD USB Reader COM 13004 Pocket Screwdriver Set TOL 12891 SparkFun Mini Screwdriver TOL 09146 ...

Page 6: ...ect USB to serial converter You may also need to follow additional instructions that are not outlined in this tutorial to install the appropriate software Hardware Overview What is an Arduino What is this Arduino thing anyway This tutorials dives into what an Arduino is and along with Arduino projects and widgets Installing Arduino IDE A step by step guide to installing and testing the Arduino sof...

Page 7: ...s to power the Main Boards Processor Board and Function Board s USB Single Cell LiPo Battery It is fine to connect a power source to the USB connector and LiPo battery s JST connector at the same time The MicroMod Main Board has power control circuitry to automatically select the best power source Power USB One option of powering the board is through the USB Type C connector You will need a USB Ty...

Page 8: ...attery i e nominal 3 7V 4 2V fully charged to the 2 pin JST connector as shown below A MCP73831 charge IC is included on the boards to safely charge the LiPo batteries via USB Type C connector A switch is included to set the charge rate The charge rate is probably set to 166mA with both switches flipped to the ON position This may vary depending on the position of the switch when it was pulled fro...

Page 9: ... MicroMod Function Board Beside the MicroMod Processor s socket is another M 2 connector for MicroMod Function Boards which allow you to add additional functionality to your Processor Board The Single Main Board includes one socket for a single Function Board while the Double Main Board includes two sockets for up two Function Boards Main Board Single Function Board Socket Main Board Double Functi...

Page 10: ...rocessor board this boot pin may not be connected SWD Pins For advanced users we proke out the 2x5 SWD programming pins Note that this is not populated so you will need a compatible header and compatible JTAG programmer to connect MicroSD Socket The board includes a microSD socket if your application requires you to log and save data to a memory card The primary SPI pins SDO SDI SCK CS0 from your ...

Page 11: ... the state of the charge IC Charge State LED status No Battery Floating should be OFF but may flicker Shutdown Floating should be OFF but may flicker Charging ON Charge Complete OFF Jumpers Note If this is your first time working with jumpers check out the How to Work with Jumper Pads and PCB Traces tutorial for more information The following five jumpers are included on both the Single and Double...

Page 12: ... jumper shunts to enable the 3 3V voltage regulator for any Function Board connected to Function Zero and Function One using alternative Processor GPIO pins Since certain processors have limited GPIO and may not be broken out on certain locations alternative pins have been provided on the board The ALT PWR EN0 jumper allows users to control the 3 3V voltage regulator on any Function Board that is ...

Page 13: ...s where you would place the board MicroMod Pinout Depending on your window size you may need to use the horizontal scroll bar at the bottom of the table to view the additional pin functions Note that the M 2 connector pins on opposing sides are offset from each other as indicated by the bottom pins where it says Not Connected There is no connection to pins that have a under the primary function AU...

Page 14: ... F0 BOOT I Open Drain BOOT I Open Drain I2C_SDA_Processor I2C_SDA I2C_SDA Qwiic UART_RTS_Processor UART_RTS I2C_SCL_Processor I2C_SCL I2C_SCL Qwiic UART_CTS_Processor UART_CTS I2C_INT_Processor I2C_INT UART_TX_Processor UART_RX D1_Processor SD Card CS microSD Card UART_RX_Processor UART_TX SWDCK_Processor SWDCK 2x5 Header SWDIO_Processor SWDCK 2x5 Header PWM0_Processor PWM0 GND GND GND A0_Processo...

Page 15: ... SPI_SCK SPI_SCK microSD Card SPI_DI_Processor SPI_DO SPI_DO microSD Card SPI_DO_Processor SPI_DI SPI_DI microSD Card SDIO_DATA2_Processor PWR_EN0 Board Dimensions The board dimension of the MicroMod Main Board Single is 2 90 x 3 40 while the MicroMod Main Board Double is 2 90 x 4 90 Both boards include 5x mounting holes Four are located on the edge of each board The fifth mounting hole is located...

Page 16: ...tery is facing in toward the board is also part of the design Users can insert a LiPo battery and have its wires neatly tucked into their enclosure Hardware Hookup If you have not already make sure to check out the Getting Started with MicroMod Hardware Hookup for information on inserting your Processor and Function Boards to the Main Board Getting Started with MicroMod OCTOBER 21 2020 Dive into t...

Page 17: ...ferent Processor Board Function Boards Align the Function Board s key into its M 2 connector s socket Insert the board at an angle 25 push down and tighten one of the screw to hold the board down Attach the second screw on the other side of the board Once the board is aligned tighten both screws fully to secure the board In this case we had the Environmental Function Board secured in the M 2 conne...

Page 18: ...0mA When the switch is flipped to the ON position on the 100mA side the charge rate will be 100mA When the switch is flipped to the ON position on both the 100mA and 500mA sides the charge rate will be 166mA For mobile applications attach a single cell LiPo battery to the 2 pin JST connector Attach a USB cable to a USB port or charger when the battery is low to begin charging To remove the LiPo ba...

Page 19: ...me standoffs and mount a standard Qwiic 1 0 x1 0 sized board using the two mounting holes near the USB Type C connector Place the standoff between the boards and tighten the screws to mount The image below used standoffs with built in threads MicroSD Card With power removed from the board insert a microSD card with the pins facing toward the board into the socket You ll hear a nice click indicatin...

Page 20: ...rd Definitions and Driver We ll assume that you installed the necessary board files and drivers for your Processor Board In this case we used the MicroMod Artemis Processor Board which uses the CH340 USB to serial converter If you are using a Processor Board make sure to check out its hookup guide for your Processor Board Installing Board Definitions in the Arduino IDE SEPTEMBER 9 2020 How do I in...

Page 21: ...and log data to a microSD card on both boards Example 1 MicroMod Main Board Single Enable Function Board MicroMod Artemis Processor Board Hookup Guide OCTOBER 21 2020 Get started with the Artemis MicroMod Processor Board in this tutorial How to Install CH340 Drivers AUGUST 6 2019 How to install CH340 drivers if you need them on Windows Mac OS X and Linux ...

Page 22: ... have not already select your Board in this case the MicroMod Artemis and associated COM port Copy and paste the code below in your Arduino IDE Hit the upload button and set the serial monitor to 115200 baud ...

Page 23: ... www sparkfun com products 16401 MicroMod Main Board Single https www sparkfun com products 18575 MicroMod Environmental Function Board https www sparkfun com products 18632 LICENSE This code is released under the MIT License http opensource org licenses MIT Define the power enable pins for the processor board with either SDIO_DATA2 or A1 Depending on the processor board the Arduino pin may be dif...

Page 24: ...aking the voltage LOW delay 5000 wait for a few seconds before turning function boards back on After uploading take a look at your Function Board s PWR LED The LED will be on for about 5 seconds and then turn off for another 5 seconds It will continue to repeat until power is removed from the MicroMod Main Board Single Example 2 MicroMod Main Board Double Enable Function Boards If you have not alr...

Page 25: ...https www sparkfun com products 18576 MicroMod Environmental Function Board https www sparkfun com products 18632 LICENSE This code is released under the MIT License http opensource org licenses MIT Define the power enable pins for the processor board with SDIO_DATA2 Depending on the processor board the Arduino pin may be different Note Certain Processor Boards like the Artemis have more than one ...

Page 26: ...r Boar d D7 define PWR_EN1 8 Function Board 1 s PWR_EN1 pin MicroMod G6 SAMD51 Processor Board D8 ESP32 define PWR_EN0 32 Function Board 0 s PWR_EN0 pin MicroMod G5 ESP32 Processor Boa rd 32 define PWR_EN1 33 Function Board 1 s PWR_EN1 pin MicroMod G6 ESP32 Processor Boar d 33 void setup initialize the digital pins as an output pinMode PWR_EN0 OUTPUT pinMode PWR_EN1 OUTPUT void loop digitalWrite P...

Page 27: ...ssor if necessary define SD_CS_PIN 44 The microSD Card s CS pin is G4 for the MicroMod Main Board Dou ble and Teensy Processor 44 Adjust for your processor if necessary The example below uses the built in SD Arduino library The only difference in the code is the CS pin for the microSD card which you will need to adjust for your processor board in this case we use the Artemis Processor Board Make s...

Page 28: ...1 for the MicroMod Main Board Single and Artemis Processor D1 Adjust for your processor if necessary const int SD_CS_PIN 28 The microSD Card s CS pin is G4 for the MicroMod Main Board Doubl e and Artemis Processor D28 Adjust for your processor if necessary File myFile void setup Open serial communications and wait for port to open Serial begin 9600 while Serial wait for serial port to connect Need...

Page 29: ...ld see the following output if this is the first time writing to the card Initializing SD card initialization done Writing to test txt done test txt testing 1 2 3 If you are looking to go the extra mile to see if data was saved close the Serial Monitor and remove power from the MicroMod Main Board Eject your microSD card from the socket and insert into a microSD card adapter Then insert the microS...

Page 30: ...croMod Weather Carrier Board and Processor of your choice MicroMod Data Logging Carrier Board Hookup Guide Get started with some customizable MicroMod data logging with the Data Logging Carrier Board MicroMod Asset Tracker Carrier Board Hookup Guide Get started with the SparkFun MicroMod Asset Tracker Carrier Board following this Hookup Guide The Asset Tracker uses the u blox SARA R510M8S LTE M NB...

Page 31: ...r air quality SGP40 humidity temperature SHTC3 and CO2 concentrations STC31 in your indoor environment To make it even easier to use all communication is over the MicroMod s I2C bus In this tutorial we will go over how to connect the board and read the sensors New MicroMod WiFi Function Board DA16200 Hookup Guide Add IoT functionality to any MicroMod project with the MicroMod WiFi function Board D...

Page 32: ... Board with a Processor Board it s time to incorporate it into your own project For more information check out the resources below MicroMod Main Board Single Schematic PDF Eagle Files ZIP Board Dimensions PNG GitHub Hardware Repo MicroMod Main Board Double Schematic PDF Eagle Files ZIP Board Dimensions PNG GitHub Hardware Repo SFE Product Showcase Looking for more inspiration Check out these other...

Page 33: ...lity This special function board acts as a coprocessor that takes advantage of Espressif s ESP32 WROOM to add WiFi and Bluetooth to your applications New MicroMod Environmental Function Board Hookup Guide The SparkFun MicroMod Environmental Function Board adds additional sensing options to the MicroMod Processor Boards This function board includes three sensors to monitor air quality SGP40 humidit...

Reviews: