Sony xperia sgp521, User Manual
The Sony Xperia SGP521 is a cutting-edge device that merges sleek design with powerful performance. Ensure optimal usage of this advanced tablet by downloading its user manual for free at manualshive.com. Get acquainted with its features, settings, and tips, making the most of your Sony Xperia SGP521 experience.
Share
Download


Reviews:
No comments
Related manuals for xperia sgp521

SGH-A187
Brand: Samsung Pages: 123

SCH-R350 Series
Brand: Samsung Pages: 140

SGH SGH-T429
Brand: Samsung Pages: 138

SCH-R200
Brand: Samsung Pages: 150

SGH-N100
Brand: Samsung Pages: 72

SCH-S738C
Brand: Samsung Pages: 326

SGH C417 - Cell Phone - AT&T
Brand: Samsung Pages: 114

SGH-A157
Brand: Samsung Pages: 136

SCH-R730 series
Brand: Samsung Pages: 134

SCH-R500
Brand: Samsung Pages: 190

SCH-1900
Brand: Samsung Pages: 34

SGH-C120
Brand: Samsung Pages: 2

SCH-I200
Brand: Samsung Pages: 186

SGH E250 - Cell Phone 13 MB
Brand: Samsung Pages: 12

SGH-A727
Brand: Samsung Pages: 185

SCH-N392
Brand: Samsung Pages: 2

MVX700
Brand: Audiovox Pages: 18
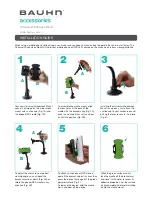
AA-05
Brand: Bauhn Pages: 2


