background image

Sony KV-HP212M63 Group B31 (

GB,

 CT) _2-688-533-11 (1)

Trinitron Color TV

© 2006   Sony Corporation

KV-HP212

2-688-533-

11

 (1)

M63

Operating Instructions

• Before operating the unit, please read this manual thoroughly and retain

it for future reference.

使用說明書

使用本電視機之前請先詳細閱讀此手冊﹐並妥善保存以備日後用作參考。

GB

CT

02CT01COV-SOEMMIX.p65

4/13/06, 9:01 AM

1

¶´ƒ

Summary of Contents for Wega KV-HP212

Page 1: ...olor TV 2006 Sony Corporation KV HP212 2 688 533 11 1 M63 Operating Instructions Before operating the unit please read this manual thoroughly and retain it for future reference 使用說明書 使用本電視機之前請先詳細閱讀此手冊 並妥善保存以備日後用作參考 GB CT 02CT01COV SOEMMIX p65 4 13 06 9 01 AM 1 ƒ ...

Page 2: ...th the TV Do not allow children to climb onto it For your own safety do not touch any part of the TV the power cord and the antenna cable during lightning storms Do not place any objects on the TV The apparatus shall not be exposed to dripping or splashing and that no objects filled with liquids such as vases shall be placed on the apparatus Do not operate the TV if any liquid or solid object fall...

Page 3: ...ponents 9 Using the remote control and basic functions 11 Introducing the WEGA GATE navigator 13 Settings Adjustment 14 Changing the Picture setting 15 Changing the Sound setting 16 Changing the Channel Setup setting 17 Changing the Setup setting 19 Enjoying stereo or bilingual programs 20 Listening to the FM Radio 21 Troubleshooting 22 Specifications Back cover Table of Contents 01GB02WAR SOEMMIX...

Page 4: ...ert the batteries supplied into the remote Note Do not use old or different types of batteries together Connect the antenna cable not supplied to 8 antenna input at the rear of the TV Tips Your TV can receive both TV and FM radio signal from the appropriate connections through the 8 antenna input terminal see page 9 You can also connect your TV to other optional components see page 9 Plug in the p...

Page 5: ...ess The selected menu language appears 2 Press V or v to select Yes then press to preset the channels automatically The screen will indicate automatic presetting is in progress After all available channels have been tuned and stored the Program Sorting Edit menu appears automatically on the screen To skip automatic channel presetting select No then press If the message No channel found Please conn...

Page 6: ... WEGA GATE to go to the next menu 4 To prevent this Initial Setup menu from appearing again when you turn on the TV by pressing press V or v to select No then press To allow this menu to appear again select Yes then press Tip You can immediately go to the end of the Initial Setup menu by pressing WEGA GATE Select Confirm Initial Setup Display this menu next time Yes No Exit Select Confirm Program ...

Page 7: ...r 12 3 1 Standby indicator 4 4 i Headphone jack 5 t2 Video input terminal 2 9 6 PROG Select program number 7 2 Adjust volume 8 t Select TV or video input 9 WEGA GATE menu operations 6 7 V v B b Select and adjust items 13 8 Confirm selected items 13 9 WEGA GATE Display or cancel WEGA GATE menu 13 0 FM Listen to FM Radio 21 qa 8 Antenna input terminal 9 qs T Monitor output terminal 10 qd Component v...

Page 8: ...o the 3 blue terminal for 3D WOOFER white wire should be connected to the 3 white terminal for left TWEETER and the black wires to the respective black terminals Notes Connect only the supplied 3D WOOFER and TWEETER otherwise your TV may malfunction Unplug your TV from the wall outlet when connecting the 3D WOOFER and TWEETER To prevent a malfunction caused by a short circuit of the terminals make...

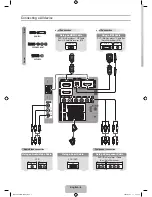
Page 9: ...supplied Note If you connect a VCR to 8 antenna input preset the signal output from the VCR to the program number 0 on the TV see page 18 Audio Video cable not supplied Camcorder TV CATV Satellite or When there is no FM signal Antenna selector FM signal TV signal Antenna cable not supplied R L L R MONO 2 R L 1 Y CB CR L R MONO L R MONO 10 10 continue DVD Player 01GB03INS SOEMMIX p65 4 13 06 9 18 A...

Page 10: ...ayer are sometimes labeled Y CB CR Y PB PR Y Cb Cr or Y B Y R Y If you select DVD on your TV screen the signal from the T monitor output jacks will not be output properly This does not indicate a malfunction Connecting optional components continued Connecting to the monitor output terminal T DVD player TV rear panel Component video cable not supplied Audio cable not supplied Y R L CR CB 1 Y CB CR ...

Page 11: ...und mode options 16 Movie Sports Off 0 Display on screen information qa Mute the sound qd t Select TV or video input 9 qf 0 9 Input numbers For program numbers 10 and above enter the second digit within two seconds ql Select sound mode options 16 with a 5 Band Graphic Equalizer display Dynamic Standard Custom When the Custom mode is selected you can receive the last adjusted sound settings from th...

Page 12: ... pressed for more than one hour after the TV is turned on using the wake up timer the TV automatically goes into standby mode qh Set TV to turn off automatically according to the desired period of time max of one hour and 30 min Teletext operations green label Not function for your TV 2 red green yellow blue PIP operations V v B b Not function for your TV Stereo bilingual operations qs A B Select ...

Page 13: ...nputs TV FM Radio 01 02 03 04 05 TV Confirm Select End Tip The WEGA GATE and V v B b buttons on the top control panel can also be used for the operations above watch the preset TV channels see page 5 select the inputs for the connected equipment see page 9 change the settings of your TV see page 14 TV External Inputs Settings Confirm Select WEGA GATE Settings External Inputs FM Radio TV 01 02 03 0...

Page 14: ...nt Sound Mode Dynamic Select Balance Intelligent Volume Surround Off Off Sound see page 16 Sound Mode Dynamic Standard Custom Sound Adjustment Adjust Reset Balance Intelligent Volume On Off Surround Movie Sports Off Confirm End Channel Setup Select Manual Program Auto Program Program Sorting Edit FM Radio Setup Channel Setup see page 17 Auto Program Manual Program Program 00 99 TV System B G I D K...

Page 15: ...will be displayed followed by picture improvement when you change the program number or the input mode red amber green weak average good Press V or v to select On then press To cancel select Off then press Intelligent Picture is still functioning You can adjust the setting to your personal preference in the Picture Adjustment and Color Temperature options only when the Custom mode is selected Adju...

Page 16: ...t for stereo sound Sports simulated stadium effect for monaural sound or Off You can adjust the setting to your personal preference in the Sound Adjustment option only when the Custom mode is selected Adjusting the Sound Adjustment items under Custom mode The 5 Band Graphic Equalizer feature allows you to adjust sound frequency settings of Custom mode in the menu 1 Make sure that Adjust is selecte...

Page 17: ... then store the radio frequency of the desired FM radio stations 1 Press V or v to select the desired FM radio station position then press 2 Press V or v to search the FM radio stations Searching stops automatically when a station is tuned in If the station has a weak signal press B or b to fine tune the radio frequency manually then press to store the FM radio station 3 You may edit the FM radio ...

Page 18: ... select TV System then press 2 Press V or v until the sound becomes normal then press 4 If you are not satisfied with the picture and sound quality you may be able to improve them by using the Fine tuning feature 1 Press V or v to select Fine then press 2 Press V or v to select Manual then press 3 Press V v B or b until the picture and sound quality are optimal then press The or icon on the menu f...

Page 19: ...t alphanumeric characters for the label then press Color System select the color system Press V or v to select either Auto PAL SECAM NTSC3 58 or NTSC4 43 then press Normally set this to Auto Wake Up Timer allow your TV to emit beeping sound when TV switches on Beep automatically using wake up timer Press V or v to select On then press To cancel select Off then press Factory Settings reset your TV ...

Page 20: ... or bilingual programs of NICAM and A2 stereo systems by using the A B button Note If the stereo sound is noisy when receiving a stereo program select Mono The sound becomes monaural but the noise is reduced NICAM Stereo sound Mono Regular sound t t NICAM Main Main sound NICAM Sub Sub sound Mono Regular sound t t t Mono Regular sound Stereo Stereo sound t t Main Main sound Sub Sub sound t t NICAM ...

Page 21: ... FM Radio mode The available radio frequency is only for temporary listening pleasure and cannot be stored in the memory If the message Please setup FM Radio appears display the Channel Setup menu and select FM Radio Setup to preset the desired FM radio stations see page 17 Note When a FM stereo program has static noise press A B until Mono appears There will be no stereo effect but the noise will...

Page 22: ...er to Auto from Manual Program see page 18 Try using an external booster Turn off or disconnect the external booster if it is in use Display the Channel Setup menu and set the Signal Booster to Off from Manual Program see page 18 Display the Channel Setup menu and select the appropriate TV System from Manual Program see page 18 Check the power cord antenna and VCR connections see page 9 Press 1 po...

Page 23: ...n power on the TV to turn off the TV for about 15 minutes then turn it on again to demagnetize the TV Check the antenna cable and connection on the TV VCR and at the wall see page 9 Check the antenna setup Contact a Sony dealer for advice Connect a separate FM antenna and the TV channel source through an antenna selector switch to your TV see page 9 Count the number of times the 1 standby indicato...

Page 24: ...式壁櫥等封閉之處 請勿打開本電視機的機殼和後蓋 因為電視機內存在高電壓和危險性 部件 須由合格的專業人員對電視 機進行檢修或棄置 為了兒童安全起見 請勿讓他們 獨自逗留在電視機旁 千萬別讓 兒童攀爬本電視機 若有任何液體流入或固體落入本 電視機內時 請勿操作本電視 機 應立即請合格的專業人員檢 查 本電視機只適於家庭使用 請勿 將本電視機放置於任何交通工具 內或多塵 高溫 潮濕或震動頻 繁之處 請用乾的軟布清潔本電視機 請 勿使用汽油 稀釋劑或任何其它 化學品清潔本電視機 請勿在電 視機殼噴塗表面貼附任何物體 例如 貼紙 透明玻璃膠紙 膠合劑等 請勿刮劃顯像管 為防止火災或觸電 請勿使本電 視機被雨淋或受潮 放置電視機於穩定的 並足以支 撐電視機重量的電視支架及地面 上 確保電視支架的表面平整且 表面積寬於電視機底面 請勿在同一電源插座上插入太多 的電器 請勿損壞電源線 捏住插頭將電源線拔...

Page 25: ...機 4 準備工作 4 設定您的電視機 初始化设定 5 電視機頂部控制 前面和背後的控制板 7 連接 3D WOOFER 和 TWEETER 8 連接選購的裝置 9 使用遙控器和基本功能 11 介紹 WEGA GATE 指示系統 13 设定 調整 14 調整 图像设定 15 調整 声音设定 16 調整 频道设定 17 調整 设定 菜單 19 欣賞立體聲或雙語言節目 20 收聽調頻收音 21 故障檢修 22 規格 封底 目錄 CT 02CT02WAR SOEMMIX p65 4 13 06 9 02 AM 3 ƒ ...

Page 26: ...條分別固定至電視機背後提供的螺 絲孔及電視支架上 x 準備工作 b End Select Confirm Initial Setup Language English 1步驟 1 將所提供的電池裝入遙控器 註 請勿使用舊電池或同時使用不同類型的電池 1 步驟 2 將天線電纜 未提供 連接至電視機背後的 8 天線輸入 端子 提示 通過 8 天線輸入 端子正確的連接 您的電視機可接收電視及調頻 收音的信號 參考第 9 頁 您也可將本電視機連接至其它選購的裝置 參考第 9 頁 1 步驟 3 插入電源線 然後按壓電視機上的 鍵以接通電視機的電源 註 打開電視機時 1 待機 指示燈將閃爍為綠燈數秒鐘 這並不表示發 生故障 1 步驟 4 按照 Initial Setup 初始化设定 菜單的指示以設定您的 電視機 參考第 5 頁 02CT02WAR SOEMMIX p65 4 13 06 9 03 AM...

Page 27: ...屏幕上 2 按壓 V 或 v 鍵以選擇 是 然後 按壓 鍵以自動預設頻道 屏幕將顯示自動預設頻道正在進行中 當所有可接收的頻道已被調諧和儲存後 频道排序 编辑 菜單將會自動顯示在 屏幕上 若要略掉自動預設頻道 選擇 否 然後按壓 鍵 如果出現 无信号 请连接有线信号线或天线 的訊息 請檢查您的電視連接 然後按壓 鍵 3 频道排序 编辑 菜單可以讓您排序或 編輯頻道 a 若您要保留當前頻道的狀態 按壓 WEGA GATE 鍵以退出 b 按壓 V 或 v 鍵以選擇您要改變的頻道號碼 被選定的頻道將會顯示在屏幕上 c 若您要改變頻道的順序 1 按壓 b 鍵以進入排序模式 2 按壓 V 或 v 鍵以選擇新的頻道位置 然後按壓 B 鍵 01 01 02 03 04 PROG 01 02 03 04 01 PROG 續 02CT02WAR SOEMMIX p65 4 13 06 9 03 AM 5 ƒ...

Page 28: ...然後按壓 鍵 2 若要跳越頻道號碼 按壓 V 或 v 鍵 以選擇 开 然後按壓 鍵 當您在使用 PROG 鍵時 您可跳越 此頻道號碼 3 若要鎖定不要的頻道號碼 按壓 V 或 v 鍵 以選擇 然後按壓 鍵 e 若您要改變其他頻道 請重復 b 至 d 的步驟 按壓 WEGA GATE 鍵以進入下個菜單 4 若要防止 初始化设定 菜單在按壓 鍵打開電 視機時再次顯示在屏幕上 則按壓 V 或 v 鍵以選擇 否 然後按壓 鍵 若要這菜單再次顯示在屏幕上 選擇 是 然後按壓 鍵 提示 您可按壓 WEGA GATE 鍵以進入 初始化设定 菜單最後的設定項目 設定您的電視機 初始化设定 續 PROG PROG PROG 02CT02WAR SOEMMIX p65 4 13 06 9 03 AM 6 ƒ ...

Page 29: ...傳感器 3 喚醒指示燈 12 3 1 待機指示燈 4 4 i 耳機插口 5 t2 視頻輸入端子 2 9 6 PROG 選擇頻道號碼 7 2 調整音量 8 t 選擇電視或視頻輸入 9 WEGA GATE 菜單操作 6 7 V v B b 選擇和調整項目 13 8 確認被選項目 13 9 WEGA GATE 顯示或取消 WEGA GATE 菜單 13 0 FM 收聽調頻收音 21 qa 8 天線輸入端子 9 qs T 監視器輸出端子 10 qd DVD 分量信號輸入端子 10 qf t1 視頻輸入端子 1 9 qg WOOFER 3D WOOFER 端子 8 qh TWEETER TWEETER 端子 8 電視機前面的控制板 電視機背後 的控制板 x 電視機頂部控制 前面和背後的控制板 電視機頂部的控制板 02CT03INS SOEMMIX p65 4 13 06 9 04 AM 7 ƒ ...

Page 30: ...R 的 3 紅色端子 藍色電線連接至 3D WOOFER 的 3 藍色端子 白色電線連接至左 TWEETER 的 3 白色端子而黑色電線則連接至相關的 黑色端 子 註 只可連接提供的 3D WOOFER 和 TWEETER 否則您的電視機可能出現故障 連接 3D WOOFER 和 TWEETER 時 請從牆上插座拔下電視機插頭 為防止因端子電流短路所導致的故障 請確保 3D WOOFER 和 TWEETER 的金屬線沒有暴 露於外 而與旁邊的 3D WOOFER 和 TWEETER 端子相接觸 3D WOOFER 3D WOOFER 和 TWEETER 的前視圖 步驟 1 步驟 2 TWEETER 紅色 電線 藍色 電線 白色 電線 黑色電線 02CT03INS SOEMMIX p65 4 13 06 9 04 AM 8 ƒ ...

Page 31: ...ONO 2 R L 1 Y CB CR L R MONO L R MONO 10 10 電視機前面的控制板 電視機背後的控制板 天線電纜 未提供 音頻 視頻 電纜 未提供 錄像機 攝像機 註 若將錄像機連接至 8 天線輸入 端子 請將錄像機輸出的信號預設至電視機上的頻道號碼 0 參考第 18 頁 音頻 視頻電纜 未提供 連接至視頻輸入端子 t 天線電纜 未提供 電視 共用天線電視 衛星或 當無調頻信號時 天線 選擇器 調頻信號 電視信號 DVD 播放機 續 02CT03INS SOEMMIX p65 4 13 06 9 04 AM 9 ƒ ...

Page 32: ...時 若您的 DVD 播放機可輸出 隔行和逐行的掃描模式信號 則請選擇隔行掃描輸出 您的電視機可接收 525i 60 赫茲或 625i 50 赫茲的隔行掃描信號 某些 DVD 播放機的插口可能標記為 Y CB CR Y PB PR Y Cb Cr 或 Y B Y R Y 若您在電視屏幕上選擇 DVD T 監視器輸出 將不能輸出正常的信號 這並不表示發生 故障 Y R L CR CB 1 Y CB CR L R MONO L R MONO 10 10 連接至監視器輸出端子 T 1 Y CB CR L R MONO L R MONO 10 10 R L 電視機背後的控制板 音頻 視頻 電纜 未提供 音頻系統 錄像機 02CT03INS SOEMMIX p65 4 13 06 9 04 AM 10 ƒ ...

Page 33: ...號碼 若要快速選擇 按住此鍵直到所要的頻道號碼 出現 5 2 調整音量 8 改變圖像尺寸 开 16 9 寬熒幕模式 关 9 選擇環繞聲模式 16 影院 竞技场 关 0 顯示屏幕上的信息 qa 消除聲音 qd t 選擇電視或視頻輸入 9 qf 0 9 輸入數字鍵 對於頻道號碼 10 和以上 請在兩秒內輸入第二位 數字 ql 以 5 Band Graphic Equalizer 16 顯示選擇聲音模式選項 动态 标准 用户 设定 當選擇 用户设定 模式時 您可接收到最終在菜單里的 声音用户设定 選項中所 調整的音響設定 w 選擇圖像模式選項 15 动态 标准 用户 设定 當選擇 用户设定 模式時 您可接收到最終在菜單里的 图像用户设定 選項中所 調整的圖像設定 100 300 1k 3k 8k 100 300 1k 3k 8k 100 300 1k 3k 8k 續 02CT04AVD SOEM...

Page 34: ...段 定時器操作 qg 依照您所要的時間設定電視以自動打開 最多12 小時 一旦你已設定喚醒定時 電視機上的 指示燈將亮 起黃褐色 用喚醒定時接通電視機電源並超過一小時後 若您不 按壓電視機或遙控器上的任何一個按鍵或控制鍵 則 電視機再進入待機狀態 qh 依照您所要的時間設定電視以自動關閉 最多 1 小時 睡眠定時器 30 分鐘 圖文電視操作 綠色標記 本電視機無此操作 紅色 綠色 黃色 藍色 畫中畫操作 V v B b 本電視機無此操作 立體聲或雙語言操作 qs A B 選擇立體聲或雙語言模式 20 喚醒定時器 註冊于 BBE 音響公司並應用了美國專利號碼 4638258 4482866 BBE 與 BBE 符號是 BBE 音響公司的註冊商標 02CT04AVD SOEMMIX p65 4 13 06 9 06 AM 12 ƒ ...

Page 35: ...消 WEGA GATE 菜單 2 按壓 鍵 或 b 鍵 以確定 您所選的項目或進入下一個階段 的菜單 3 按壓 V 或 v 鍵以選擇所要的項目 4 按壓 RETURN 鍵以回到之前的 階段 提示 頂部控制板上的 WEGA GATE 鍵 鍵和 V v B b 鍵也可用於上述操作 觀看預設電視頻道 參考第 5 頁 選擇連接裝置的輸入 參考第 9 頁 改變電視機的設定 參考第 14 頁 电视 外接输入 调频收音 WEGA GATE 01 02 03 04 05 选择 电视 确认 结束 01 02 03 04 05 WEGA GATE WEGA GATE 01 02 03 04 05 1 2 DVD 1 9 设定 收聽調頻收音 參考第 21 頁 02CT04AVD SOEMMIX p65 4 13 06 9 06 AM 13 ƒ ...

Page 36: ...调 锐度 重新设定 彩色色调设定 冷色调 自然色调 暖色调 智能图像降噪 开 关 信号强度指示器 开 关 声音设定 參考第 16 頁 声音模式 动态 标准 用户设定 声音用户设定 设定 重新设定 平衡 智能音量控制 开 关 环绕声 影院 竞技场 关 频道设定 參考第 17 頁 自动调台 手动调台 频道 00 99 电视系统 B G I D K M VHF 低 VHF 高 UHF 微调 自动 手动 信号增强 自动 关 频道排序 编辑 调频收音设定 设定 參考第 19 頁 语言 Language English 英文 中文 视频输入标注 视频输入 标注 彩色制式 自动 PAL SECAM NTSC3 58 NTSC4 43 唤醒鸣叫声设定 开 关 出厂设定 是 否 註 當菜單顯示的功能呈暗淡色 您將無法選擇此功能 Language 02CT04AVD SOEMMIX p65 4 13 06 9...

Page 37: ...以選擇 开 然後按壓 鍵 要取消時 選擇 关 然後按壓 鍵 信号强度指示器 當 智能图像降噪 操作時顯示信號強度 當您更換頻道號碼或輸入模式時 智能图像降噪信号强度 指示器 將會顯示 接著圖像被改善 紅色 黃褐色 綠色 弱 普通 良好 按壓 V 或 v 鍵以選擇 开 然後按壓 鍵 要取消時 選擇 关 然後按壓 鍵 智能图像降噪 還在操 作中 僅當 用户设定 模式被選取時方可隨個人喜好調整 图像用户设定 和 彩色色调 设定 選項中的設定 調整 用户设定 模式下的 图像用户设定 項目 1 按壓 V 或 v 鍵以選擇 对比度 亮度 颜色 色调 顏色深 淺 或 锐度 然後按壓 鍵 選擇 重新设定 將會使電視機恢復到工廠設定 2 按壓 V v B 或 b 鍵以調整您所選項目的設定 然後按壓 鍵 3 重復上述步驟以調整其它項目 當選擇 用户设定 項目時 您可接收已被調整的設定 註 只有當彩色制式為 N...

Page 38: ...量控制 自動調整所有頻道號碼和視頻輸入的音量 按壓 V 或 v 鍵以選擇 开 然後按壓 鍵 要取消時 選擇 关 然後按壓 鍵 环绕声 選擇 影院 適用於立體聲的電影院環繞聲效果 竞技场 適用於單聲道聲音的模擬運動場效果 或 关 僅當 用户设定 模式被選取時方可隨個人喜好調整 声音用户设定 選項中的設定 調整 用户设定 模式下的 声音用户设定 項目 5 Band Graphic Equalizer 5 波段互動音響均衡器 可使您在菜單上的 用户设 定 模式調整聲音頻率設定 1 確認 设定 已被選定 然後按壓 鍵 選擇 重新设定 將會使電視機恢復到工廠設定 2 按壓 B 或 b 鍵以選擇所要的聲音頻率 然後按壓 V 或 v 鍵以調整設定再按壓 鍵 當選擇 用户设定 模式時 您可接收已被調整的設定 註 調整高頻率將影響高音調聲音 調整低頻率將影響低音調聲音 您可直接按壓遙控器上的 鍵 參考第 1...

Page 39: ...8 頁的手 動預設頻道 改變顯示在屏幕上的頻道順序 標註頻道號碼 跳越頻道號碼 和鎖定不要的頻道 參考第 5 頁 初始化设定 的步驟 3 最多可以預設 9 組的調頻廣播電台 您可手動預設所處地區內可以接收的每個調頻廣播電台 然後 儲存所要調頻電台的廣播頻率 1 按壓 V 或 v 鍵以選擇所要調頻廣播電台的位置 然後按 壓 鍵 2 按壓 V 或 v 鍵以搜尋調頻廣播電台 當調諧到電台時 搜尋自動停止 當該電台的信號微弱時 請按壓 B 或 b 鍵以手動微調廣 播頻率 然後按壓 鍵以儲存該頻道廣播電台 3 您可編輯調頻廣播電台標註 按壓 V 或 v 鍵以選擇英 文 數字 字符進行標註 然後按壓 鍵 4 重復步驟 1 至 3 以預設其它調頻廣播電台 僅有調頻收音模式可讓您使用 调频收音设定 功能 若要 啟動此功能 使用 WEGA GATE 系統以進入調頻收音模式 參考第 13 頁 或按壓頂部控制板...

Page 40: ...後按壓 鍵 3 若所要頻道的聲音失真 則請選擇適當的電視系統 1 按壓 V 或 v 鍵以選擇 电视系统 然後按壓 鍵 2 按壓 V 或 v 鍵直到聲音正常為止 然後按壓 鍵 4 若您不滿意圖像和聲音質量 您可用 微调 來改善它 1 按壓 V 或 v 鍵以選擇 微调 然後按壓 鍵 2 按壓 V 或 v 鍵以選擇 手动 然後按壓 鍵 3 按壓 V v B 或 b 鍵直到圖像和聲音最佳 然後按壓 鍵 菜單上的 或 符號將會在調諧時閃爍 5 若電視信號太強 圖像失真 圖像有線條 信號干擾 或微弱 圖像有雪花狀斑 點 您可設定 信号增强 以改善圖像質量 1 按壓 V 或 v 鍵以選擇 信号增强 然後按壓 鍵 2 按壓 V 或 v 鍵以選擇 关 適用於圖像失真 圖像有線條 信號干擾 或 自动 適用於圖像有雪花狀斑點 然後按壓 鍵 調整 频道设定 續 VHF 01 02CT05ADJ SOEMMIX p...

Page 41: ...鍵以選擇您要標註的輸入 然後按壓 鍵 2 選擇 标注 並按壓 鍵 然後按壓 V 或 v 鍵以選擇標註 選項 视频信号 1 视频信号 2 DVD 录像 机 卫星节目 游戏机 或 编辑 您可用喜愛的名稱編輯視頻輸入標註 按壓 V 或 v 鍵以選擇英 文 數字 字符進行標註 然後按壓 鍵 改變彩色制式 按壓 V 或 v 鍵以選擇 自动 PAL SECAM NTSC 3 58 或 NTSC 4 43 然後按壓 鍵 通常將此設定為 自动 使您的電視機在使用喚醒定時自動打開時發出鳴叫聲 按壓 V 或 v 鍵以選擇 开 然後按壓 鍵 要取消時 選擇 关 然後按壓 鍵 使電視機恢復到工廠設定 按壓 鍵後再按壓 V 或 v 鍵以選擇 是 然後按壓 鍵 要取消時 選擇 否 然後按壓 鍵 註 您無法在調頻收音模式裡選擇彩色制式 想要確保能聽得到鳴叫聲 您必須先設定一個適當的音量並確定電視機不是處於靜音狀態 若要...

Page 42: ... 當接收麗音節目時 播送 屏幕顯示 所選擇的聲音 麗音立體聲 麗音雙語言 麗音單聲道 當接收 A2 節目時 播送 屏幕顯示 所選擇的聲音 A2 立體聲 A2 雙語言 A B TV 1 2 3 4 6 7 8 9 0 5 PROG A B RETURN WEGA GATE x 欣賞立體聲或雙語言節目 您可使用 A B 鍵以欣賞麗音 NICAM 和 A2 立體聲制式的立體聲或雙語言節 目 註 當接收立體聲節目時 若有噪音則請選擇 单声道 聲音變成單聲道 但噪音降低 02CT05ADJ SOEMMIX p65 4 13 06 9 14 AM 20 ƒ ...

Page 43: ... 頁 3 按壓 WEGA GATE 鍵以退出 频道设定 菜單 被選取的預設調頻廣播電台和標註將出現於屏幕 上 欲選擇所要的預設調頻廣播電台 按壓 PROG 鍵 提示 您也可直接用遙控器上的 1 9 鍵以選擇所要的預設調 頻廣播電台 WEGA GATE A B PROG TV 1 2 3 4 6 7 8 9 0 5 PROG RETURN WEGA GATE V v B b 收聽非預設電台 1 進入調頻收音模式 2 按壓 V 或 v 鍵以搜尋所要的調頻廣播電台 已預設的調頻廣播電台和標註將不會 出現於屏幕上 3 若該電台的信號微弱 按壓 B 或 b 鍵以手動微調廣播頻率 註 在調頻收音模式裡 您只可以使用遙控器上的按鍵以操作 V v B 和 b 功能 接收到的廣播頻率只供暫時的聽覺享受 且不能儲存在記憶體中 如果出現 请设定调频电台 的訊息 請顯示 频道设定 菜單並選擇 调频收音设定 以預設...

Page 44: ...示 频道设定 菜單並選擇 手动调台 以再次預設頻道 參考第 18 頁 顯示 频道设定 菜單並選擇 手动调台 裡的 信号增强 為 自动 參考第 18 頁 嘗試使用外部信號增強器 切斷外部信號增強器的電源或拔掉其插頭以終止其操作 顯示 频道设定 菜單並選擇 手动调台 裡的 信号增强 為 关 參考第 18 頁 顯示 频道设定 菜單並在 手动调台 裡選擇適當的 电视系统 參考第 18 頁 檢查電源線 天線和錄像機之連接是否正確 參考第 9 頁 按壓 1 電源 鍵以接通電視機的電源 參考第 11 頁 按壓電視機上的 主電源 鍵以切斷電視機的電源 五秒左右後再次接通 電源 參考第 7 頁 按壓 2 鍵以提高音量水平 參考第 11 頁 按壓 鍵以取消靜音 參考第 11 頁 不要在電視機旁使用吹風機或其它設備 檢查天線的裝置 請尋求 Sony 經銷商的協助 使用高定向天線 使用 微调 功能 參考第 18 ...

Page 45: ...視機時 聽到 的聲音 將外部揚聲器或其它電器放置在離電視機較遠的地方 將外部揚聲器或其它電器放置在離電視機較遠的地方 請別在電視機打開時進 行搬移 按壓電視機上的 主電源 鍵以切斷電視機的電源 約 15 分鐘 後再將其打開以使電視機消磁 檢查天線電纜以及電視機 錄像機和牆上的天線連接是否正確 參考第 9 頁 檢查天線的裝置 請尋求 Sony 經銷商的協助 通過一個天線選擇器 開關 連接另外一個調頻天線和電視頻道源至您的電 視機 參考第 9 頁 計算 1 待機 指示燈的亮光次數 按壓 主電源 鍵以切斷電視機的電 源 通知您鄰近的 Sony 維修服務中心 信号增强 正在操作以探測微弱的信號 這並不表示發生故障 室溫的變化有時會導致電視機的外殼膨脹或縮小 因此產生噪聲 這並不表示 發生故障 電視機自動消磁 這並不表示發生故障 02CT05ADJ SOEMMIX p65 4 13 06 9 15 ...

Page 46: ...75 ohms Input 3 Output 1 Phono jacks 500 mVrms Input 1 Phono jacks Y 1 Vp p 75 ohms sync negative CB 0 7 Vp p 75 ohms CR 0 7 Vp p 75 ohms Output 1 Stereo minijack 87 5 108 0 MHz 10 7 MHz 21 in 54 Measured diagonally 51 Measured diagonally 630 560 494 29 x Specifications Note KV HP212M63 Design and specifications are subject to change without notice Power requirements Power consumption W Television...

Reviews: