Sony MXD-D3, Operating Instructions Manual
The Sony MXD-D3 is a versatile audio player and recorder. To optimize your experience, make sure to consult the comprehensive Operating Instructions Manual. You can easily download the free manual from manualshive.com to learn how to maximize the capabilities of this high-quality Sony product.
Share
Download


Reviews:
No comments
Related manuals for MXD-D3

SV-SD05
Brand: Panasonic Pages: 8

YP-60V - YEPP Sports 256 MB Digital Player
Brand: Samsung Pages: 36

CD-200
Brand: Tascam Pages: 39

CD-200
Brand: Tascam Pages: 28

DVD-8
Brand: Farenheit Pages: 30

PDP2356 - ANNEXE 1
Brand: THOMSON Pages: 24

HV-DH1
Brand: Aiwa Pages: 6

DVX 380
Brand: Hyundai Pages: 26

PLAYNETWORK CURIOPlayer Z8
Brand: Octave Pages: 7

AQ-CD-4B
Brand: Aquatic Pages: 32

IRIS COMPACT DISC PLAYER
Brand: Hafler Pages: 18

AV402E
Brand: Pocketdish Pages: 2

AFD102
Brand: DNA Pages: 10

Archos Ondio 128 FM
Brand: Rockbox Pages: 148
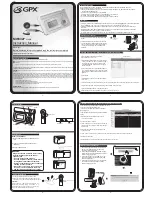
MW3327
Brand: GPX Pages: 4

CD-150
Brand: Oakcastle Pages: 16

XV-NP10S
Brand: JVC Pages: 53

DVP435E
Brand: Hitachi Pages: 31


